
Are Windows 11’s Start Menu options leaving you cold? Having a custom command center that looks like you and increases your productivity. Good news is, it is not as difficult as you would think to make your own Start Menu personal!
Windows 11 has plenty of settings to customize the Start Menu experience. Whether you’re tweaking a layout, adding your favourite apps and content, or adjusting colours, the changes you make can be endless. But with so many settings and features, it can be difficult to know what to pay attention to. No worries – we can help!
In the guide that follows, we’ll show you simple six highly effective ways to turn your Start Menu into a powerhouse of efficiency and style. You will find out how to set the settings, arrange the layout, personalize recommendations, handle items, modify the colours and extend its capabilities. Ready to start taking the reins of your Windows 11 experience? Let’s get started and make your Start Menu work for you!
Accessing and Customize the Start Menu Settings

Opening Windows Settings
To customize the Start menu tiles of Windows 11, first open the Windows Settings. There are a few methods you can use, but the fastest is the keyboard shortcut Windows Key + I. Or, you can simply right-click the Start button and click Settings there. Alternatively, if you’d rather access the start menu itself, click the start button, and look for a gear symbol that resembles a settings menu.
Navigating to Personalization
After you’ve launched Windows Settings, you’ll see a panel with categories listed at its left side. Find and click on “Personalization” in this list. This section includes all sorts of personalization options for the look and feel of your Windows 11 interface (including the Start menu).
Where to find the Start menu options
Within the Personalization category, you’ll find a sidebar with different subcategories. Keep going down this list until you find “Start” and click on it. That will display all the options you have for changing up your Start menu. Here, you will see the toggles and dropdown menus that offer you the ability to tweak different aspects of the Start menu, including the ability to show recently added apps, most used apps and recently opened items.
Customize the Start Menu Layout
Choosing between full screen and compact views
Windows 11 offers two mains Start menu layouts: full screen and compact. The compact view is the default, using a floating pinned-apps-and-recommendations menu. If you’d like to switch to full screen mode, navigate to Settings > Personalization > Start and toggle on “Use full screen Start menu.” This expanded view utilizes your entire display.
Adjusting the number of pinned items
Personalize the number of pinned items in your Start Menu to fairly suit your needs. There’s a ”Show more pins option” in start menu settings, that can be toggled to see more or fewer in the apps list. This change will also adjust the balance of pinned items and recommended content and how it all hangs together when you are trying to prioritize your most-used apps.
Organizing apps into folders
With Windows 11, you also get the ability to add pinned apps in folders, like a phone interface. You can do this by dragging one app icon onto another in the Start menu. You can then give the folder a name and insert more apps into it—and keep your Start menu clean and logically arranged.
Resizing the Start menu
Windows 11 doesn’t have explicit Start menu resizing options, but you can have more say about its size than you might think. Adjusting the number of pinned items and toggling between full screen and compact views effectively changes the menu’s dimensions. Your display resolution and scale settings will also influence the size and aesthetics of the Start menu.
Personalizing the Recommended section
Showing or hiding recently opened items
Windows 11 conveniently houses a section called Recommended where you can find these recently accessed items. If you want to further customize the start menu feature, head to Settings > Personalization > Start. Here you’ll see the options to show or not recent opened items. Adjust their visibility by toggling the switch next to “Show recently opened items in Start, Jump Lists, and File Explorer.” And this is one of those settings that not only changes the Start menu but also affects the way other parts of your system look.
Managing most used apps display
The Suggested section recommends your most used applications as well. To control this feature, visit the same Start menu settings page. Find the “Show most used apps” setting and switch it to On or Off. When on, Windows 11 will populate that area with apps you use frequently, so they’re always close at hand.
Manage recently added apps visibility
Windows 11 automatically features freshly installed apps in the Recommended category. If you like a cleaner look, or if you’d like more control over what shows, you can tinker with this setting. In the Start menu settings, locate the “Show recently added apps” setting and flip it to your preference. When you disable this feature, new apps that get installed won’t automatically show in the Recommended section, so you have more control over how your Start menu looks.
Adjust these settings to more personalise a Recommended section filled with the work and tools you use most to make Windows 11 even better for you. Next, I’ll show you how to add and remove items to the Start menu for a fully customized look.
Adding and Removing Start Menu Items
Pinning your favourite apps and programs
It’s handy to be able to pin your most-used apps to the Start menu. Just right-click any app in the “All apps” list, and then choose Pin to Start. You’ll see the app appear in the pinned section of your Start menu immediately. You can even grab apps from your “All apps” list and drop them directly into the pinned section for easy customization.
Unpinning unnecessary items
As much as adding, decluttering is important on your Start menu. To get rid of one of these apps or programs, right-click its pinned Start menu item and select “Unpin from Start.” No, this won’t uninstall the app, just unpin it from the Start menu — and help keep your interface clean and organized.
Creating custom app groups
With Windows 11, you have the ability to bring together apps of a similar kind for better organization. To make a group, just drag one app tile on top of another. Then, you can name the group by selecting the space above it. This is particularly handy for grouping apps by what they do, or by how often you use them.
Adding website shortcuts
Enhancing your Start menu with website shortcuts can streamline your browsing experience. To add a website, open Microsoft Edge, navigate to the desired site, click the menu icon (three dots) and choose “Pin to Start.” This forms a tile that opens the website directly, making it as accessible as any other app on your Start menu.
Through these customizations, you can turn your Windows 11 Start menu into an efficient, personal hub for all your daily computing activities. Now let’s find out how you can tweak its colours and themes to even better suit your Start menu.
Changing Start Menu Colours and Themes
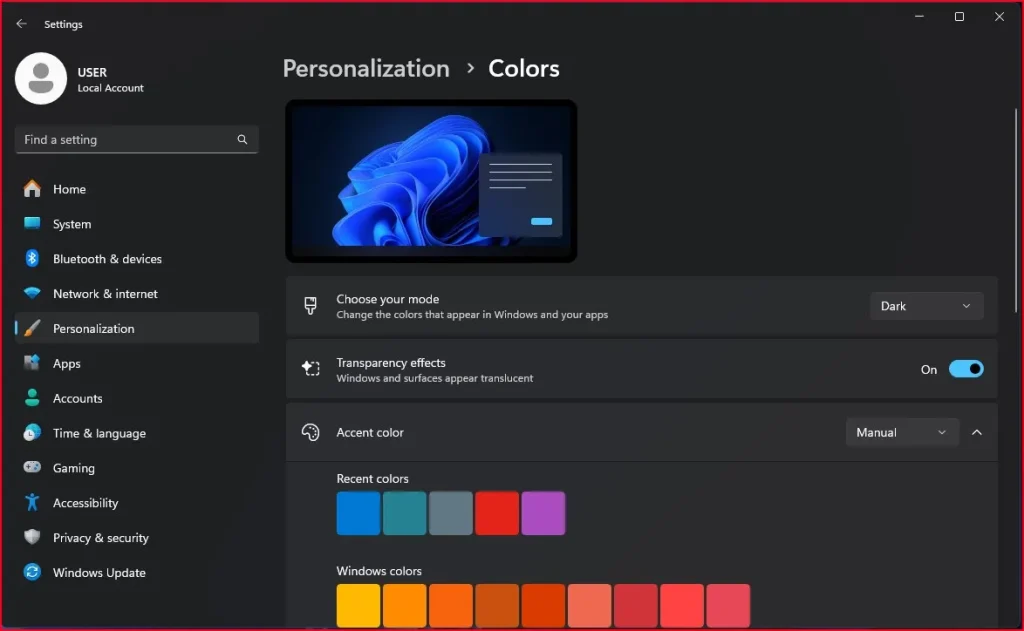
Selecting accent colours
In Windows 11, you have the opportunity to customize the Start Menu by selecting accent colours that match your sense of style. To choose an accent colour, navigate to Settings > Personalization >Colours. Here, you can choose from what I considered to be a pretty wide selection of preset colours or cook up a custom colour that’s just right for you. Accent colour will be applied to select parts of the Start Menu as highlights, and to some app tiles.
Applying light or dark mode
Switching back and forth from light to dark mode can dramatically adjust the look of your Start Menu. To switch between them, head to Settings > Personalization >Coloursand select your preferred mode under “Choose your mode.” Light mode offers a bright, clean look, while dark mode provides a sleek, eye-friendly reading experience in low-light environments.
Syncing with overall Windows theme.
To carry on your vibe across your system, Windows 11 lets you sync the look of your Start Menu with your overall Windows theme. You can find this Setting under Settings > Personalization > Themes. When you choose a theme, you’ll be updating multiple parts of your desktop — including the Start Menu — all at the same time, for a cohesive look that spans your whole PC.
Improving Start Menu Functionality
Enabling or disabling web search results
If you want to customize the start menu even more, you can decide whether search results from the web are part of that experience. Open the Settings app and then tap on Privacy & Security followed by Search Permission. Here you can toggle “Show search highlights” on or off. If you turn off this feature, you will search in only your local device, potentially speeding up searches and preventing noise from remote results.
Adding quick access to settings
If you want to get to your settings more quickly, pin important settings to Start. Open the Settings app, locate the setting you want to add, right-click it, and click “Pin to Start.” This adds a tile on your Start menu so you can quickly access that one setting without wasting time and clicks.
Installing third-party Start menu replacements
If you want more advanced tweaks, try third-party Start menu replacements to customize the start menu even deeper. Applications like Start11 or StartAllBackbring extended functionality and greater customization. These tools can offer a more traditional Windows 10-like way to access the Start menu or offer completely new layouts and features to let you customize the Start menu to your exact liking.
Conclusion
Customize the start menu of Windows 11 is an easy and effective way to enhance your experience and make things convenient. By following the advice here, you can customize the Start Menu the way you want, tweaking its layout, personalizing the Recommended list, adding or removing items, and playing with colours and themes.
And don’t forget, the Start Menu is the portal to your Windows 11 experience. So, play around with a few of the customizations and find what meets your needs best. With these tips and tricks, you can craft a Start Menu that not only looks better but makes you much more efficient.
Related Posts You Might Like:
How to Easily Check Your Laptop Battery Health for Better Performance
How to fix high disk usage in windows 11