
Have you ever wondered why your Windows 11 PC’s task manager shows 100% disk usage?
Your computer starts slowing down, apps can take an age to open, and the fan sounds like it’s preparing for takeoff.
You’re not alone — this is a fairly common problem that many Windows 11 users have, particularly on laptops or PCs with HDDs. But you do not need to panic — this post is here to help you step by step to resolve high disk usage in Windows 11. You don’t need to be super tech-savvy to follow through with these solutions—all of the methods are beginner-friendly.
Understand the causes of high disk usage
Identify common culprits
High disk usage in Windows 11 can be attributed to several common culprits. These include:
- Windows Update: Running in the background, consuming disk resources
- Antivirus software: Performing real-time scans
- Search indexing: Cataloging files for faster searches
- Temporary files: Accumulating and taking up disk space
- Fragmented hard drive: Slowing down read/write operations
Now that we know the possible causes, let’s start fixing it.
Use Task Manager to spot resource-hungry processes
Task Manager is an invaluable tool for identifying processes that are hogging your disk resources. To use it effectively:
- Right-click the taskbar and select “Task Manager“
- Click “More details” if needed
- Navigate to the “Processes” tab
- Sort by the “Disk” column to see high-usage processes
- Look for unfamiliar or suspicious processes
Pay special attention to processes with consistently high disk usage percentages.
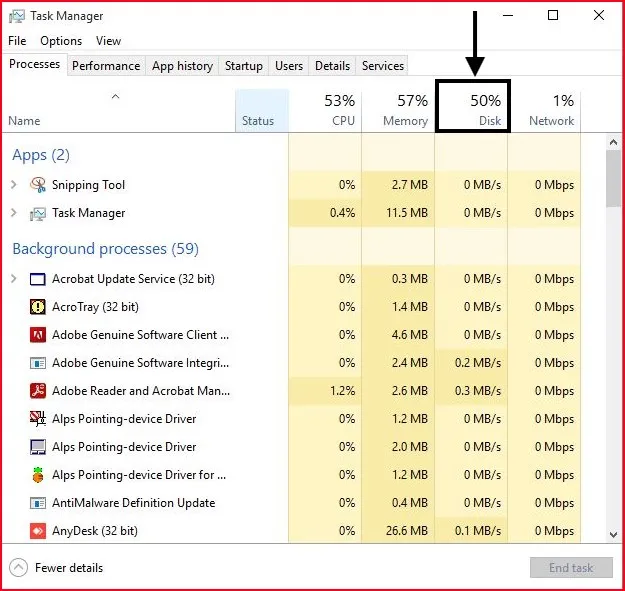
Simple Ways on How to Fix High Disk Usage in Windows 11
1. Restart Your Computer
Sometimes your PC gets stuck with background processes or memory leaks that make the disk usage spike without any clear reason. Restarting the computer clears temporary files, resets stuck processes, and gives your system a fresh start.
It’s the easiest and quickest way to fix random 100% disk usage problems.
If you haven’t tried it yet, go ahead — it only takes a minute and might save you a lot of hassle!
2. Turn Off SysMain (Superfetch)
SysMain, a Windows built-in service, has already been designed to let apps to start faster, thanks to the fact that it preloads app in the memory according to your usage preference. But on some PCs — specifically those that have a classic spinning hard drive (HDD) — SysMain can use a lot of disk activity, resulting in high disk usage.
Disabling it won’t hurt your system and it can actually make a difference in your performance.
It’s one of the first things you should try if you see 100% disk usage in Task Manager.
Related post: How to Disable Unnecessary Services in Windows 11
How to disable SysMain:
- Press Windows + R and type services.msc, then hit Enter.
- Scroll down and find SysMain.
- Right-click on it > Properties.
- Click Stop.
- Change Startup Type to Disabled.
- Click Apply and OK.
Done!
This small change can make a big difference.
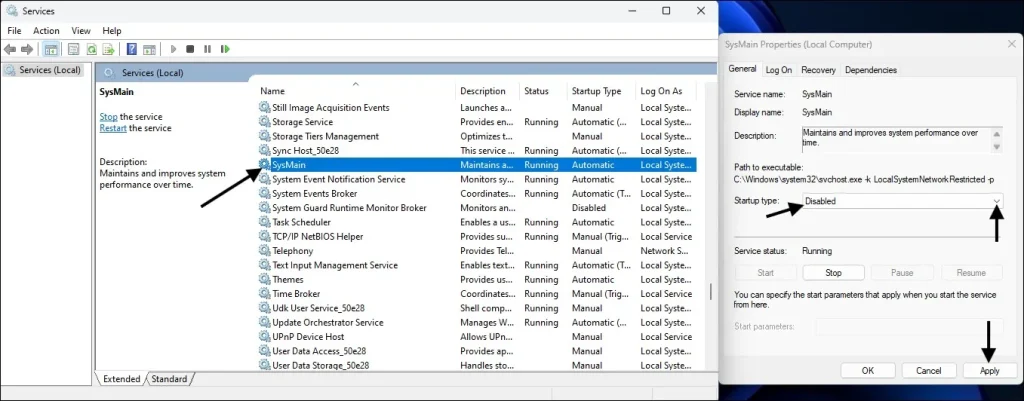
3. Disable Windows Search
Windows Search constantly indexes files and folders on your PC to make searches faster.
But when indexing runs out of control — especially after a big Windows update — it can cause your disk to work overtime.
If you don’t use the search function heavily, disabling Windows Search can reduce disk load and improve system responsiveness.
Don’t worry, you’ll still be able to browse your files manually even after disabling this feature.
Steps to turn it off:
- Open Services again (Windows + R > services.msc).
- Find Windows Search.
- Right-click > Properties.
- Click Stop.
- Change Startup Type to Disabled.
- Click Apply and OK.
You can still search manually even after disabling this service.
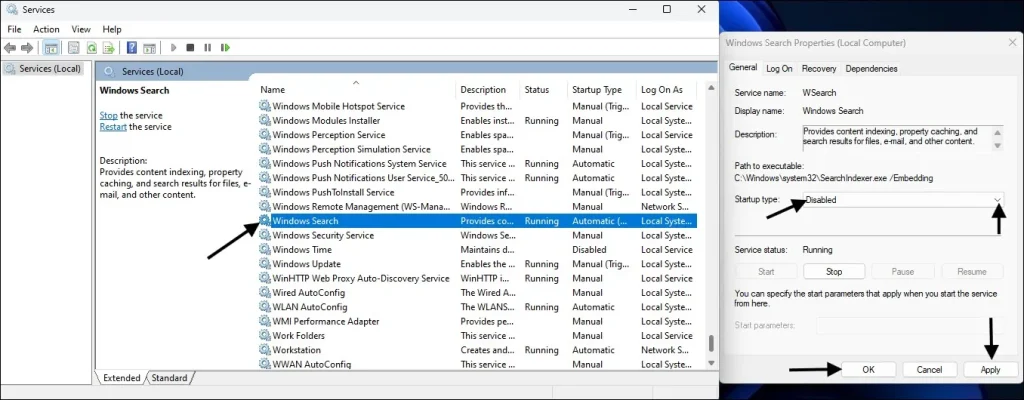
4. Check for Windows updates and system file corruption
Outdated system files or buggy drivers are often the hidden reason behind strange performance issues, including high disk usage.
Microsoft often come up with patches to correct these bugs, so it becomes really important to keep your system up to date.
And outdated storage drivers can interfere with how your hard drive or solid-state drive functions.
Updating just about everything will make sure that you have the best possible improvements and bug fixes silently doing their job for you.
Related: Windows 11 Update Stuck? Here’s How to Fix It
To update Windows:
- Go to Settings > Windows Update.
- Click Check for Updates.
To update drivers:
- Right-click Start > Device Manager.
- Update your disk driver and storage controller driver.
For more on keeping your drivers updated, you can refer to Microsoft’s official driver update guide
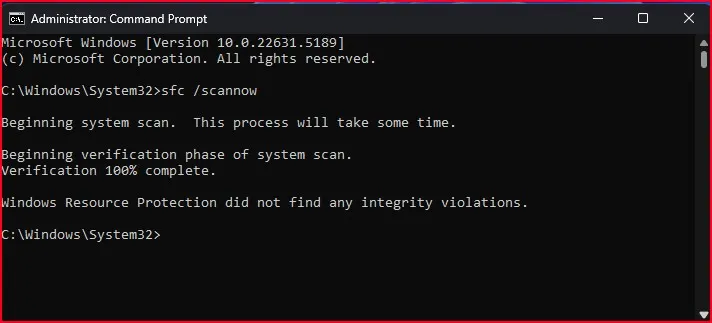
Additionally, run a system file check:
- Open Command Prompt as administrator
- Type “sfc /scannow” and press Enter
- Give it time to scan and follow the suggestions if you have any.
By addressing these potential causes, you can often resolve high disk usage issues in Windows 11.
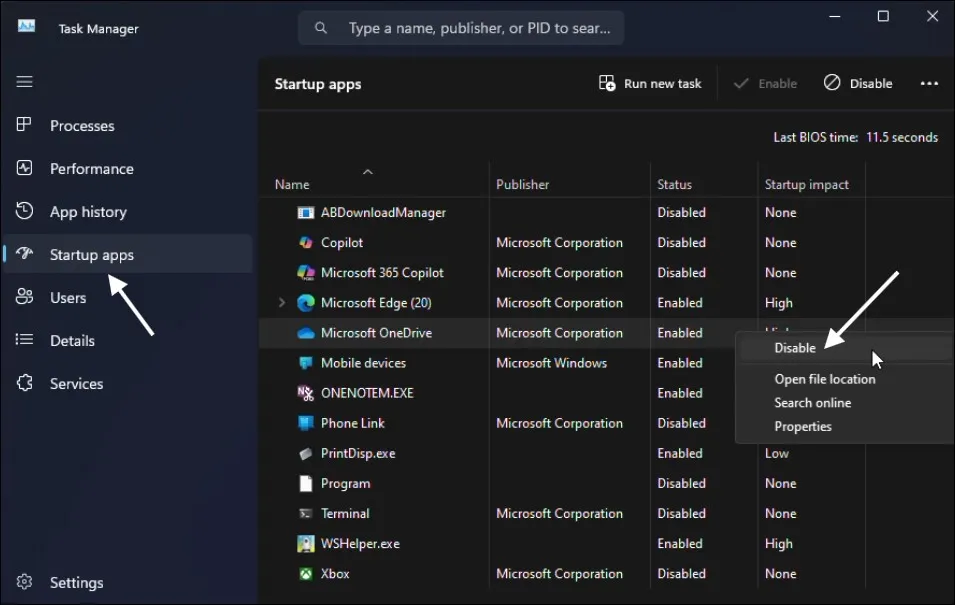
5. Disable unnecessary startup programs
You can improve your Windows 11 performance and lower your disk usage if you turn off unnecessary startup program. These apps start up every time your computer does, slowing everything down. To manage startup programs:
- Press Ctrl + Shift + Esc to open Task Manager
- Click on the “Startup” tab
- Review the list of programs and their impact
- Right-click on non-essential programs and select “Disable“
By carefully selecting which programs start with Windows, you can significantly improve boot times and overall system performance.
6. Adjust visual effects for performance
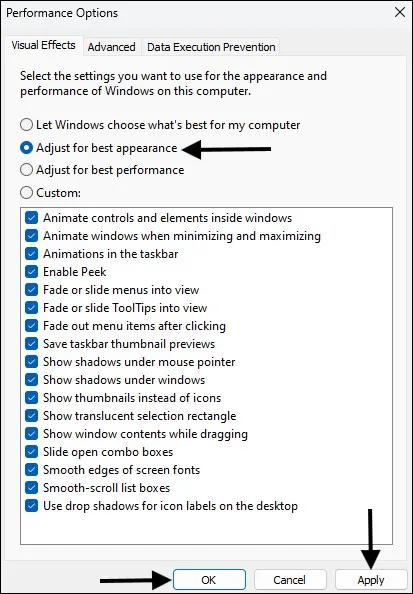
Windows 11 includes a lot of visual effects that look nice, but can also hog your system resources. To optimize performance:
- Open the Start menu and search for “Performance“
- Click on “Adjust the appearance and performance of Windows”
- Select “Adjust for best performance” or customize settings
- Click “Apply” and then “OK“
This adjustment can noticeably reduce disk and CPU usage, especially on older or less powerful systems.
Want to reduce RAM and CPU usage too? Check this out: How to Reduce RAM and CPU Usage in Windows 11
7. Configure Storage Sense for automatic disk cleanup
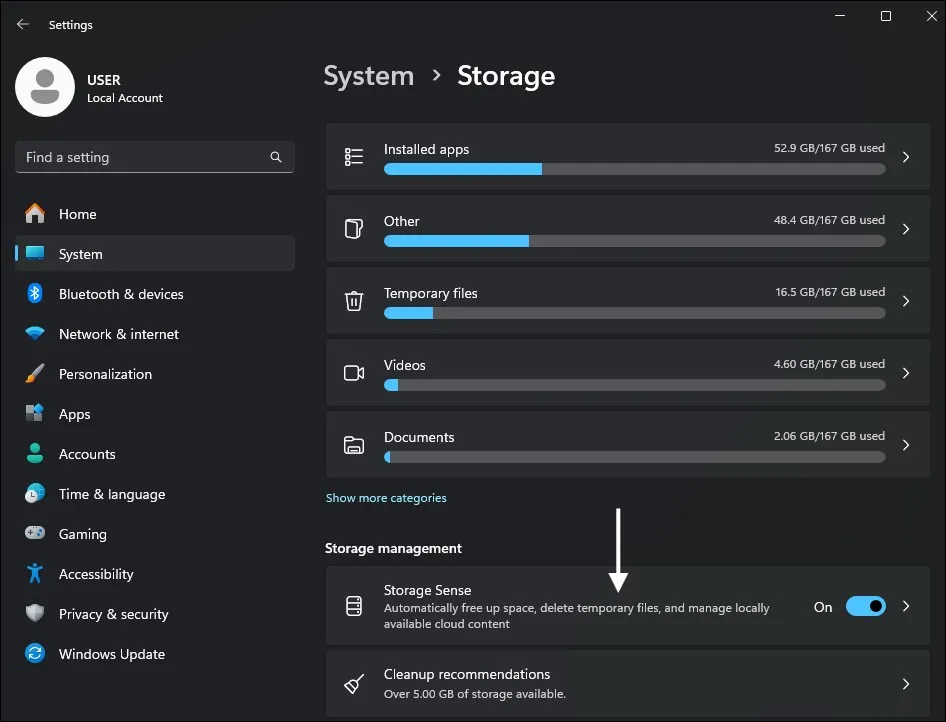
Storage Sense is a native feature in Windows 11 designed to automatically clean your disk by deleting unwanted files. To enable and configure Storage Sense:
- Open Settings > System > Storage
- Turn on Storage Sense
- Click “Configure Storage Sense or run it now“
- Adjust settings to your preference
By regularly clearing temporary files and downloads, Storage Sense helps maintain optimal disk usage without manual intervention.
8. Delete temporary files and downloads
Temporary files and old downloads can accumulate over time, taking up precious disk space:
- Press Windows key + R, type “%temp%“, and hit Enter
- Select all files and delete them
- Empty your Downloads folder of unnecessary files
This procedure also saves up a lot of disk space and Improve System Performance. We can now move on to dealing with possible malware problems that could be causing excessive disk usage.
It’s a good idea to regularly clean up junk files, uninstall unused apps, and keep your system optimized. You can also follow our performance guide: How to Speed Up Windows 11 PC for Better Performance
9. Check for Malware
Malware infections can silently cost you because you may not realize they are sapping your resources. They can lead to high disk usage because they’re doing suspicious tasks, downloading additional files, or damaging system processes. Even if you use another brand’s antivirus tool like Malwarebytes, it’s good to run a manual full scan with Windows Defender on occasion.
Catching malware early can not only solve high disk usage but also protect your personal information.
How to run a quick scan:
- Open Windows Security from Start menu.
- Click Virus & Threat Protection.
- Run a Quick Scan or Full Scan.
If malware is found, remove it and reboot your PC.
10. Change Virtual Memory Settings
When your RAM becomes full, Windows moves all data to a part of your hard drive, known as Virtual Memory or Paging File. But if these settings are too aggressive, your system will continue hitting your disk and it will run at 100%.
Manually adjusting the virtual memory size to match your RAM (or a little more) can balance the load better.
It’s a small tweak that often brings a big improvement, especially on systems with less RAM (like 4GB or 8GB machines).
Fix it like this:
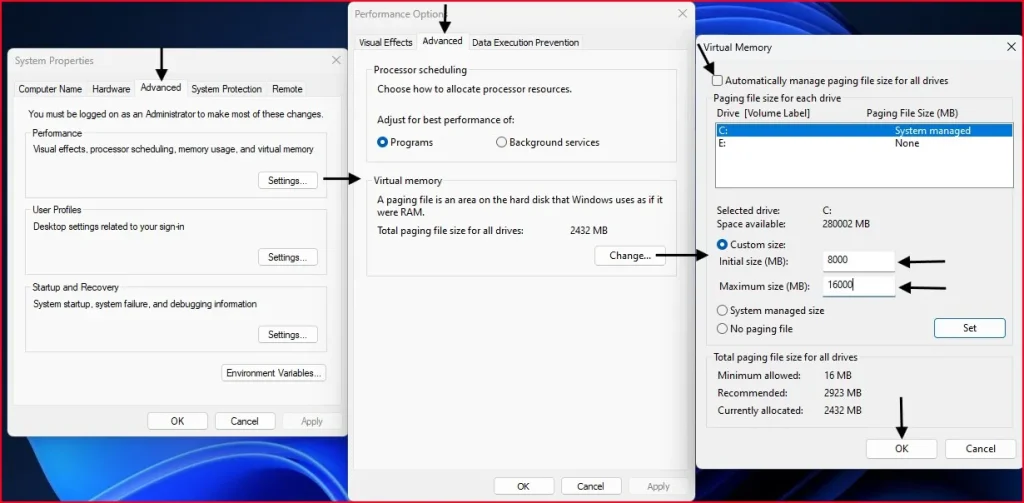
- Press Windows + R > type sysdm.cpl and hit Enter.
- Go to the Advanced tab > click Settings under Performance.
- Again, go to Advanced > Click Change under Virtual Memory.
- Uncheck Automatically manage paging file size.
- Select your drive (C: usually) > Click Custom size.
- Initial size should be your RAM in MB, and Maximum size should be double your RAM.
For instance, if you have 8GB RAM, set Initial Size = 8000MB, Maximum Size = 16000MB.
11. Reset Virtual Memory If Needed
Sometimes changing virtual memory settings manually doesn’t bring the desired result, or even makes things worse if set incorrectly.
In that case, it’s best to go back and set Windows to manage it automatically.
Windows is pretty smart at handling memory allocation by itself when left alone.
Resetting this can fix stubborn issues that don’t respond to manual size adjustments.
12. Perform a Disk Check
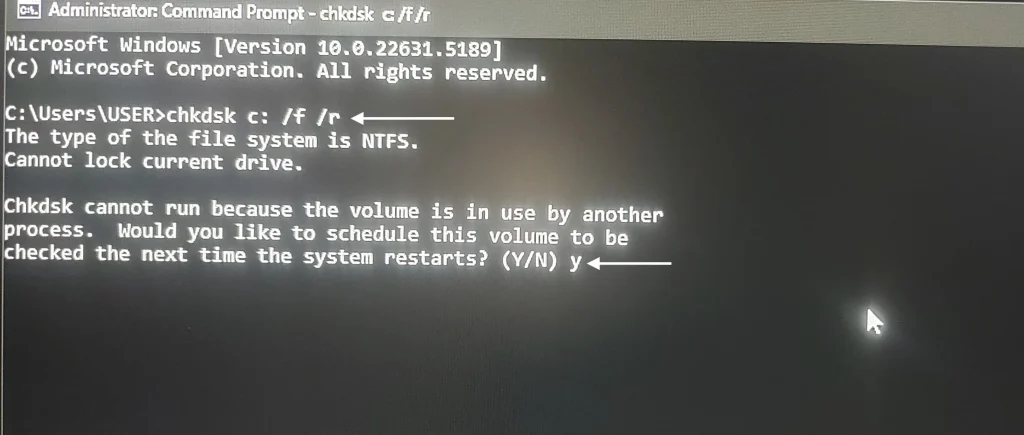
If all else fails, these steps could also mean that there are physical issues with your hard drive, such as bad sectors or file system errors.Running a built-in tool such as CHKDSK (Check Disk) scans your drive, finds these issues then attempts to resolve them. It’ll take a while depending on how big your disk is, but will be definitely be worth doing.
A simple scan and repair might bring your PC back to life and solve high disk usage for good.
To check and fix:
- Open Command Prompt as Administrator.
- Type: chkdsk.exe /f /r
- Press Enter.
It will ask to schedule the check at the next reboot. Type Y and restart your PC.
Repairing Windows 11 high disk usage doesn’t need to be difficult. For the most part, stopping the SysMain service, turning off Windows Search, updating drivers and scanning for malware should do the trick.
I hope this guide helped you make your PC faster and smoother!
If you still face any issues, feel free to drop a comment below. I’m always happy to help!
And if you liked this guide, don’t forget to check out some more simple tech tutorials on our blog!
Frequently Asked Question (FAQ)
Is 100% disk usage bad?
Yes. It makes your computer slow and unresponsive. It means your drive is under heavy load.
Can an SSD have high disk usage too?
Yes. But it’s less damaging compared to HDDs because SSDs are much faster.
Should I disable Windows Search permanently?
If you rarely use Windows Search, disabling it can help reduce disk usage without major problems.
Will upgrading RAM fix high disk usage?
In many cases, yes! More RAM means less dependency on virtual memory.
How can I monitor disk usage?
Press Ctrl + Shift + Esc to open Task Manager and check the Disk column.