
Ever felt your internet slowing or a website taking forever to load? Occasionally it’s not your computer or even your Wi-Fi that is to blame — the problem could lie somewhere along the path your data takes to get to that website. This is where the Traceroute Command in Windows comes to help.
It’s kind of like looking at the route your data takes on a map. With one quick command, you can see all the stops it makes before reaching the website. And the good news is, you don’t have to install anything extra — Windows already has this tool ready to use.
What is the Traceroute Command in Windows
The Traceroute Command in Windows is a built-in tool that shows how your data travels from your computer to a website or server.
Think of it as akin to following a package online — only instead of delivery trucks, it’s routers and servers. Each stop your data makes along this journey is referred to as a “hop.”
On Windows, the command is tracert (short for “trace route”). Consider it a GPS tracker for your network packets. Each time you send data to a website or server, the information doesn’t travel in a straight line — it goes through several routers and servers before arriving at its destination.
What Do Your Traceroute Command in Windows Results Mean? Each of these hops is detailed in your traceroute command Windows results with IP addresses and response times for the routers in between. You can see the specific internet service providers, data centers and network infrastructure your data passes through. This provides a full map of the journey your packets make and can reveal bottlenecks, failing connections or uncharacteristically long routes that might explain why your internet feels slow.
The brilliance of network path tracing windows utilities is that they can pinpoint exactly where problems are happening. If you have a slow connection between your location and the web server, you can tell whether the problem is in your immediate area or with an internet service provider or some other aspect of network infrastructure.
Why Should You Use Traceroute Command in Windows?
You may not be using Traceroute in everyday life, but it comes in handy when:
- A website feels unusually slow.
- Online games are lagging.
- Your ISP (Internet Service Provider) asks for diagnostic info.
- You’re curious about how internet traffic actually moves.
It’s a great way to understand where a connection problem is happening.
Command explanation for ping vs traceroute
Both ping and tracert are Windows commands to test network connection, but they focus on different aspects and deliver the results that you may be interested in exhibiting. Ping is just for checking if you can reach a destination and the round-trip time of packets. It’s the same as, “Can I get there?” and “How long does it take?”
Traceroute goes a step further. It doesn’t just check if you can connect — it shows you every stop your data makes along the way, from your computer to the website. While ping just tells you if you can reach something or not (a yes-or-no answer), traceroute lays out the red carpet for your data, showing exactly how it gets to its destination
| Feature | Ping | Traceroute |
| Purpose | Tests basic connectivity | Maps network path |
| Information provided | Response time, packet loss | Each hop, individual response times |
| Troubleshooting value | Confirms if destination is reachable | Identifies where problems occur |
| Time required | Seconds | Usually longer, depends on path length |
Your command prompt traceroute results show response times for each individual hop, while ping only shows the total round-trip time to the final destination. This granular detail helps you understand not just whether there’s a problem, but exactly where that problem exists in the network chain.
When you’re having occasional connectivity problems, ping is your tool of choice to confirm that there’s a connection while traceroute explains why a specific connection point is so slow — or even failing at the moment.
How to Run Traceroute Command in Windows (Step by Step)
OK, let’s go through the steps. Running Traceroute on the Windows platform is simpler than you may have thought.
Step 1 – Open Command Prompt
- Press Windows + S on your keyboard.
- Type cmd in the search bar.
- Right-click on Command Prompt and select Run as Administrator.
To execute the traceroute command in Windows, you’ll need to open the Windows Command Prompt as administrator. Receiving these permissions will prevent the tracert command Windows running from being hampered in any way.
And on a somewhat related side note… Another simple way of doing this is through the Run dialog. Try hitting Windows + R and in the box that appears type cmd, then hit Ctrl + Shift + Enter instead of just Enter. By using this keyboard shortcut, the Command Prompt would open and run as an administrator.
Step 2 – Run the Traceroute Command
- In the Command Prompt window, type: tracert google.com or you can use IP address like tracert 8.8.8.8
- Press Enter.
Wait a few seconds, and you’ll see a list of results.
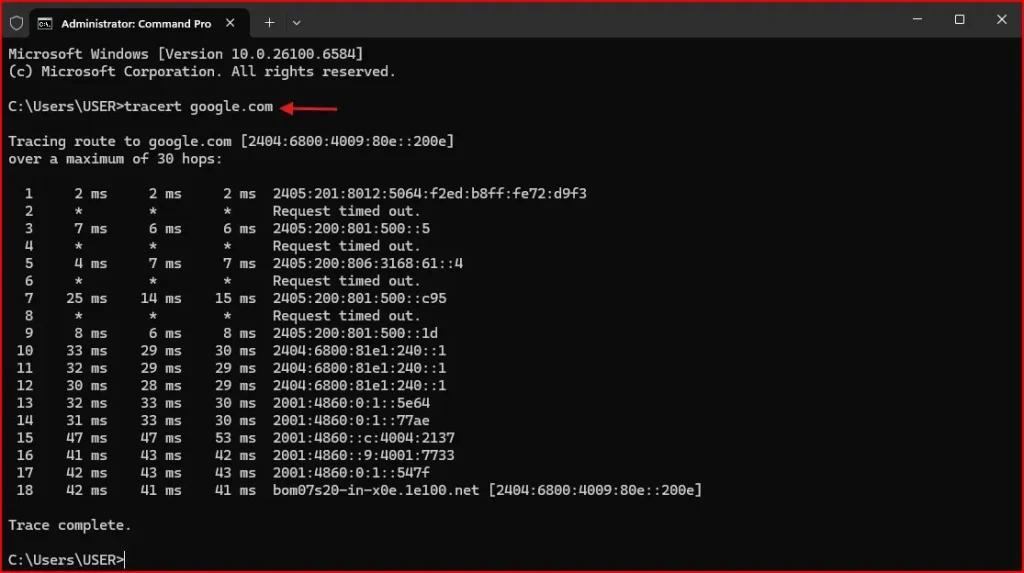
Understand the Results
When you run the Traceroute Command in Windows, the results show:
- Hop Number → The order of stops your data makes.
- Time (ms) → How long each hop takes. Lower numbers = faster.
- IP Address/Hostname → The server or router at that hop.
If you see * * *, it means that hop didn’t respond. That’s normal sometimes, so don’t panic.
Your traceroute runs in real-time, showing you each hop as it discovers the path to your destination. You’ll see three response times for each hop because the Windows traceroute tutorial shows that tracert sends three test packets to each router along the route.
Watch the progression carefully – normal hops typically show response times between 1ms and 100ms, depending on distance and network quality. If you see dramatically increasing response times or timeouts (shown as asterisks), you’ve likely found network congestion or connectivity issues.
Some hops may show asterisks (*) instead of IP addresses. This doesn’t always mean there’s a problem – many routers are configured not to respond to traceroute queries for security reasons, but they still forward your packets normally.
Diagnosing Slow Internet Connections
When your internet feels sluggish, the traceroute command in Windows users rely on becomes your detective tool. You can quickly identify where delays occur in the data path between your computer and the destination server. Run tracert google.com and watch the response times for each hop – anything over 100ms warrants investigation.
Look for sudden spikes in response times between consecutive hops. If hop 3 shows 25ms and hop 4 jumps to 250ms, you’ve found your culprit. What you’re seeing is congestion or hardware limitation at that router. When your ISP’s infrastructure gets overloaded, you’ll typically experience timeouts (indicated with asterisks), especially during peak usage hours.
Check some more destinations to see if it is all traffic or just certain links. If tracert Facebook. com yields good times but tracert Netflix. com is showing delayed, it probably isn’t your local connection; it’s a CDN routing problem.
Monitoring Website Accessibility from Your Location
When you think a website is down or slow, your natural presumption may be that it’s the site’s own fault. But traceroute in Windows can at least hawk up the problem, if it’s between you and the destination server. Running tracert google. com or tracert Facebook. com gives you troubleshooting options to understand every hop your data takes to a popular site.
You’ll quickly spot where delays occur along the path. If the first few hops respond normally but later one’s time out, the issue likely stems from your internet service provider’s routing or a problem with intermediate networks. This information proves invaluable when contacting your ISP’s support team – you can point to specific hop numbers where packet loss begins.
For e-commerce businesses or content creators, you can also test how accessible your own website looks from various places. Get people in the other cities you have agents to traceroute to your domain and compare it with yours. This uncovers potential network challenges that apply to your audience.
If you’d like to dig deeper into networking, here are some great resources: Microsoft Tracert Documentation
Tips for Using Traceroute Command in Windows
- Test more than one website to compare.
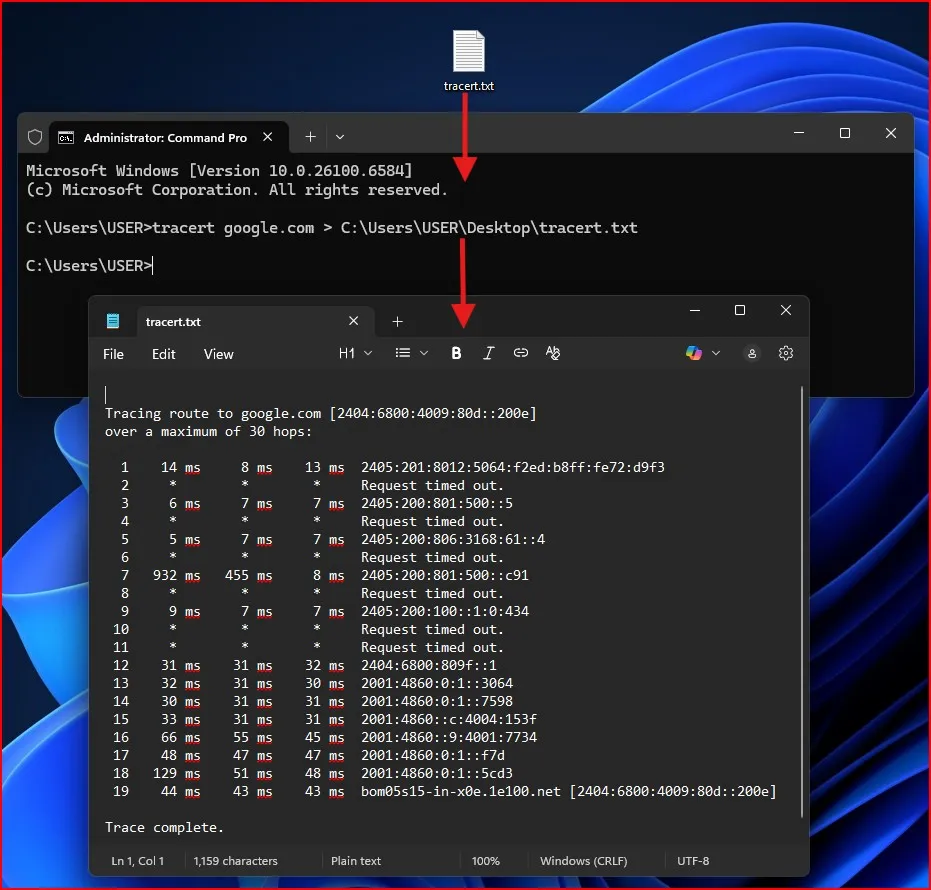
- Save the results by typing: tracert google.com > C:\Users\YourName\Desktop\tracert.txt
- This saves the output as a text file on your desktop. Very useful if you need to share it with your ISP.
If a website is slow but others are fine, the issue may not be with your ISP.
Traceroute is great for spotting where the problem lies, but if you’re looking for practical fixes to speed things up, check out my post on How to Fix Slow Internet Speed in Windows 11.
Final Thoughts on Traceroute Command in Windows
Hope now you have got an idea on what is traceroute command in windows. Running the Traceroute Command in Windows isn’t complicated at all. In one simple command, you can track the route your data takes over the internet.
It’s not repairing the internet itself, but it should give you a better idea of where things are held up. The next time your connection feels sluggish, try Traceroute — you might just feel like a mini network detective.
Frequently Asked Question (FAQ)
What is the Traceroute Command in Windows?
It’s the tracert command in Command Prompt that shows the path your data takes to a website or server.
Do I need admin rights to run Traceroute Command in Windows?
Not always, but running as administrator ensures full access.
Why do I see stars (*) in Traceroute results?
That means the hop didn’t respond. It’s common and not always a problem.
Does Traceroute Command in Windows fix internet issues?
No, it helps you identify where the issue is, but it doesn’t fix it.
Can I use Traceroute Command in Windows for any website?
Yes! Just type tracert followed by the website address.