
If you’ve had your Windows PC for a while, chances are your storage is starting to feel cramped.And sometimes, the culprit isn’t a giant game or a bunch of photos — it’s those leftover Windows update files.
You know, the ones Windows keeps “just in case” you want to roll back to a previous version?They can sit quietly in the background, slowly eating up gigabytes of space.
The good news is that you can remove them without causing any harm. Today, I’m going to show you exactly how to delete old Windows update files in a safe, simple way — even if you’re not super techy.
What are Windows Update files and where are they stored?
Have you ever wondering what happens to all those Windows updates once they are downloaded? Then, they’re not just lost in the digital abyss. These update files are stored by Windows in a dedicated folder on your primary system drive, usually C:
You’ll find most Windows Update files in the following location:
C:\Windows\SoftwareDistribution\Download
That folder is where Windows stores the installation files, patches, security updates and service packs that it downloads automatically before applying the contents to your system. Sort of a prep area in Windows before everything gets booted up.
Why Delete Old Windows Update Files?
Windows Does Not Always Manage to Clean Up After Itself. When updates are installed, the original installation files can often be left lying around on your system instead of automatically deleted.
I get it — deleting system files sounds scary.But there are a few good reasons to do it:
- More Free Space – These files can take up several GBs.
- Less Clutter – Your PC feels cleaner and easier to manage.
- No Longer Needed – If your current Windows update is working fine, keeping old files is like holding onto old phone chargers that don’t fit your new phone.
Method 1: Using the Settings app to Delete Old Windows Update Files
The first method is the easiest. You don’t have to dig into system folders.
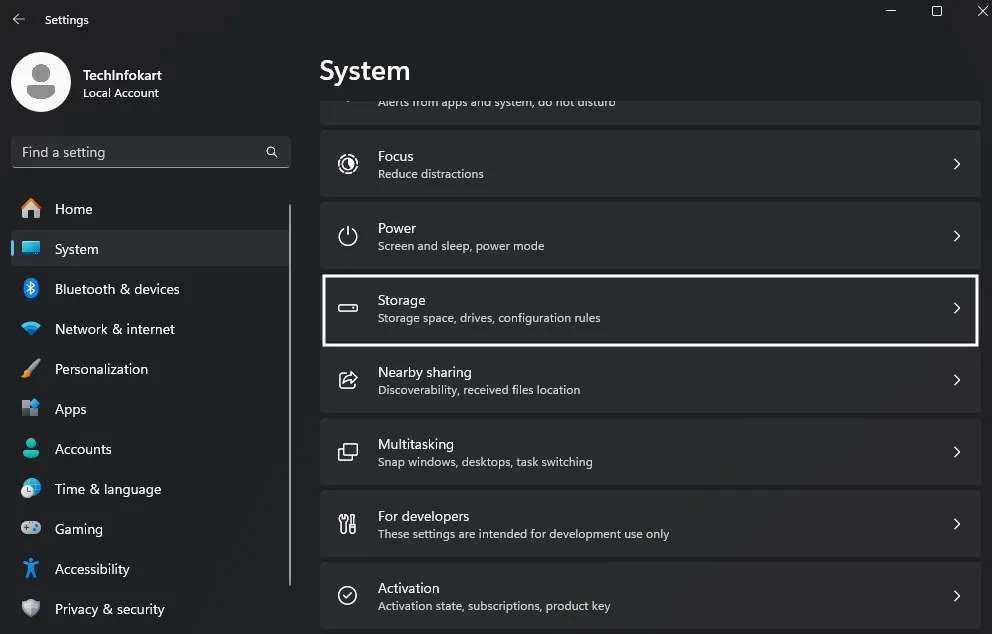
Open Settings – Click the Start menu and choose Settings. Go to Storage – Navigate to System > Storage.
Select Temporary Files – Windows will scan for files you can remove.
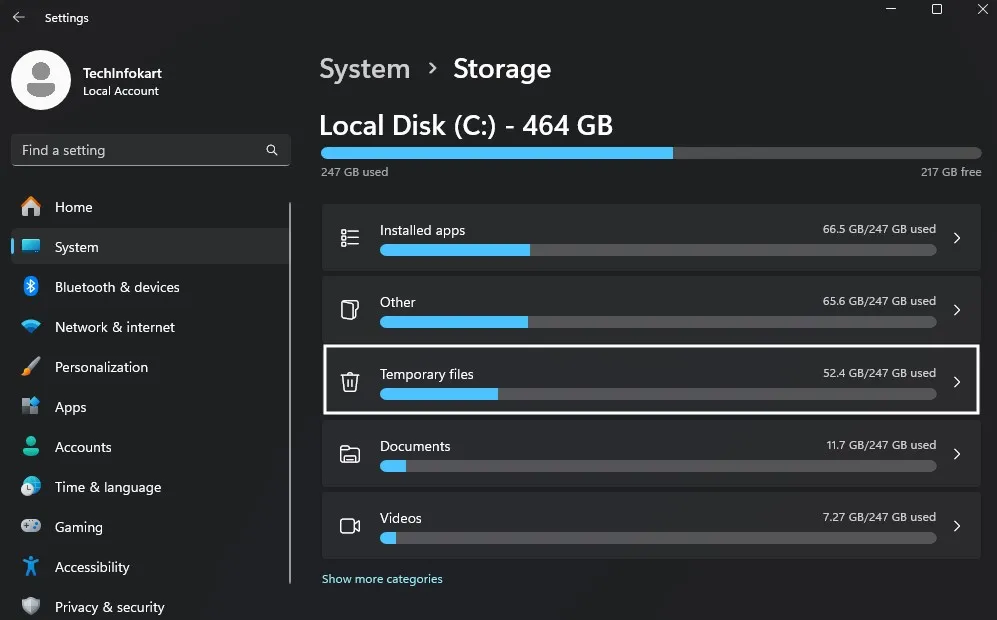
Find “Windows Update Cleanup” – This is where the old update files live.
Tick the box and click Remove files.

That’s it! Windows will take care of the rest.
Method 2: Using Disk Cleanup utility to Delete Old Windows Update Files
If you like the traditional way this is for you
Go to the Start menu, type Disk Cleanup, and open it. From the following popup, select your system drive (commonly C:)

Click Clean up system files
Tick Windows Update Cleanup. Click OK and confirm.

If there is a lot to clean up you might need to wait or a couple minutes.
Method 3: Using Command Prompt to Delete Old Windows Update Files
For our techy readers that want more control, the Command Prompt has legitimate options for clearing out update files one (or both) at a time:
- Run the Command Prompt as administrator (right click Start and select “Command Prompt(admin)”)
- Type:
net stop wuauservand press Enter - Type:
net stop bitsand press Enter - Type:
rd /s /q C:\Windows\SoftwareDistributionand press Enter - Type:
net start wuauservand press Enter - Type:
net start bitsand press Enter - It disables the Windows Update service, deletes Update file folder and resumes the service. The next time Windows Update is executed, it will simply generate the new directory.
Method 4: Advanced Option – Clearing the SoftwareDistribution Folder
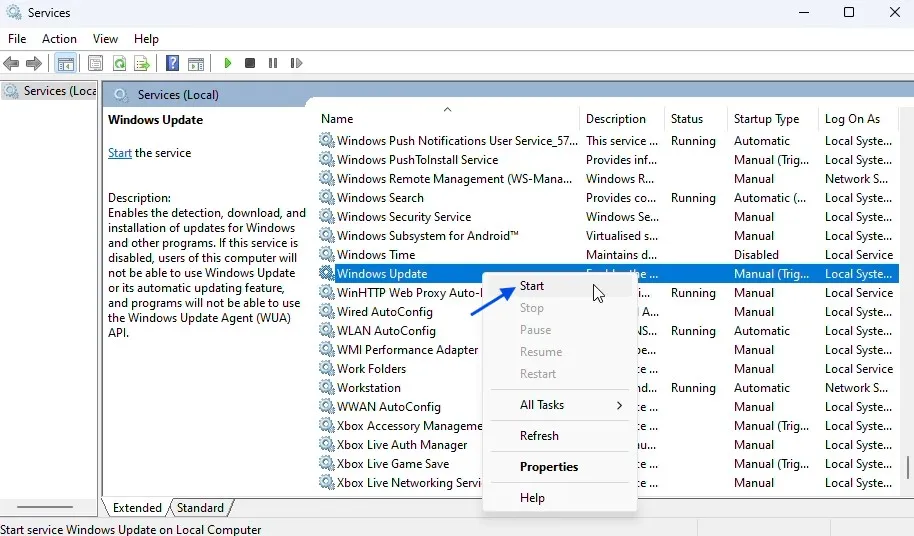
For the brave (or curious), there’s another place old update file hide — the SoftwareDistribution folder. Press Windows + R, type services.msc, and hit Enter.

Find Windows Update in the list, right-click it, and choose Stop.

Launch File Explorer and navigate to: C:\Windows\SoftwareDistribution\Download
Delete everything inside the folder.

Go back to Services and start Windows Update again.
Don’t worry — this doesn’t break future updates.
How Often Should You Delete Old Windows Update Files?
Not too often. This should be good for once in 2–3 months or till the time you feel your free space getting decreased.
Things to Keep in Mind before you Delete Old Windows Update Files
- You won’t be able to roll back to an older Windows version once these files are gone.
- Make sure Windows isn’t installing updates when you delete them.
- If you’re nervous, back up important files first.
Final Thought – Delete Old Windows Update Files for cleaner, faster PC
When I first heard about cleaning out system files, it sounded like something only a techie could do.But honestly, once you try it, you’ll see that how to delete old Windows update files is just a matter of clicking a few buttons.
The result?
A lighter, cleaner, and more spacious computer.
And if you’re looking for even more ways to make your PC run smoothly, you might want to check out my earlier guide: How to Speed Up Windows 11 PC for Better Performance.
FAQ – Delete Old Windows Update Files
Is it safe to delete old Windows update files?
Yes, as long as the updates are fully installed, it’s completely safe to delete old Windows update files.
How much space can I free up by deleting them?
Depending on your update history, deleting old Windows update files can free anywhere from a few hundred MB to several GB.
Can I delete them during an update?
No. Always wait until Windows says the updates are complete.
Will deleting old Windows update files make my PC faster?
While it won’t directly boost speed, freeing up disk space can help your system run more smoothly.
Can Windows delete old update files automatically?
Sometimes it does, but not always — which is why knowing how to manually delete old Windows update files is useful.