
Some time ago, my PC began the occasional lock-up for no reason — and I even received the dreaded blue screen once or twice. At first, I had assumed it was just one of the quirks of Windows, but when it kept occurring, I knew something more fundamental was amiss.
After ruling out drivers and updates, I started to suspect my RAM. Instead of rushing to buy new sticks, I decided to test RAM with Windows Memory Diagnostic, a tool that’s already built into Windows. Most people don’t even know it exists, but it’s a lifesaver when your PC starts acting strangely.
When Should You Test RAM with Windows Memory Diagnostic?
RAM problems can be sneaky. Here are a few signs that should raise red flags:
- Random restarts without warning
- Blue screens with confusing error codes like MEMORY_MANAGEMENT
- Apps crashing or freezing for no clear reason
- Instability right after you’ve upgraded or swapped RAM
If any of this sounds familiar, running a memory test is worth it. Worst case, you’ll confirm your RAM isn’t the issue; best case, you’ll save yourself hours of pointless troubleshooting.
Different Ways to Open Windows Memory Diagnostic
The tool is hidden in Windows, but there are a few ways to access it. Use whichever feels easiest.
1. Using Windows Search
The fastest way:
- Tap the Windows key
- Type Windows Memory Diagnostic
- Click the app when it shows up
This is usually how I launch it—it’s quick and doesn’t require digging around menus.
2. Through Control Panel
If you’re already inside Control Panel, you can get there this way:
- Open Control Panel (search for it if you don’t see it)
- Change the view to Large icons
- Click Windows Tools
- Then double-click Windows Memory Diagnostic
It takes a couple of extra clicks, but it works just the same.

3. Using Command Prompt
For those who prefer commands, here’s the geek-friendly version:
- Press Win + R, type cmd, hit Enter
- In Command Prompt, type mdsched.exe and press Enter
The tool will launch right away—no menus involved.

Running the RAM Test
Once the tool opens, Windows gives you two choices:
- Restart now and check for problems (your PC reboots and the scan starts immediately)
- Check for problems the next time I start my computer (runs on your next restart)
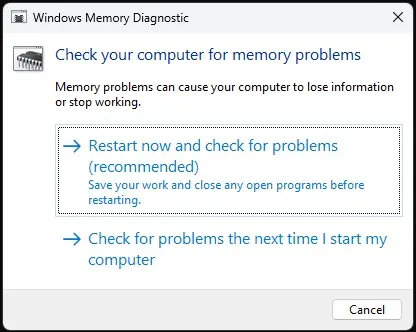
If you’re in the middle of work, go with the second option. Otherwise, I usually choose the first one so I can get results right away. Just make sure you save everything before restarting—Windows won’t wait.
If your computer feels slow or keeps freezing, the issue might be faulty RAM. But sometimes high memory usage is the cause. In that case, you can also check out my guide on How to Reduce RAM and CPU Usage in Windows 11.
What Happens During the Test
After reboot, you’ll see a blue screen with the diagnostic running. It tests your RAM in a few different passes, searching for corrupted data as well as issues with the timing, or bad memory cells. This may take a few minutes (or quite a bit longer if you’re on a system with 16GB of RAM or more).

You’ll see a blue screen and a progress bar indicating how far into the process you are during the test. You can hit F1 while it’s running to see more options such as modifying the test mix, or changing the cache settings.
The diagnostic runs three test levels:
- Basic – Quick check with standard test patterns
- Standard – More comprehensive testing
- Extended – Thorough testing that takes significantly longer

Viewing the Results
When Windows starts back up, you’ll often see a quick notification about the test results. Sometimes it flashes too quickly to catch, though.
To check manually:
- Right-click the Start menu and pick Event Viewer
- Go to Windows Logs > System
- Search for MemoryDiagnostics-Results

If it says no errors, you’re in the clear. If it lists problems, your RAM likely needs attention.

What If Errors Show Up?
I’ve run into this myself, and here’s what usually helps:
- Reseat the RAM – Power down, remove the sticks, and put them back firmly.
- Test sticks individually – Run the test with one stick at a time to spot the faulty one.
- Try different slots – Sometimes the motherboard slot is the culprit, not the RAM.
- Replace the bad stick – If errors won’t go away, it’s time for new memory.
Extra Tip: Use MemTest86
The Windows tool is solid, but it doesn’t catch everything. If your PC still acts up after passing the test, try MemTest86. It runs from a USB drive and digs deeper into memory issues that Windows Memory Diagnostic might miss.
Final Thoughts
RAM troubleshooting doesn’t have to be difficult. If your computer is crashing, constantly freezing, or just getting that dreaded blue screen at random due to your RAM, the very first thing you should do is test RAM with Windows Memory Diagnostic.
It’s already built into Windows 10 and 11, it’s easy to use and it can help prevent you from spending money on hardware that you don’t need. If you are getting errors, reseat or replace the failing RAM. If not, well, then at least you can eliminate memory from your list of suspects and move on.
Frequently Asked Question (FAQ)
How do I test RAM with Windows Memory Diagnostic?
Open the Start menu, type Windows Memory Diagnostic, select it, and restart your PC to begin the RAM test.
Can I test RAM with Windows Memory Diagnostic in Windows 11?
Yes, the tool works on both Windows 10 and Windows 11. The steps are the same.
Is Windows Memory Diagnostic reliable for testing RAM?
It’s good for catching common memory errors.
How long does it take to test RAM with Windows Memory Diagnostic?
The scan usually takes 15–30 minutes, depending on the size of your RAM.
What should I do if errors appear after testing RAM with Windows Memory Diagnostic?
If errors are found, try reseating the RAM sticks or replacing the faulty module.