
When your internet goes down, you fumble around with cords and cables trying to get it working again — and it’s frustrating, embarrassing and usually the last thing you feel like doing. But sometimes the solution is easier than you’d expect. If you’re on Windows 11 and nothing else will work, try resetting your network settings as a magic wand. In this article, I am going to go through the process of how to reset network settings in Windows 11.
Why you may need to reset network settings
When your Wi-Fi goes down, so many things can go wrong, that’s why these troubleshooting tips will prove to be most helpful: Your Wi-Fi drops randomly Ethernet act strangely Network adapter has a life of its own and you most likely did the common ways on fixing it: Reboot the router Toggle Wi-Fi off and back on Forget network reconnect – Or doing some variation of those. If none of that does the trick, sometimes your system’s network settings are out of whack.
Factory resetting network settings in Windows 11 will clear all your network adapters and other related things to default. Your PC removes the old network adapters, re-installs them and clears any customising network settings that were also reset.
Method 1: Reset Network Settings Using Settings
Let’s begin with the most beginner-friendly method — through the graphical Settings menu.
- Click the Start Menu, then Settings (the gear icon)
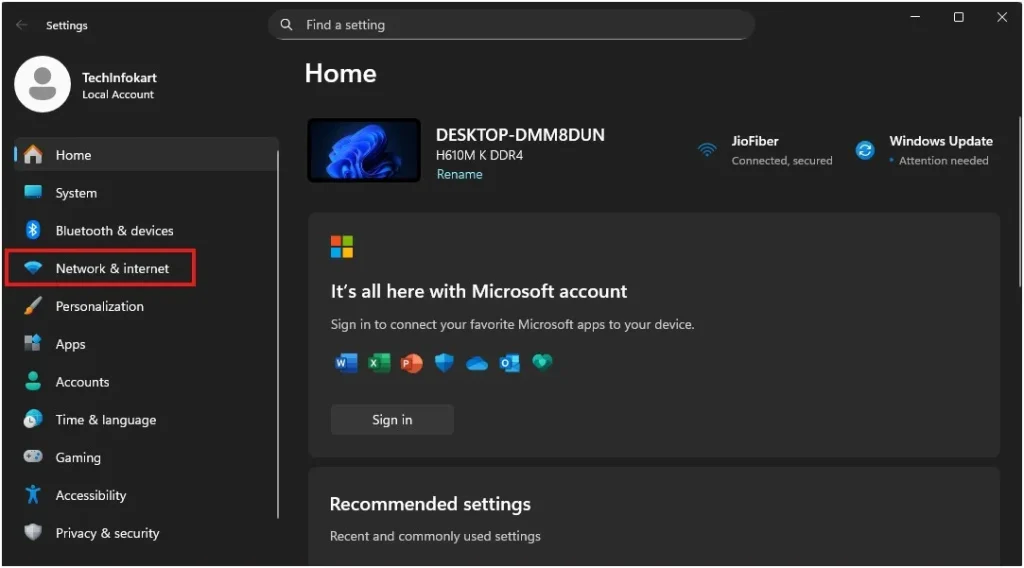
- Select Network & Internet from the left panel
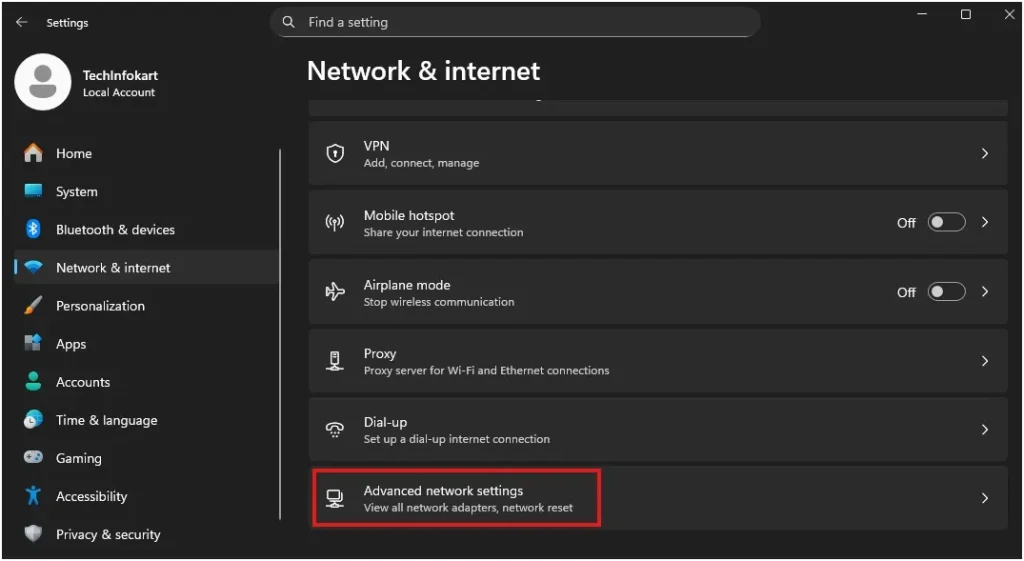
- Scroll down and click Advanced network settings
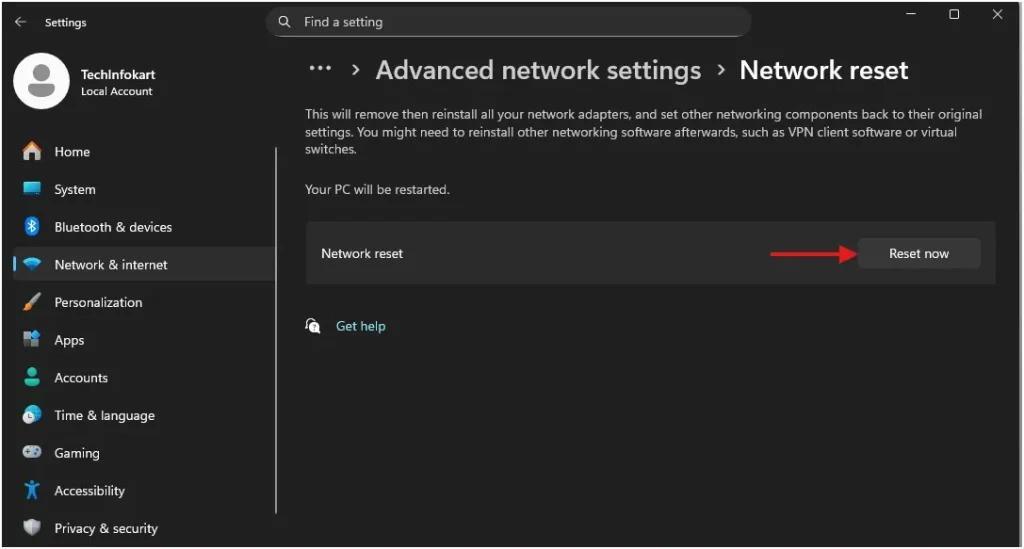
- Under More settings, click Network reset

- Read the short note about removing adapters and resetting settings
- Click Reset now, then confirm with Yes
Your computer should automatically reboot in a minute or 2. When the PC reboots, reconnect to you wifi and enter the password again. If you have a VPN or custom proxy, set that up again as well.
Method 2: Reset Network Settings using Command Prompt
If you’re someone who likes fixing things the “techy” way, Command Prompt is the fastest method.
- Press Windows + S, type cmd
- Right-click Command Prompt → select Run as administrator
A black window will open — that’s where you’ll type the reset commands.
Type the following command and hit Enter: netcfg -d
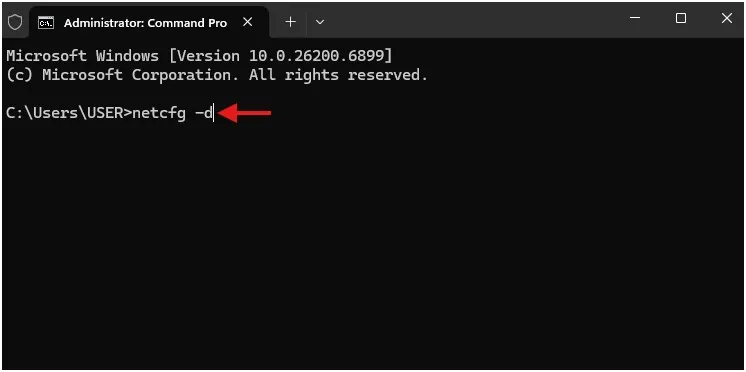
- Deletes all network adapters (Wi-Fi, Ethernet, VPN, virtual switches etc.)
- Removes stored Wi-Fi profiles and resets settings
- Resets both TCP/IP and Winsock values to default ones
- Does the same thing as “Network Reset” in Settings — but it is faster
When the process is finished, try to reboot your PC. Once Windows restarts, reconnect to Wi-Fi and enter your password.
Tip: You’ll want to have taken note of your custom DNS or IP settings before doing this command.
Method 3: Reset Network Settings using PowerShell
PowerShell gives you another advanced option for resetting network components. It’s powerful and works well when other methods fail.
- Press Windows + S, type PowerShell,
- Right-click Windows PowerShell → Run as administrator.
Now, copy and paste the following commands one by one. Each of them fixes a specific part of your network configuration.
- netshwinsock reset
- netsh int ip reset
- ipconfig /release
- ipconfig /renew
- ipconfig /flushdns
What these do:
- Winsock reset: Fixes socket and protocol issues
- IP reset: Rebuilds the IP stack
- Release/Renew: Refreshes your IP address
- Flush DNS: Clears DNS cache to remove bad entries
Once you’ve typed all the commands, restart your PC. Once it’s up again, reconnect to your network.
If you’d like to learn more about what it does and how it helps, check out my detailed post on how to flush DNS cache on your Windows 11 computer.
What Happens if You Reset Network Settings
But before you go hitting reset, here’s what’s actually happening behind the scenes:
- All networking devices (Wi-Fi, Ethernet, Bluetooth and Virtual Switch) are removed and reinstalled.
- Saved Wi-Fi networks and passwords are forgotten.
- You will lose all your custom IP addresses, DNS settings and VPN settings.
- The PC will reset on its own after the process is finished.
- You’ll need to reconnect to Wi-Fi and rewrite in your password after reboot.
Have no fear — your files, photos and apps will remain untouched. The only settings that are reset are those for network.
Wrapping Up
This is how you can reset network settings on Windows 11 — via Settings, Command Prompt or PowerShell.
If your Wi-Fi has been flaky or you’re plagued by endless random disconnects, a reset can be a panacea. Just don’t forget to save your passwords and VPN settings before you begin.
Also, when you have it reset, it will disconnect your Wi-Fi and you’ll need to put in your password again, but that just gives yourself a fresh network anyway.
Frequently Asked Question (FAQ)
What happens if I reset network settings in Windows 11?
It removes all saved Wi-Fi networks, VPNs, and adapters, and then restores default network configurations.
Will resetting network settings delete my files?
No, your files and apps remain safe. Only network configurations are reset.
Will I lose saved Wi-Fi passwords?
Yes. You’ll need to reconnect to networks and enter passwords again.
How do I reset network settings in Windows 11 using CMD?
Open Command Prompt as administrator and run: netcfg -d, then restart your computer.
How long does the reset take?
Typically less than 5 minutes, but your PC will restart once.
When should I reset network settings in Windows 11?
Do it when your PC won’t connect to Wi-Fi or the internet, even after basic troubleshooting.