
Have you ever tried to explain a computer problem to someone and felt like they just don’t get it? You know the issue is right there on your screen, but describing it in words is just too confusing?
That’s where Problem Steps Recorder (PSR) in Windows 11 comes to the rescue – the unsung hero feature that captures every click, keystroke, and system hiccup while you work. This built-in tool creates a detailed report of everything happening on your screen, making troubleshooting infinitely easier.
What is Problem Steps Recorder (PSR) and its purpose
Ever struggled to explain a tech issue to someone? You know that painful back-and-forth where you’re trying to describe what’s happening on your screen? That’s exactly why Problem Steps Recorder exists.
Problem Steps Recorder (PSR) is a built-in Windows utility that captures exactly what you’re doing on your computer—every click, keystroke, and screen change. It’s like having a digital assistant that takes detailed notes of your actions, then packages everything into a neat HTML file you can share with tech support or your IT-savvy friend.
The beauty of PSR isn’t just that it records—it documents. Each screenshot includes arrows showing where you clicked, annotations explaining what happened, and a step-by-step breakdown of your actions. No more “I clicked something and then it did that thing where it goes weird.”
How Problem Steps Recorder (PSR) differs from screen recording software
PSR isn’t trying to be OBS Studio or Camtasia. Those are heavyweight champions for creating videos, while PSR is more like a specialized tool with a very specific job.
| PSR | Regular Screen Recorders |
| Creates HTML reports with annotated screenshots | Produces video files |
| Small file sizes (typically KB or MB) | Large video files (often GB) |
| Automatically documents each user action | Just shows what happened visually |
| Built into Windows – no installation needed | Usually requires downloading software |
| Focuses on troubleshooting | Designed for content creation |
The difference is like comparing a detailed maintenance log to a dashcam video. Both show what happened, but in completely different ways for different purposes.
While Problem Steps Recorder is great for quick issue reporting, it has its limits. If you want full video recordings, check out my blog post on the 7 Best Free Screen Recorders for Windows 11.
How to Access and use Problem Steps Recorder in Windows 11
Using PSR is super easy! Just follow these steps:
Step 1: Open Problem Steps Recorder
Click on the Start menu and type psr. Click on “Steps Recorder” or “Problem Steps Recorder” when it appears. Or, Press Win + R to open the Run dialog, type “psr.exe,” and hit Enter.
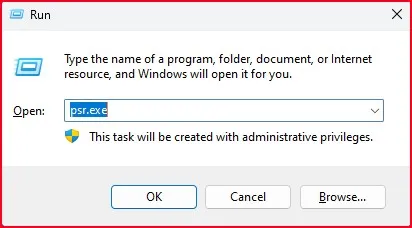
Whichever method you choose, you’ll get the same lightweight but powerful tool ready to document your PC issues.
Step 2: Navigating the Problem Steps Recorder interface and controls
The Problem Steps Recorder interface is intentionally minimalist – Microsoft designed it for simplicity. When you launch it, you’ll see a compact window with just a few controls:
- Start Record – The main button that begins capturing your screen activity
- Stop Record – Appears once recording begins
- Pause Record – Temporarily halts recording
Add Comment – Lets you annotate specific steps with notes
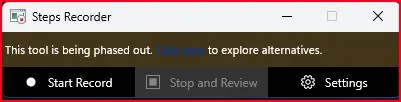
There’s also a small settings menu that gives you options for:
- Capturing screenshots for every mouse click
- Setting output file location
- Adjusting the maximum number of recent screenshots
The clean design keeps it focused on its core job – documenting problems without getting in your way.
Step 3: Recording your first session step-by-step
Ready to capture that glitch? Here’s how to record your first Problem Steps Recorder (PSR) session:
- Launch Problem Steps Recorder using any method from above
- Click Start Record
- Notice the red recording indicator appears at the top of your screen
- Perform the exact steps that reproduce your problem
- Click through menus
- Type text if needed
- Navigate between applications
- Add comments at key points by clicking Add Comment
- Type your observation (e.g., “Error message appears here”)
- Continue your demonstration
- Click Stop Record when finished
The recorder captures each click, keystroke, and screen change automatically. Go slowly and deliberately to ensure everything gets documented properly.
Step 4: Saving and sharing Problem Steps Recorder(PSR) recordings
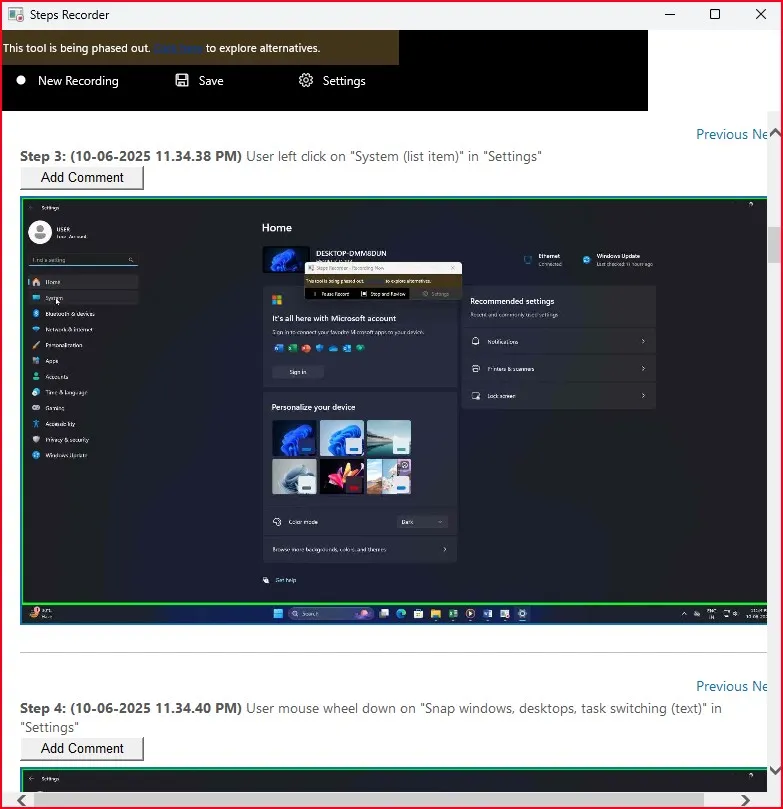
After stopping your recording, Problem Steps Recorder automatically generates a report and displays it for review. Here’s what happens next:
- A preview window opens showing your captured steps
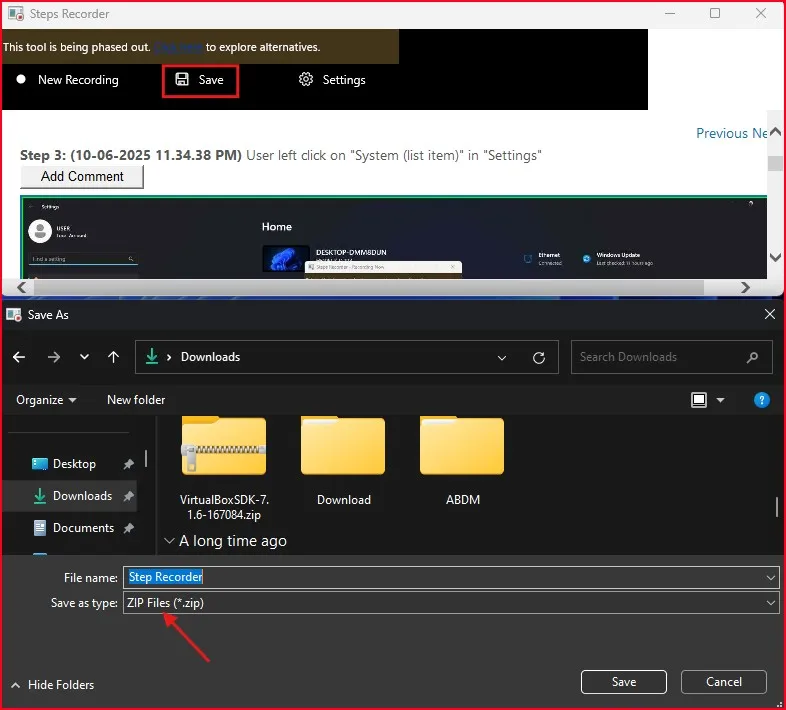
- Click Save to store the recording
- Choose your save location
- The file saves as a ZIP archive containing an MHT file
This MHT file can be opened in any web browser

- Emailing the ZIP file directly
- Uploading to cloud storage like OneDrive
- Adding as an attachment in a support ticket
- Posting in company knowledge bases or forums
The recordings are surprisingly compact, usually just a few MB even for lengthy sessions, making them easy to share via most platforms.
Keyboard shortcuts for efficient PSR usage
Power users love keyboard shortcuts, and Problem Steps Recorder has several that make documentation faster:
| Action | Shortcut |
| Start/Stop Recording | Alt+S |
| Pause/Resume | Alt+P |
| Add Comment | Alt+C |
| Open Settings | Alt+O |
| Exit PSR | Alt+X |
These shortcuts are particularly helpful when you’re trying to capture an issue that involves using the mouse in specific areas where clicking the PSR interface might disrupt your demonstration.
You can also launch PSR directly from the Run dialog (Win+R) by typing “psr” and pressing Enter, saving you several clicks when you need to quickly document something.
Still not sure how to get started? Watch my YouTube video to see the full demo in action.
Final Thought: A Handy Tool You Never Knew You Needed
The Windows 11 Problem Steps Recorder is the kind of tool you don’t know exists—until you really need it. Whether you’re helping a friend, contacting support, or documenting a process for your own memory, PSR is the quiet helper behind the scenes.
And the best part? It’s built into your computer. No downloads, no fancy setups.
So next time you’re stuck, or someone asks “What exactly did you do?” just fire up PSR and let it do the talking.
FAQ – Windows 11 Problem Steps Recorder
Is PSR available on all versions of Windows 11?
Yes, it comes built-in with all standard Windows 11 installations.
Can I record audio or video with PSR?
No, PSR only captures screenshots and descriptions of your clicks—not audio or video.
Is PSR safe to use?
Absolutely. It only records your screen actions during the session you start. You choose when to start and stop.
Can I edit the PSR file after recording?
No, the .mht file is not meant to be edited, but you can always add extra notes before sharing.
What if PSR doesn’t show up when I search for it?
Try pressing Win + R, type psr, and hit Enter. If it still doesn’t open, check if you’re using a restricted version of Windows (like Windows 11 SE or a managed school PC).