
Have you ever experienced your Slow PC while playing game or in serious video editing? Could it be your virtual memory settings? This secret setting is how Windows 11 makes use of your RAM to cache more data than you can fit in memory and mastering how to change virtual memory size is the difference between a high-quality computer experience or endless headaches.
Have probably fixed hundreds of systems with that one simple little tweak and the performance gains on a lot of them were astounding. Once you find where to look, the process is not complicated.
What is virtual memory and why it matters
If your computer does not have enough physical RAM, virtual memory is used to manage excessive information. When your RAM runs out of space, Windows 11 moves the least used data to what is called a page file (or swap file) on your hard drive. This one gives you a sense of having more memory than is actually there.
Think of it like you have a small desk (your RAM) and a filing cabinet which is located in another room (a hard drive). It’s like pushing a few papers you don’t need immediately aside to clear the space for what you do.
Why does this matter? Because without virtual memory, your computer to crash when the RAM runs out. And we all have experienced this. Voila, now things keep on running — more slowly at times, though.
How Windows 11 Manages Virtual Memory Automatically
Compared to previous versions, Windows 11 does a pretty solid job managing memory. By default, it sets your virtual memory size to about 1.5 times your installed RAM.
It constantly evaluates what data to keep in RAM for quick access and what can be safely offloaded to the page file. So your most-used apps and tasks remain fast, while background stuff gets pushed to virtual memory.
But sometimes, especially with memory-hungry tasks like gaming, editing, or large spreadsheets, you may need to take manual control—and change virtual memory size yourself.
When Should You Change Virtual Memory Size?
Increasing virtual memory space is not necessarily required; however you may want to increase it if:
- Your PC keeps freezing or slowing down
- You get errors like “Your system is low on virtual memory”
- You’re using heavy apps like Photoshop, AutoCAD, or large Excel files
- You have limited physical RAM (like 4GB or 8GB)
These symptoms might generally arise if your default virtual memory settings cannot and might not cope with your workload. Generally, power users such as heavy multitaskers, gamers, 3D designers, and video editors need more virtual memory than average users.
How to Change Virtual Memory Size in Windows 11
Let’s go step by step
Step1: First, click the Windows button on your taskbar or press the Windows icon from your keyboard. In the search bar, you need to enter advanced system settings and then click on Enter.
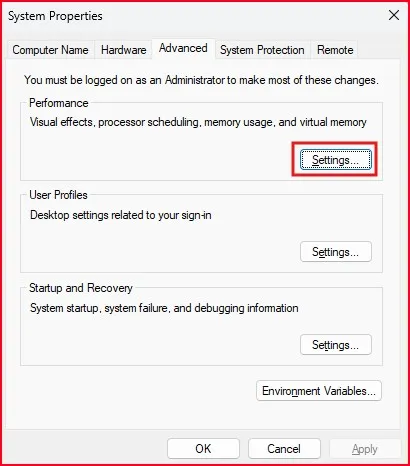
Step 2: Then System Properties window will appears, click on the Advanced tab. Under Performance, click Settings.
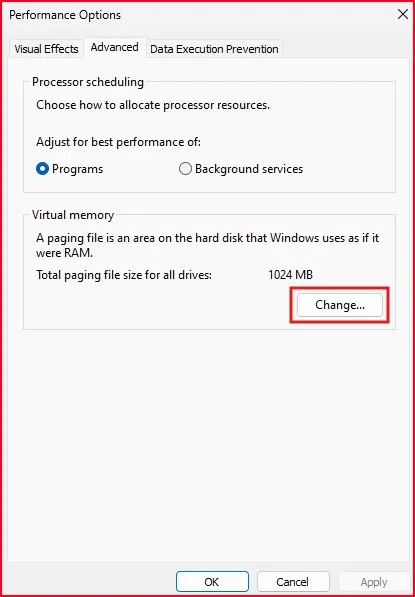
Step 3: On the Performance Options window, select the Advanced tab. Under Virtual memory, click Change.
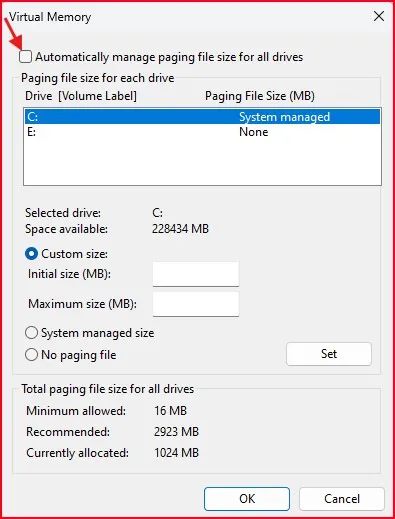
Step 4: Deselect the “Automatically manage paging file size for all drives” option. Select the Drive where Windows is installed (usually c:). Choose Custom size.
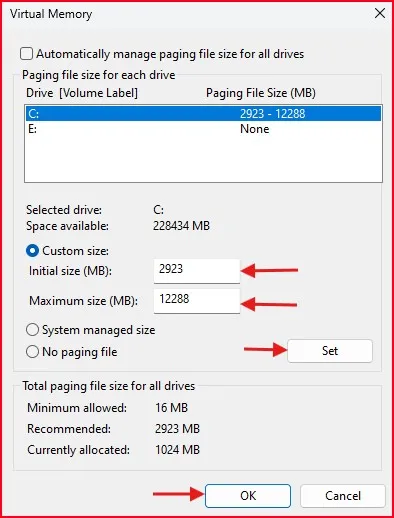
Now set your new values:
- Initial size (MB): Enter the recommended value that you can find at the bottom of this window.
- Maximum size (MB): 1.5 to 3x your RAM. E.g. 12288MB — 24576MB, if you have 8GB RAM (8192MB).
Example for 8GB RAM:
- Initial: 8192
- Maximum: 16384 or 24576
Step 5: Click the Set, then click OK on each open window. After that restart your computer to make these changes take effect
Upon restarting, the new Virtual Memory settings you created will be reflected on Windows.
You should notice that it runs much better, at least when you’re running memory-heavy processes or multitasking with a lot of programs open at once.
Final Thought
Now that you know how to change virtual memory size in Windows 11, you have boosted your PC performance, especially where physical RAM is limited
Of course, it is not going to turn your system into a supercomputer but can definitely help ease the slow downs and improve multi-tasking performance.
Want to go one step further? Check out my detailed guide on How to Reduce RAM and CPU Usage in Windows 11.
Frequently Asked Question (FAQ)
What does changing virtual memory size do in Windows 11?
It lets your system use a portion of your hard drive as “extra RAM” when needed. Knowing how to change virtual memory size in Windows 11 can improve performance during multitasking or running heavy apps.
Is it safe to change virtual memory size in Windows 11?
Yes, it’s perfectly safe as long as you follow the recommended size (1.5x to 3x your RAM). It’s a built-in feature of the OS.
Can increasing virtual memory size speed up my PC?
Yes, especially when physical RAM runs out. Learning how to change virtual memory size helps avoid performance slowdowns.
Do I need to restart my PC after changing virtual memory settings?
Yes, a system restart is required for the changes to take effect.
Can I set virtual memory size on an SSD instead of an HDD?
Yes! In fact, putting the virtual memory (page file) on an SSD can improve speed since SSDs are faster than HDDs.