
We’ve all been there—pushing the power button, waiting around for the PC to boot and half-wondering why we aren’t moving faster. If you’re using Windows 11 and your PC feels slow every time you turn it on, startup programs are often the culprit.
The good news? You don’t need to be a tech wizard to fix this. In this blog post, I’ll walk you through how to disable startup programs in Windows 11 in a simple, friendly way. This will help your computer boot faster and feel more responsive.
What Are Startup Programs in Windows 11
The first time you start your Windows 11 computer, dozens of programs silently spring into action in the background, and you don’t even know they’re running. These startup programs are applications, services, and processes that get loaded when your computer boots up so you can use them whenever they’re needed.
There are different classifications of your startup programs. System-critical services, such as Windows Security and audio drivers, are necessary to even operate a PC. And then you have software apps like Spotify, Steam or Microsoft Office that install with the default setting to open them whether you want to or not. There are lots of programs that add themselves to the startup process without asking for your permission, because it’s generally assumed that you’ll want them.
These applications do this by using trademarks to register themselves into the Windows registry of certain areas or start-up folders. When Windows 11 boots it looks in these places for apps to run that may have been running the last time you shut down and runs everything it finds. There are programs that you can see running in your system tray and then there are those that discreetly lurk in the background, eating up your computer’s resources.
Why You Should Disable Startup Programs
Here are some good reasons you may want to pare down those startup apps:
Faster boot time – Deactivating useless start-up launches on Win 11 brings that quick-and-easy boost to all of our computers. The most apparent benefit you’ll receive is when starting your computer as many are able to shave more than 50% off their boot time simply by fine tuning.
Improved performance – With less programs start automatically with Windows, your system will have more available memory. That means more RAM for your actual applications and it should translate to better multitasking performance, with fewer situations where your system gets sluggish because it’s running out of memory.
Longer lifespan for your Laptop Battery – The less running programs you have, the more your battery life on your laptop will be. Background applications, while open, always use CPU and keep hardware input or output devices active on behalf of an app to which they belong even when the user is not directly using that app.That’s going to significantly extend laptop battery life, by not allowing all that junk to launch at startup.
Simply put, the less junk we have starting up along with us, the better Windows 11 will run.
How to Disable Startup Programs on Windows 11
Don’t worry, this is easier than it sounds. You won’t break your computer by doing this. Just follow the steps below.
Method 1 – Using Task Manager
- Right-click the Taskbar and select Task Manager.
- Or press Ctrl + Shift + Esc.
- Once Task Manager opens, click on the Startup apps tab.
- You’ll see a list of programs with their “Startup impact” (Low, Medium, High).
- And of course, just switch Off for the ones you don’t want started automatically.
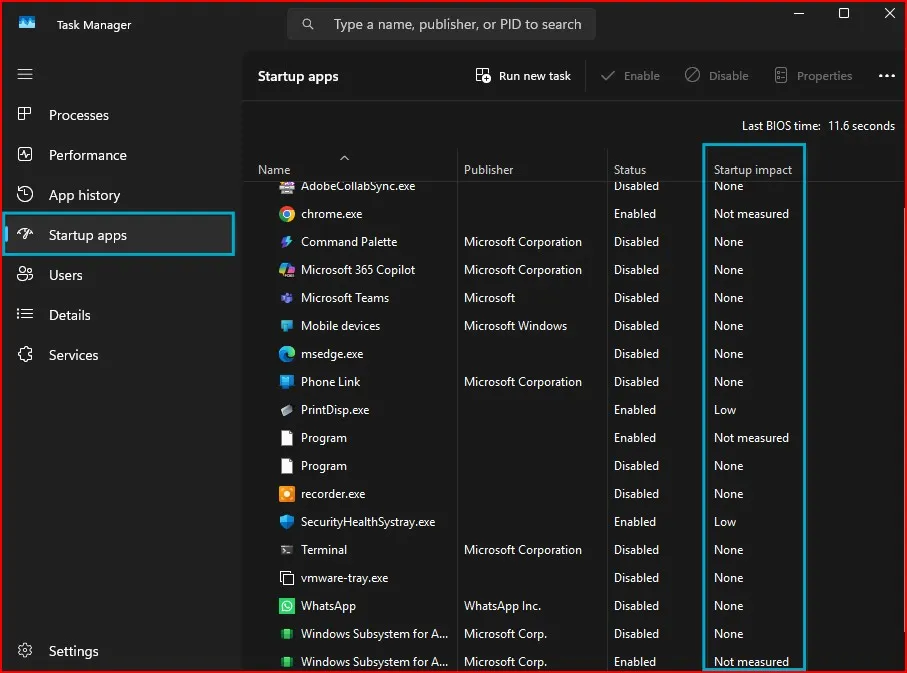
Pro tip: Disable apps with High impact unless you absolutely need them at startup.
Method 2 – Using Windows Settings
- Click Start and go to Settings.
- From the left panel, select Apps.
- Click on Startup.
- A list of apps with toggle buttons appears.
- Simply switch Off for the ones you don’t want starting automatically.
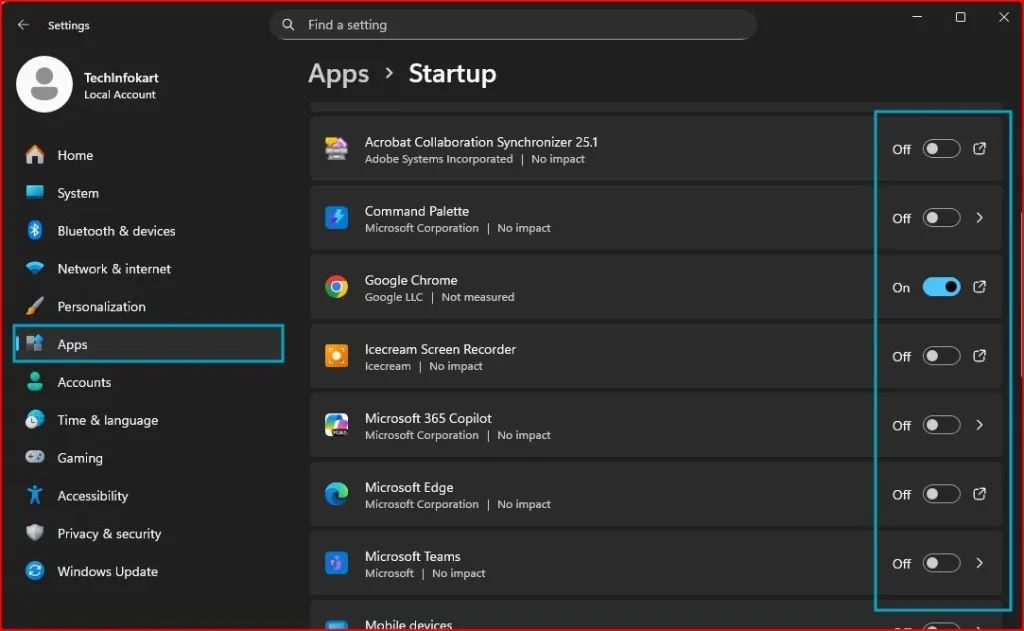
That’s it! You’ve successfully managed startup programs.
If you’d like a more detailed guide with screenshots, you can also check out this helpful article from AVG on how to manage startup programs in Windows
Method 3 – Using System Configuration Utility (MSConfig)
This method is for those who want another way to manage startup programs besides Task Manager and Settings.
- Press Windows + R on your keyboard.
- This opens the Run dialog box.
- Type msconfig and press Enter.
- The System Configuration Utility window will appear.
- Go to the Startup tab.
- In Windows 11, this tab usually provides a shortcut to open Task Manager for startup programs.
- But in some cases, depending on your version, you may still get a list of startup apps here.
- If you see the shortcut to Task Manager,just click on it and move on with managing startup items.
- If your system still shows the list in MSConfig, uncheck the apps you don’t want at startup.
- Click Apply and then OK.
- Reboot your computer for the changes to be applied.
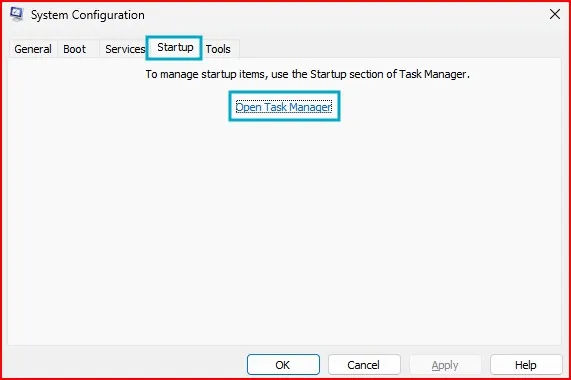
Note: MSConfig is a system-level tool, so you need to know what you are doing and don’t touch anything else when using it. Just use the Startup -tab.
Method 4 – For Advanced Users (If You’re Comfortable With Regedit)
You can of course use the Registry Editor or MSConfig for more civilian options, but be careful with msconfig. Most users do not need it.Stick to Task Manager or Settings unless you’re comfortable with advanced tools.
If you’re familiar working with your system’s registry, direct registry editing is the most comprehensive method for controlling the startup programs Windows 11. This method also allows you to detect startup items that are hidden deep in the third level of system registry.
Open Registry Editor by typing “regedit” in the Start menu.Your primary targets are the Run keys located at:
- HKEY_CURRENT_USER\Software\Microsoft\Windows\CurrentVersion\Run
- HKEY_LOCAL_MACHINE\Software\Microsoft\Windows\CurrentVersion\Run
- HKEY_LOCAL_MACHINE\Software\Microsoft\Windows\CurrentVersion\RunOnce
The HKEY_CURRENT_USER location is for startup programs related to your user account, the HKEY_LOCAL_MACHINE one affects all users on the computer. You’ll find entries for the names of programs and their file paths. Right-click any that you want to prevent starting automatically in autostart programs windows 11, and click “Delete” – always export the registry first via File > Export.
Final Thoughts
If your Windows 11 system is taking forever to boot, don’t worry: It’s usually because you have too many of your apps loading up at startup.Disable startup programs in Windows 11 via knowing how to disallow them from opening when you boot and you may be able to make your computer boot faster and get things done more smoothly without upgrading its hardware.
It’s just a few minutes of work, but the difference in performance is immediately noticeable.
And if you want to go even further, I’ve written another helpful guide: 10 Best Windows 11 Settings for Maximum Performance. It covers additional tweaks that can make your computer run like new.
Frequently Asked Question (FAQ)
Is it safe to disable startup programs in Windows 11?
Yes. It’s safe to disable apps like Spotify, Skype, or Steam. Just don’t disable antivirus or drivers.
Will disabling startup programs delete them?
No. The apps remain installed; they just won’t launch when you start your PC.
Can I re-enable startup apps later?
Yes. You can always go back into Task Manager or Settings and enable them again.
Does this improve gaming performance?
Definitely. Freeing up memory and CPU helps games run smoother.
How often should I check startup programs?
Every couple of months, especially after installing new apps.