
Imagine turning on your laptop, ready to work or watch something online — and suddenly WiFi not showing in Windows 11, the WiFi option is completely gone. No WiFi icon. No wireless networks. Only Ethernet showing in Settings.
If this is a problem you are facing in Windows 11, you should not worry. This is actually a pretty common problem, and in most instances it’s due to drivers, services or minor network hiccups — not hardware failure. In this guide, I’m going to explain step by step ways how you can fix the issue due to which your internet is not working.
Why Is WiFi Not Showing in Windows 11?
When WiFi disappears, it usually happens because of:
- A corrupted or missing WiFi driver
- Disabled network services
- Windows update issues
- Incorrect network settings
It could be a hardware problem, but very rarely. Don’t worry about that — we’ll go through everything step by step.
Step 1: Restart Your Laptop (Yes, Really)
Before trying anything technical, restart your PC.
Sometimes Windows fails to load the wireless network adapter properly. A regular restart refreshes everything and restores the WiFi icon.
If it is still missing, follow the next step.
Step 2: Run the Windows Network Troubleshooter
In case WiFi is not visible in Windows 11, the very first appropriate way to get better should be the phenomenal Network Troubleshooter which comes within. This tool automatically checks common issues like disabled adapters, incorrect settings, or minor driver problems.
Follow these steps carefully:
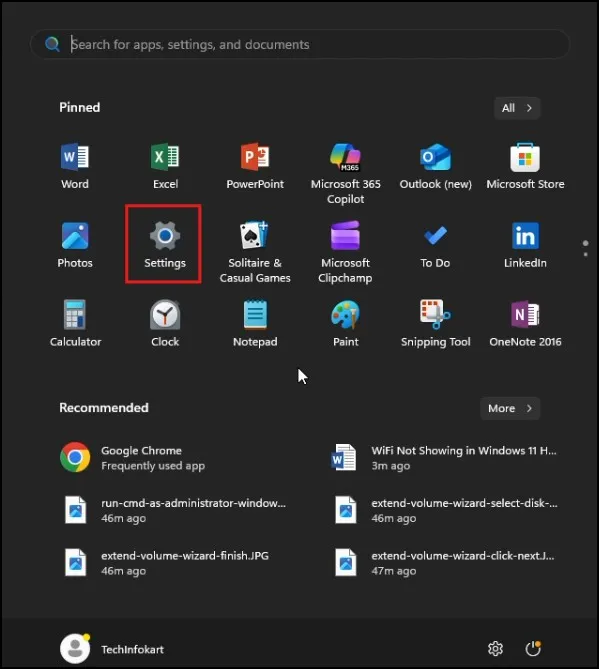
- Click on the Start button in the bottom-left corner of your screen. Then click on Settings (the gear icon).
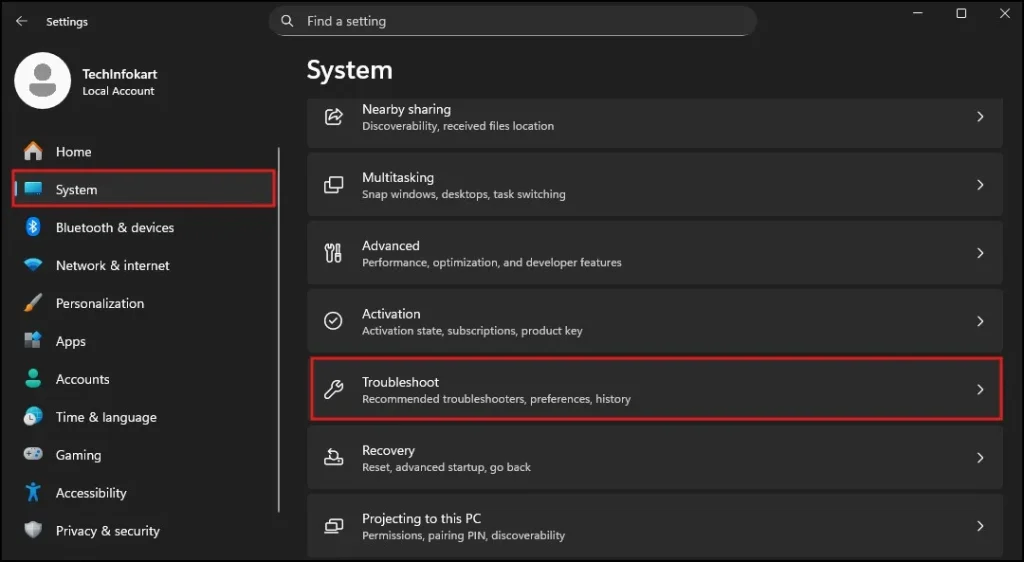
- In the Settings window, click on System from the left side menu. Scroll down a little and click on Troubleshoot.
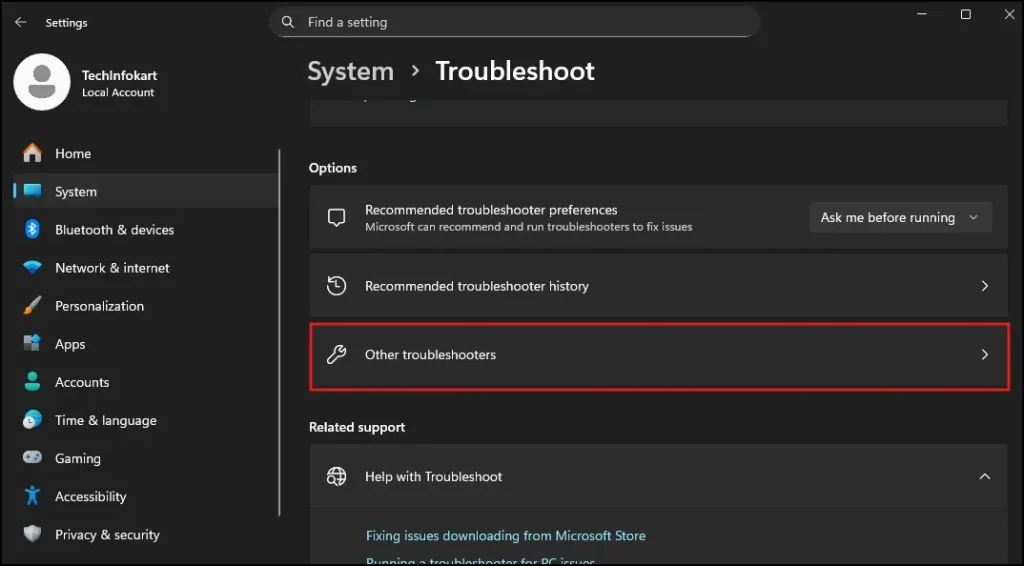
- Now click on Other troubleshooters.
- Find Network and Internet in the list. Click the Run button next to it.
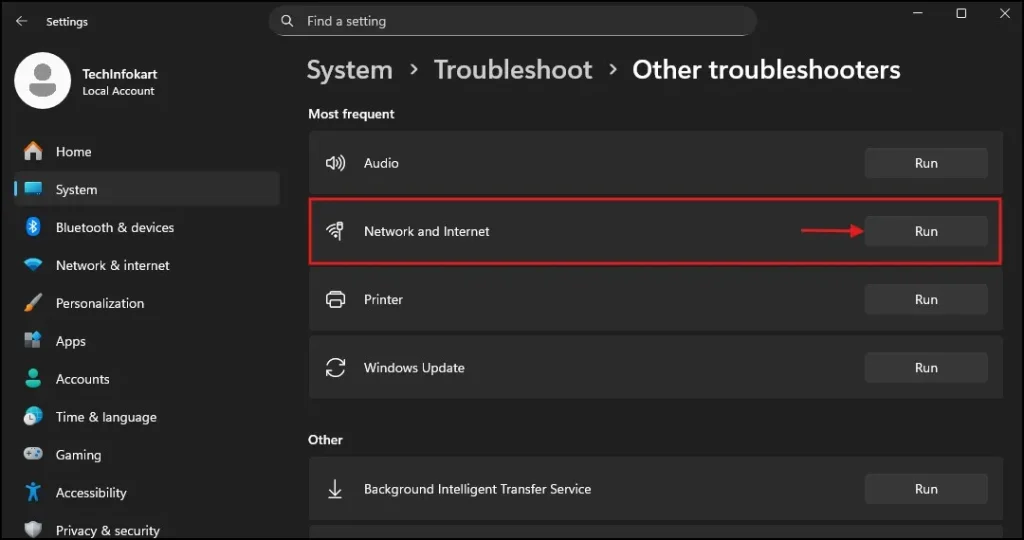
Windows will now start scanning your system. Be patient as it scans for network issues. It will then either correct automatically or, if it detects some problem, display onscreen instructions for you instead. Follow whatever it suggests.
Once the process completes, see if the WiFi icon is back. If WiFi is still not displayed in Windows 11, don’t worry — go on to the next step.
Step 3: Check If the WiFi Adapter Is Disabled
The WiFi adapter might not even be missing — it may only be disabled. This may happen some Windows updates or accidental changes.
Here’s how to check:
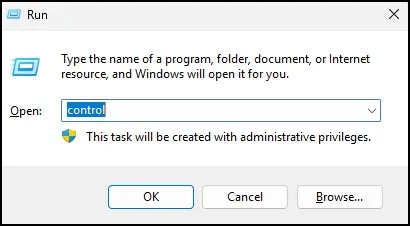
- Press Windows + R on your keyboard.
- Type control and press Enter to open the Control Panel.
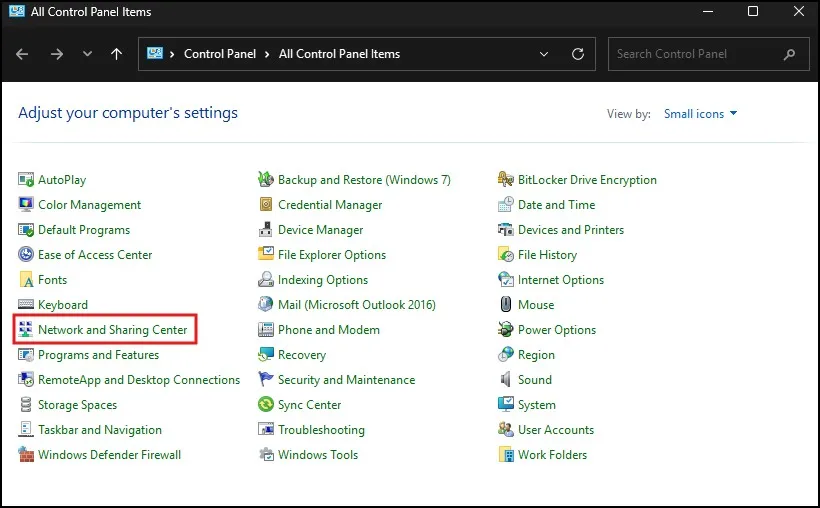
- Click on Network and Internet.
- Then click on Network and Sharing Center.
- On the left-hand side, click Change adapter settings.
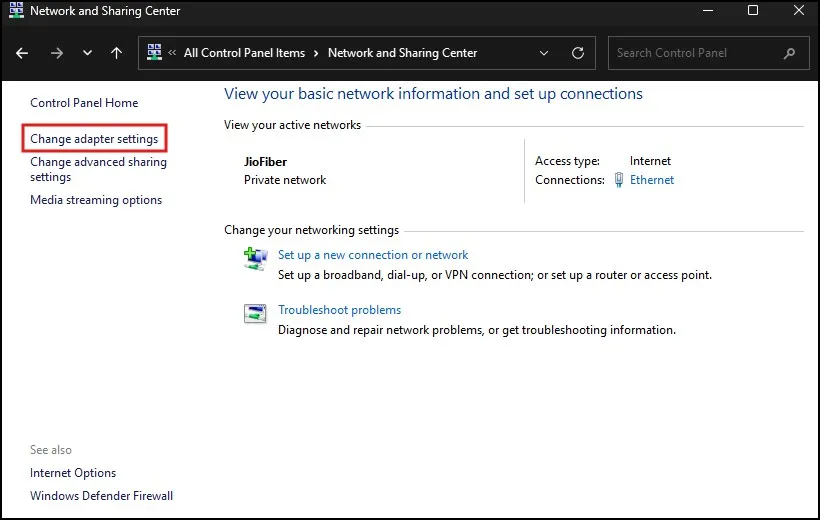
You will now see a list of network connections.
Look for an icon named WiFi or Wireless Network Connection.
- If it appears greyed out, that means it is disabled.
- Right-click on it and click Enable.
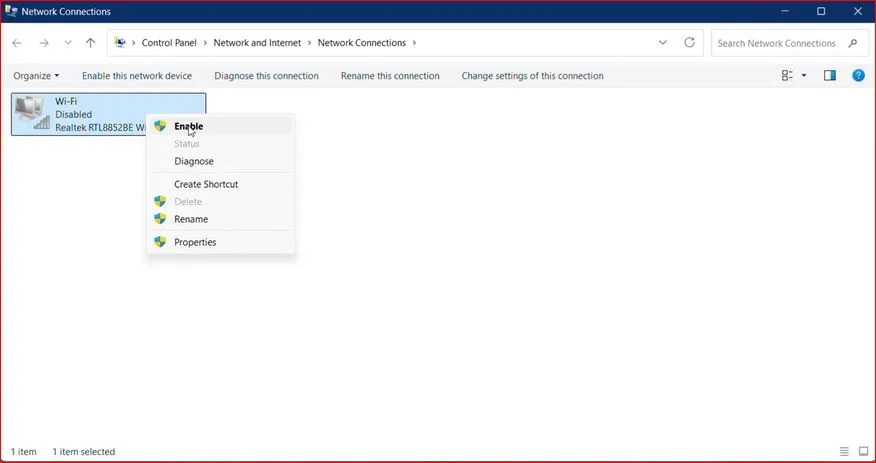
- Wait a few seconds for it to turn active.
If it is already enabled:
- Right-click it
- Click Disable
- Wait 5–10 seconds
- Right-click again and click Enable
This refreshes the adapter and often fixes the WiFi missing problem.
If you do not see WiFi listed here at all, move to the next step.
Step 4: Check the WiFi Driver in Device Manager
In case, if you don’t see the adapter listed then it’s a WiFi driver issue.
Drivers let Windows talk to hardware. If the driver is missing or corrupted, WiFi will not show.
Follow these steps:
- Click on the Search bar.
- Type Device Manager and open it.
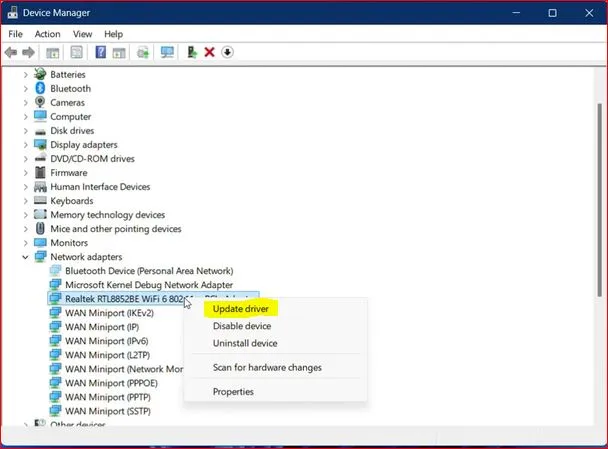
- In the Device Manager window, locate Network adapters.
- Click the small arrow next to it to expand the list.
Now carefully check for your WiFi adapter. It may have names like:
- Intel Wireless
- Realtek Wireless
- Qualcomm Atheros
- Broadcom WiFi
If you see your WiFi driver:
- Right-click on it.
- Click Update driver.
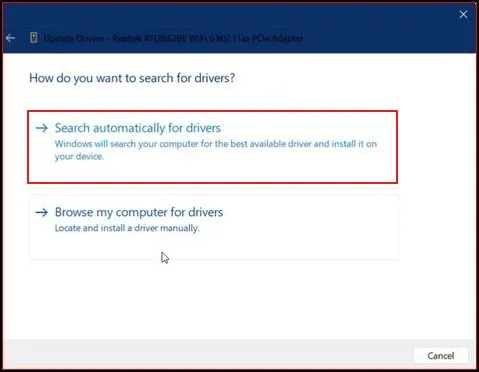
- Choose Search automatically for drivers.
If updating doesn’t work:
- Right-click again.
- Click Uninstall device.
- Restart your PC.
Windows will automatically reinstall the driver after restart.
If you do NOT see any WiFi driver:
- Click on View from the top menu.
- Select Show hidden devices.
- Then click Action.
- Select Scan for hardware changes.
Wait a short bit (few seconds) and see if WiFi driver shows up.
If it doesn’t, you’ll have to go on another device and download the driver manually from your laptop manufacturer’s website.
Step 5: Make Sure WLAN AutoConfig Is Running
This is one of the most important steps.
If this service is stopped, WiFi will not appear at all in Windows 11.
Follow these steps:
- Type services in search
- A new window called Services will open.
- Scroll down slowly until you find WLAN AutoConfig.
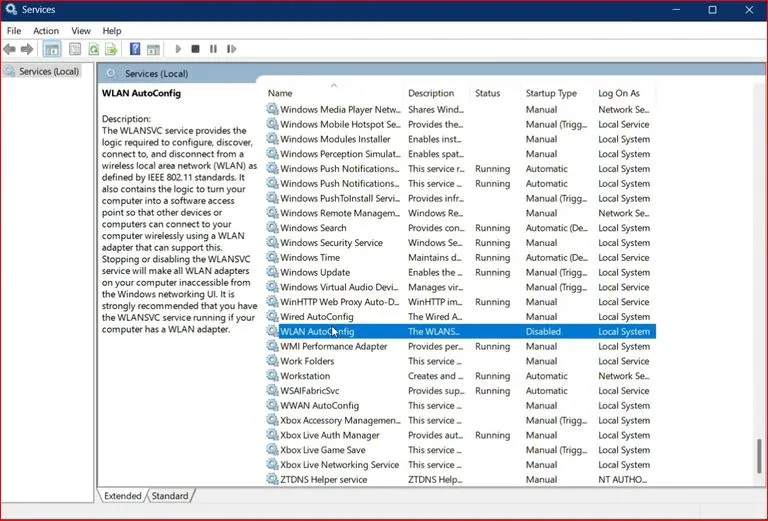
- Double-click on it.
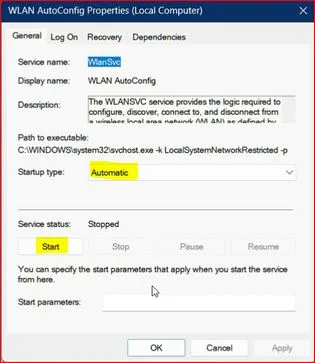
A properties window will open.
Now check:
- If Startup type is set to Disabled, change it to Automatic.
- If the Service status shows Stopped, click the Start button.
- Then click Apply.
- Click OK.
Close the Services window and check if WiFi is visible now.
If WiFi is still not showing in Windows 11, continue to the next solution.
Step 6: Perform a Network Reset
If smaller fixes did not work, it’s time to reset all network settings completely.
This will remove and reinstall all network adapters and reset configurations to default.
Here’s how:
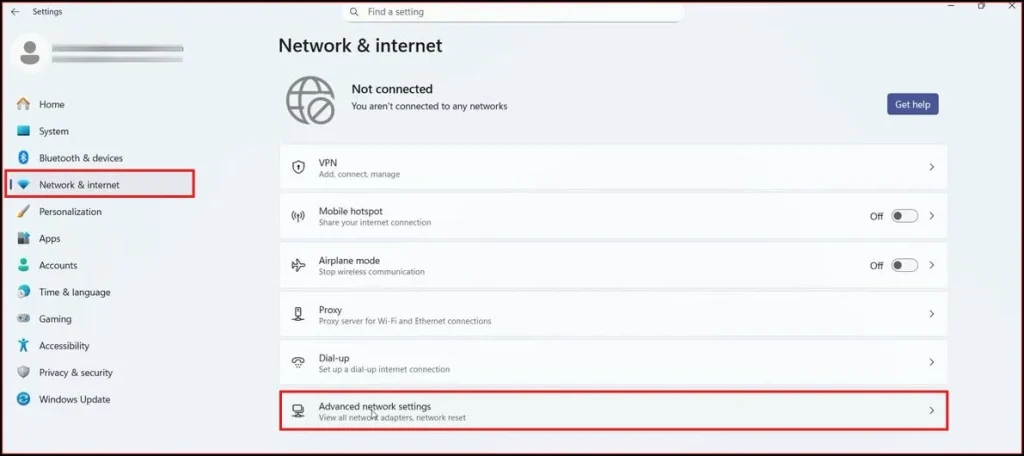
- Open Settings.
- Click Network & Internet.
- Scroll down and click Advanced network settings.
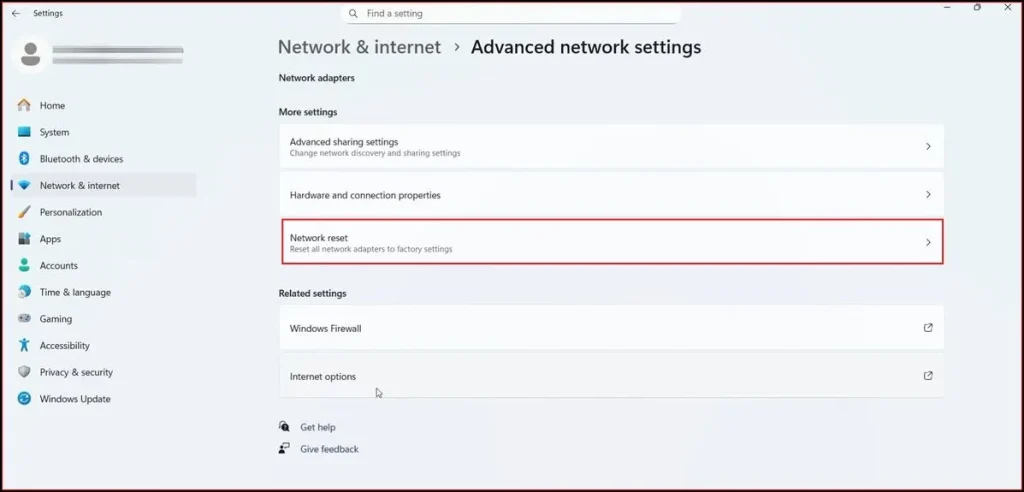
- At the bottom, click Network reset.
- Click Reset now.
- Click Yes to confirm.
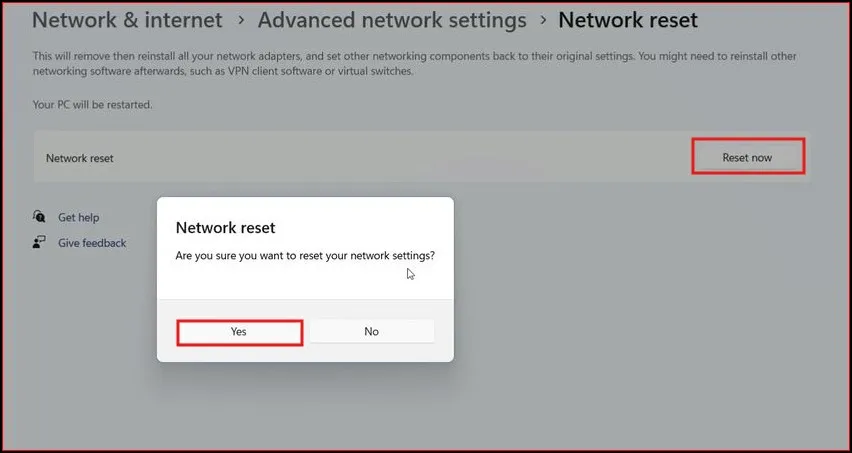
Windows will show a message that your PC will restart in a few minutes.
Wait for the restart.After reboot, check whether WiFi has returned.
Step 7: Use Command Prompt Network Reset (Advanced Fix)
If WiFi is still missing, this advanced step resets the core networking system inside Windows. Learn more about the Network Reset feature in Windows.
Do the following:
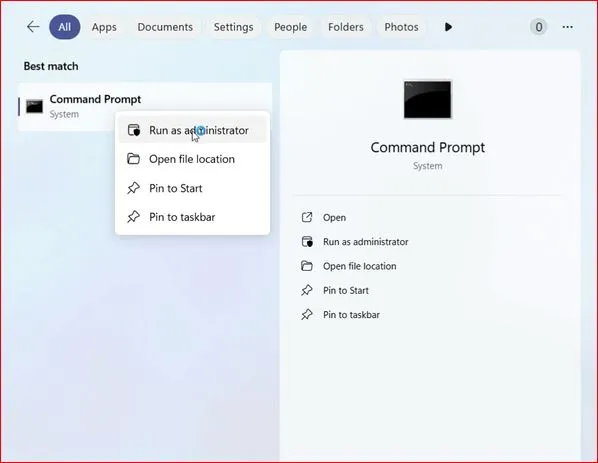
- Click the Search icon.
- Type CMD.
- Right-click Command Prompt.
- Select Run as administrator.
- Click Yes if prompted.
Now type the first command:
netshwinsock reset
Press Enter.
You should see a confirmation message saying the Winsock catalog was successfully reset.
Now type the second command:
netsh int ip reset
Press Enter again.
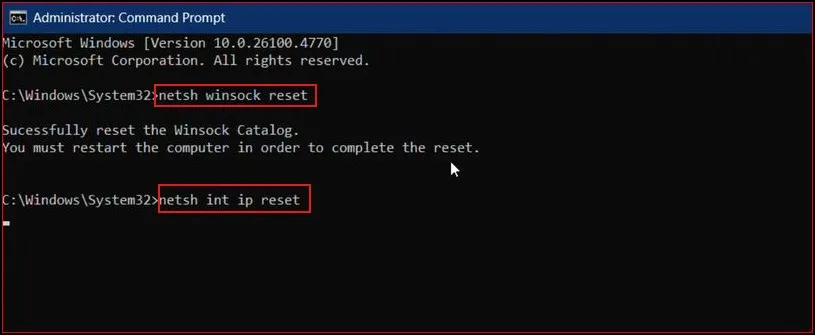
You may see several “Resetting OK” messages.
When both commands have finished, close Command Prompt. Now restart your computer. After your PC turns back on, see if the WiFi icon has come back.
If your WiFi connects but shows “No Internet” or displays a “WiFi doesn’t have a valid IP configuration” error, check out our detailed guide on how to fix the WiFi doesn’t have a valid IP configuration issue in Windows 11/10 for step-by-step solutions.
Final Thoughts
Don’t worry, if your WiFi not showing in Windows 11. For the most part, it’s a minor software problem that can be corrected in minutes.
Begin with some basic steps, such as restart and run troubleshooter. Then drivers and services if necessary. One of these ways will always fix the issue. Take things one step at a time, remain patient and you will soon be back connected to your WiFi.
Frequently Asked Questions (FAQs)
Why is my WiFi completely missing in Windows 11?
Usually due to driver issues, disabled services, or network configuration errors.
Does network reset delete my personal files?
No. It only resets network settings.
How do I know if my WiFi hardware is damaged?
If drivers reinstall correctly but WiFi still doesn’t appear, hardware may be faulty — but this is rare.
Can a Windows update cause WiFi issues?
Yes. Sometimes updates install incompatible drivers.
Do I need internet to fix this issue?
Not always. Most fixes work offline. You only need internet to download drivers manually.