How to Fix “Extend Volume Greyed Out” Error in Windows 10/11

If you opened Disk Management to extend your C drive and saw “Extend Volume” greyed out, you probably felt stuck. The unallocated space is clearly visible. But Windows simply won’t let you use it.

Don’t worry — this is a very common issue in Windows 10 and Windows 11. In this guide, I’ll explain why the Extend Volume greyed out problem happens and show you the exact steps to fix it safely.

Why Is Extend Volume Greyed Out?

Windows has one important rule.

You cannot extend a partition if unallocated space is not directly next to it on the right.

If there’s a small recovery partition wedged between your C drive and the unallocated space, extending your main partition will be disabled.

That’s why you may see:

  • Extend Volume greyed out
  • Cannot extend C drive
  • Unallocated space not usable
  • Disk Management extend volume disabled
If you opened Disk Management to extend your C drive and saw “Extend Volume” greyed out, you probably felt stuck.The unallocated space is clearly visible. But Windows simply won’t let you use it.
Don’t worry — this is a very common issue in Windows 10 and Windows 11. In this guide, I’ll explain why the Extend Volume greyed out problem happens and show you the exact steps to fix it safely.
Why Is Extend Volume Greyed Out?
Windows has one important rule.
You cannot extend a partition if unallocated space is not directly next to it on the right. 
If there’s a small recovery partition wedged between your C drive and the unallocated space, extending your main partition will be disabled. 
That’s why you may see:
•	Extend Volume greyed out
•	Cannot extend C drive
•	Unallocated space not usable
•	Disk Management extend volume disabled Pic1
It’s not a bug. It’s just how Windows Disk Management works.
How to Fix Extend Volume Greyed Out in Windows 10/11
Follow these steps carefully. If you take it step by step, it is an easier process.
Step 1: Check Your Disk Layout
Press Windows + X and click Disk Management.
Now look at your partitions.
You’ll usually see something like this:
•	System Reserved
•	C Drive
•	Recovery Partition
•	Unallocated Space
So if Recovery partition is between C drive and unallocated space, then this is the reason you can’t extend C drive. Pic2
Step 2: Open Command Prompt as Administrator

Now, we’ll delete the recovery partition that prevents C from being extended. 
The first task is to tap on the Start button. In the search bar, type cmd. Right-click Command Prompt from the results and select Run as administrator. In case Windows prompts for permission, click Yes. Pic3
A black window will open. This is where we’ll type a few commands carefully.
Enter into the black window: diskpart and enter. 
DiskPart is a native tool in Windows that we can use to manage disks/partitions. 
Then enter: list disk and hit enter again. This will display all of the disks connected to your computer. If there is nothing other than a single internal hard drive or SSD, it will typically appear as Disk 0. 
Now enter: select disk 0, and press Enter. This tells Windows that we want to work with Disk 0.
Next, type: list partition. You’ll now see a list of all partitions on that disk, along with their sizes. Pic4
Carefully look at the sizes. The recovery partition is usually small — around 500 MB to 1000 MB. That’s the one blocking your unallocated space.Take your time here. Make sure you identify the correct partition.

Step 3: Delete the Recovery Partition

Once you’ve confirmed the recovery partition number, it’s time to select it.
Now type: select partition 3. Then press Enter.
(Important: Replace 3 with the actual number of your recovery partition.)
After selecting it, type: delete partition override and press Enter.
This command forces Windows to delete that recovery partition.
After the command is executed successfully, type: exit and hit enter and close Command Prompt window. Pic5
Note: Make sure that the partition number is correct before you delete anything. Do NOT delete your C drive. Do NOT remove the System Reserved partition. Be careful; deleting the wrong partition can have dire consequences. 

Step 4: Extend the C Drive

Now let’s complete the process. Go back to Disk Management. You should see that the unallocated space is directly adjacent to your C drive now. The recovery partition doesn't block it anymore. 
Right-click on your C drive.This time, you’ll see that the Extend Volume option is no longer greyed out. Pic6
Click Extend Volume. The Extend Volume Wizard will open. Click Next. Pic7
Click Next again (Windows will automatically select the available space). Pic8
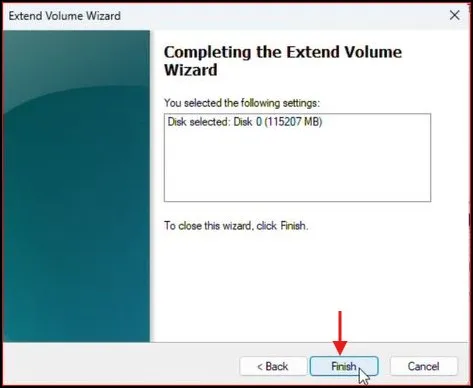
Then click Finish. Pic9
That’s it. Your C drive has now been successfully extended, and the unallocated space has been added to it. Pic10
What Happens After Fixing It?
After completing the steps:
•	C drive size increases
•	Unallocated space disappears
•	Extend Volume works normally
•	No more Extend Volume greyed out issue
You’ve successfully fixed the problem.
Final Thoughts
The Extend Volume greyed out issue seems a bit complicated initially, but it can be fixed simply if you get how the partition system functioning. 
Windows can only extend a drive when the unallocated space is positioned correctly. Removing the recovery partition allows you to merge the space properly.
Follow the steps carefully, double-check everything, and you’ll extend your C drive without any trouble.
Also Read: How to Fix “The Disk Is Write Protected” USB Error

It’s not a bug. It’s just how Windows Disk Management works.

How to Fix Extend Volume Greyed Out in Windows 10/11

Follow these steps carefully. If you take it step by step, it is an easier process.

Step 1: Check Your Disk Layout

Press Windows + X and click Disk Management.

Now look at your partitions.

You’ll usually see something like this:

  • System Reserved
  • C Drive
  • Recovery Partition
  • Unallocated Space

So if Recovery partition is between C drive and unallocated space, then this is the reason you can’t extend C drive.

Small recovery partition between C drive and unallocated space in Disk Management

Step 2: Open Command Prompt as Administrator

Now, we’ll delete the recovery partition that prevents C from being extended.

The first task is to tap on the Start button. In the search bar, type cmd. Right-click Command Prompt from the results and select Run as administrator. In case Windows prompts for permission, click Yes.
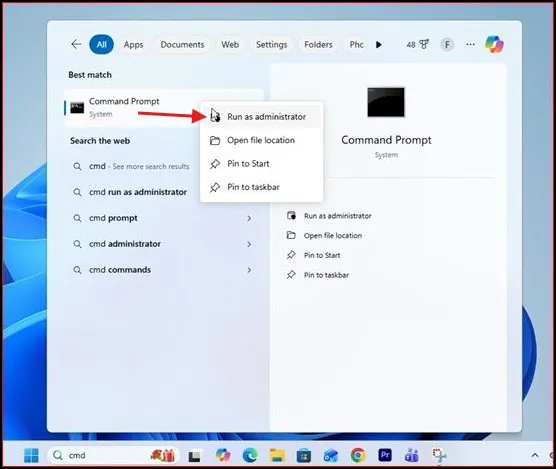
Typing cmd and selecting Run as administrator in Windows search

A black window will open. This is where we’ll type a few commands carefully.

Enter into the black window: diskpart and enter.

DiskPart is a native tool in Windows that we can use to manage disks/partitions.

Then enter: list disk and hit enter again. This will display all of the disks connected to your computer. If there is nothing other than a single internal hard drive or SSD, it will typically appear as Disk 0.

Now enter: select disk 0, and press Enter. This tells Windows that we want to work with Disk 0.

Next, type: list partition. You’ll now see a list of all partitions on that disk, along with their sizes.

DiskPart commands list disk select disk 0 and list partition in Command Prompt

Carefully look at the sizes. The recovery partition is usually small — around 500 MB to 1000 MB. That’s the one blocking your unallocated space. Take your time here. Make sure you identify the correct partition.

Step 3: Delete the Recovery Partition

Once you’ve confirmed the recovery partition number, it’s time to select it.

Now type: select partition 3. Then press Enter.

(Important: Replace 3 with the actual number of your recovery partition.)

After selecting it, type: delete partition override and press Enter.

This command forces Windows to delete that recovery partition.

After the command is executed successfully, type: exit and hit enter and close Command Prompt window.
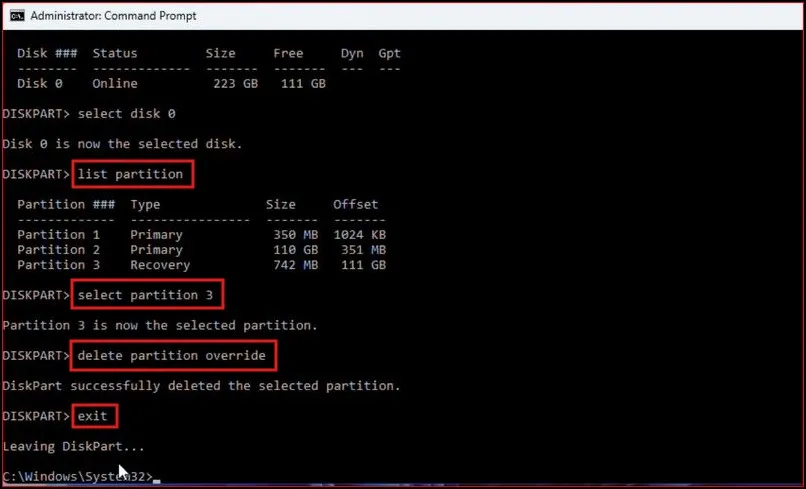
DiskPart commands select partition 3 delete partition override and exit

Note: Make sure that the partition number is correct before you delete anything. Do NOT delete your C drive. Do NOT remove the System Reserved partition. Be careful; deleting the wrong partition can have dire consequences.

Step 4: Extend the C Drive

Now let’s complete the process. Go back to Disk Management. You should see that the unallocated space is directly adjacent to your C drive now. The recovery partition doesn’t block it anymore.

Right-click on your C drive. This time, you’ll see that the Extend Volume option is no longer greyed out.
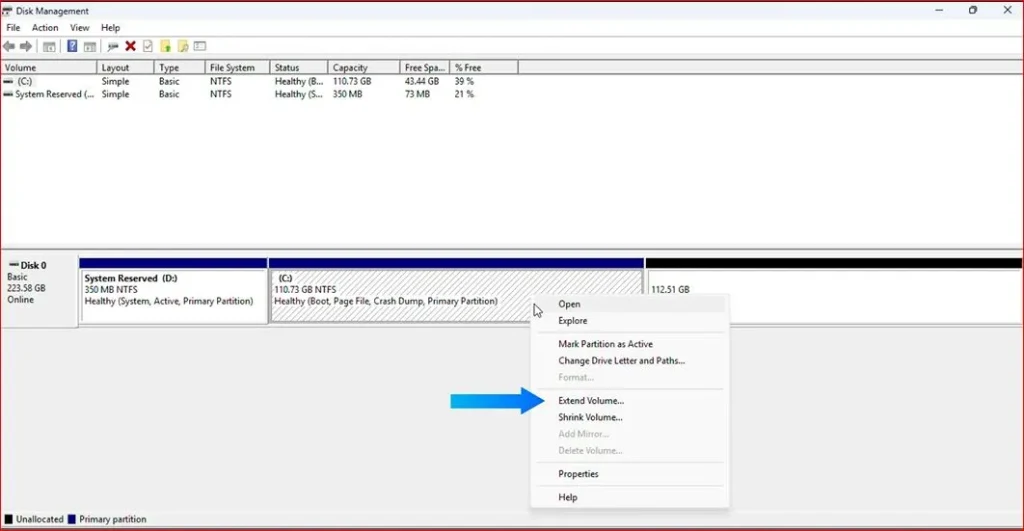
Extend Volume option enabled after deleting recovery partition

Click Extend Volume. The Extend Volume Wizard will open. Click Next.

Extend Volume Wizard first screen with Next button

Click Next again (Windows will automatically select the available space).
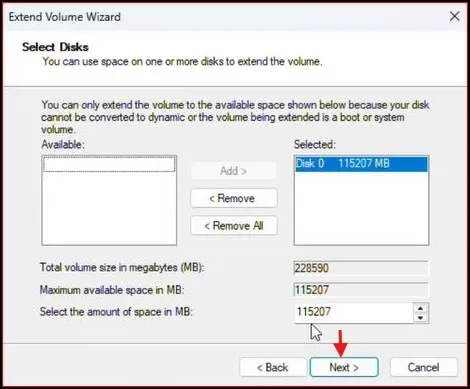
Extend Volume Wizard automatically selecting available unallocated space

Then click Finish.

Extend Volume Wizard final screen with Finish button

That’s it. Your C drive has now been successfully extended, and the unallocated space has been added to it.
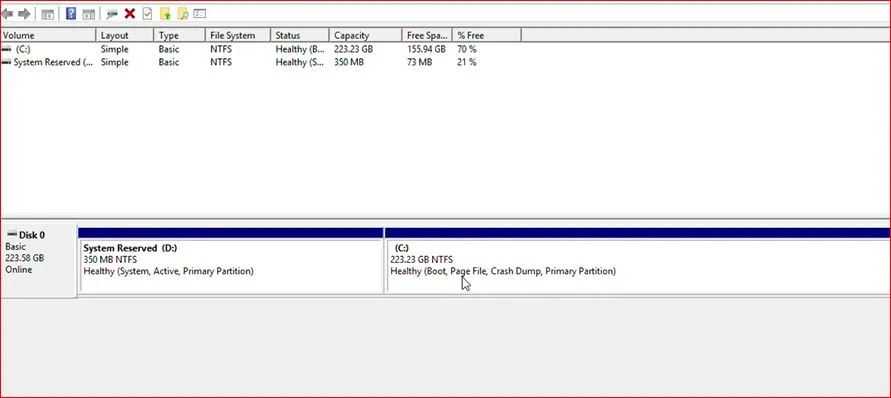
C drive extended successfully with increased disk size in Disk Management

What Happens After Fixing It?

After completing the steps:

  • C drive size increases
  • Unallocated space disappears
  • Extend Volume works normally
  • No more Extend Volume greyed out issue

You’ve successfully fixed the problem.

Final Thoughts

The Extend Volume greyed out issue seems a bit complicated initially, but it can be fixed simply if you get how the partition system functioning.

Windows can only extend a drive when the unallocated space is positioned correctly. Removing the recovery partition allows you to merge the space properly.

Follow the steps carefully, double-check everything, and you’ll extend your C drive without any trouble.

Also Read: How to Fix “The Disk Is Write Protected” USB Error

Frequently Asked Questions (FAQs)

Why is Extend Volume greyed out in Windows 11?

Because the unallocated space is not directly next to the C drive. A recovery partition is usually blocking it.

Can I fix Extend Volume greyed out without deleting the recovery partition?

Not using built-in Disk Management. You would need third-party partition software.

Is it safe to delete the recovery partition?

Yes, but it removes Windows Recovery Environment. You can create a recovery USB before deleting it.

Does this method work in Windows 10?

Yes. The steps are the same for Windows 10 and Windows 11.

Will I lose my files?

No, if you delete only the recovery partition and not your C drive.

Leave a Comment