
You plugged a USB drive into your computer, and you tried to drag some files onto it, but you couldn’t– the disk is Write Protected error kept popping up. You try again, maybe even reboot your PC, but to no avail. You can open the files, but you simply cannot delete copy or format anything.
This is a pretty common issue and fortunately it can be fixed quite easily. In this guide, I’ll show you how to resolve the disk is write protected error on USB drive using easy and proven steps.
What Does “The Disk Is Write Protected” USB Error Mean?
When your system shows the disk is write protected USB error, it simply means your USB drive has become read-only.

That means:
- You can open and copy files from the USB
- You cannot copy files to the USB
- You cannot delete files
- You cannot format the USB drive
Your computer is blocking any changes to protect the drive. This protection can be intentional or caused by a problem.
Method 1: Check the Physical Write Protection Switch
Before trying anything technical, check this first.
Some USB drives and SD card adapters have a small switch on the side, which can be toggled to lock.
What to do:
- Remove the USB drive from your PC
- Look carefully at all sides
- If there is a switch labelled Lock / Unlock, set it to Unlock
- Unplug the USB and try again
If the USB does not have a switch, proceed with the next method
Method 2: Fix The Disk Is Write Protected USB Using CMD
This is one of the most effective methods and works in many cases.
Steps:
- Press Windows + S and type CMD
- Right-click on Command Prompt
- Select Run as administrator
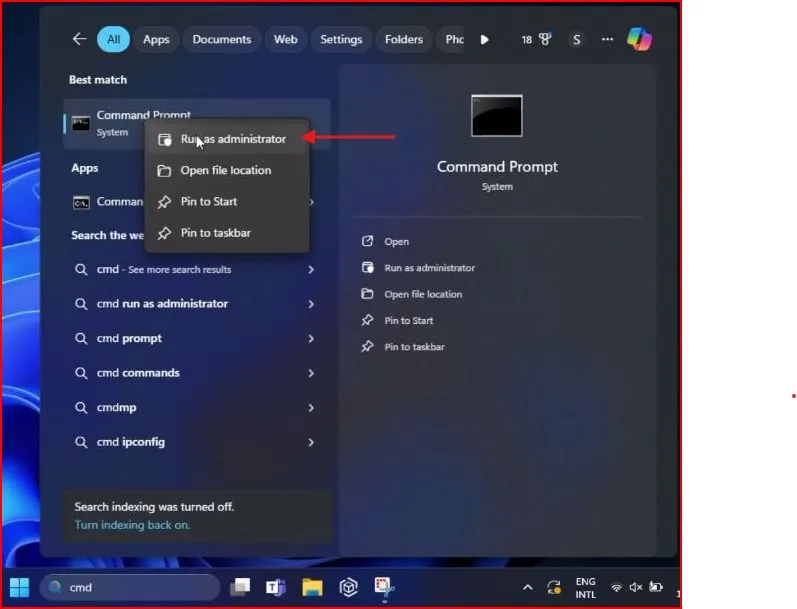
Now type the following commands one by one, pressing Enter after each:
diskpart
list disk
Look at the list and identify your USB drive by checking the size.
select disk X
(Replace X with your USB disk number)
attributes disk clear readonly
exit
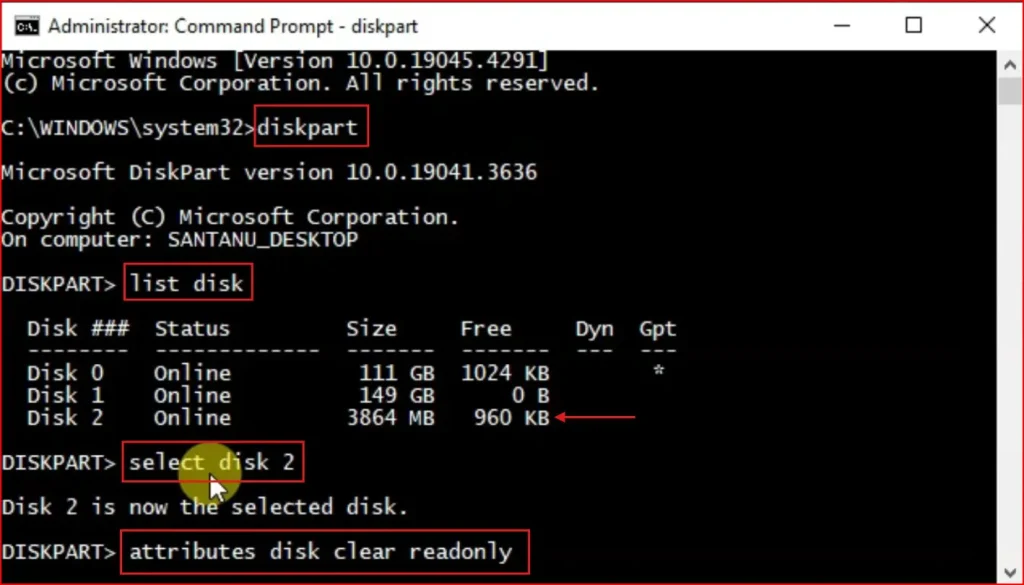
Now safely remove the USB and reconnect it.
In many cases, this method alone fixes the disk is write protected USB error.
In my YouTube video, I show this CMD method in real time so you can clearly see which disk to select and which commands to type.
Method 3: Registry Editor Fix for The Disk Is Write Protected USB
If CMD doesn’t work, this method often helps.
Steps:
- Press Windows + R
- Type regedit and press Enter
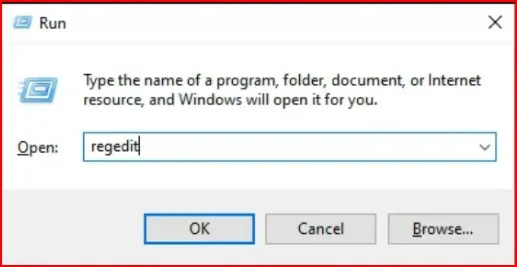
- Navigate to the following path:
HKEY_LOCAL_MACHINE\SYSTEM\CurrentControlSet\Control\StorageDevicePolicies

If StorageDevicePolicies is missing, you can create it manually.
If StorageDevicePolicies Is Missing – Create It Manually
If you do not see StorageDevicePolicies in the Registry Editor, don’t worry. You can create it yourself safely.
- In Registry Editor, right-click on the Control folder
- Click New → Key
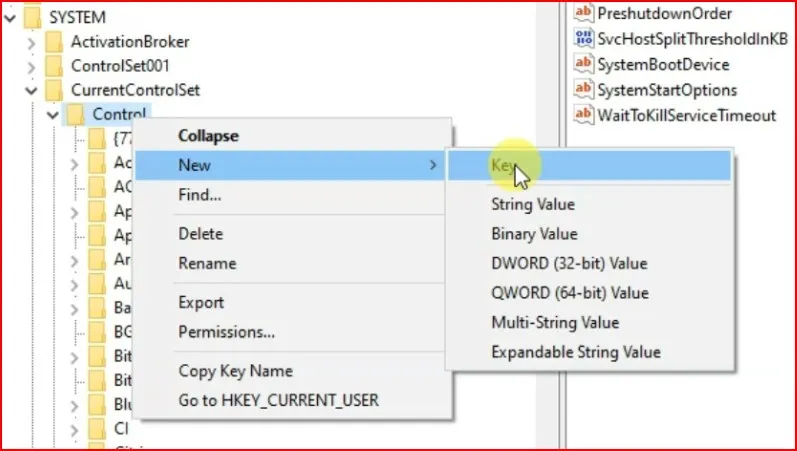
- Name the new key exactly as:
- StorageDevicePolicies

- Now click on the newly created StorageDevicePolicies folder
- On the right side, right-click on an empty area
- Click New → DWORD (32-bit) Value
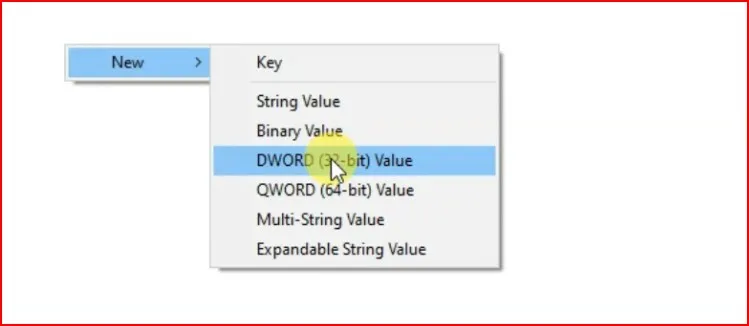
- Name it exactly as:WriteProtect

- Double-click WriteProtect
- Set Value data to 0
- Click OK

Value meaning:
- 0 = Write protection disabled
- 1 = Write protection enabled
After this close Registry Editor and restart your computer. After that reconnect the USB drive and check again.
This method often fixes the disk is write protected USB error when CMD does not work.
Method 4: Format the USB Drive (If Data Is Not Important)
Sometimes formatting is the easiest solution.
Warning: Formatting will erase all data on the USB.
Steps:
- Open This PC
- Right-click on the USB drive
- Click Format
- Choose FAT32 or exFAT
- Uncheck Quick Format (recommended)
- Click Start
If formatting completes successfully, the write protection is removed.
Method 5: Use Disk Management Tool
If normal formatting fails, Disk Management can help.
Steps:
- Press Windows + X
- Click Disk Management
- Locate your USB drive
- Right-click on it and select Delete Volume
- Create a New Simple Volume
- Format the drive
This method works well when the file system is corrupted.
Method 6: Scan USB Drive for Virus or Malware
In some cases, malware locks the USB to protect itself.
What to do:
- Use Windows Defender or a trusted antivirus
- Perform a full scan on the USB drive
- After scanning, safely remove and reconnect the USB
Many users fix the disk is write protected USB issue this way.
Final Thoughts
Receivingthe disk is write protected USB error can be quite frustrating, especially when you are in a hurry to access your files. However, in general the issue is not too serious and can be solved with the methods told earlier.
Begin with the basic steps, and then try CMD and Registry fixes. One of them usually works.
Also Read: How to fix high disk usage in windows 11
Frequently Asked Question (FAQ)
Why does my computer show the disk is write protected USB error?
This usually happens due to corrupted files, virus infection, registry settings, or hardware issues.
Can CMD permanently fix the disk is write protected USB problem?
Yes, if the issue is software-related. Hardware damage cannot be fixed using CMD.
Is the disk is write protected USB error common?
Yes, it’s very common, especially after unsafe USB removal.
What if none of the methods work?
If nothing works, the USB drive may be physically damaged and needs replacement.