
Did you download a Windows ISO file. But when you right-click on it, the Mount option is missing? You watched a tutorial. The video clearly says: “Right-click the ISO file and click Mount…” But on your PC? There is no Mount option at all.
Don’t worry. This is not a serious problem. And your ISO file is not corrupted. In this guide, I’ll show you how to Fix Mount Option Missing Windows. The real reason behind this issue and How to restore it in just a few minutes.
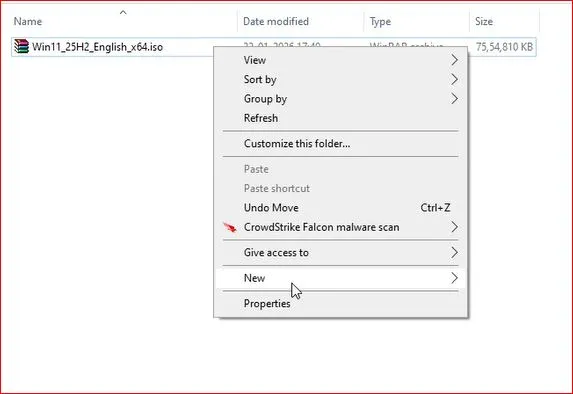
First, What Is Mount Option in Windows?
In modern versions of Windows like Windows 10 and Windows 11, Microsoft added built-in support to mount ISO files.
Mounting means:
Windows creates a virtual DVD drive.
You can open and access files inside the ISO.
No need to extract it.
No need to burn it to USB or DVD.
Normally, when you right-click an ISO file, you should see Mount. But sometimes… it disappears. Let’s understand why.
Why Is the Mount Option Missing?
The most common reason is very simple: Windows File Explorer is not set as the default app to open ISO files. That’s it.
When you install tools like archive software, they may take control of ISO files. Then Windows stops showing the Mount option.
Important point:
Only Windows File Explorer supports native mounting.
If some other app becomes default, the Mount option will not appear in the right-click menu.
Now let’s fix it.
How to Fix Mount Option Missing Windows 10/11
Follow these steps carefully.
Step 1: Open File Explorer
Open File Explorer and go to the folder where your ISO file is saved.
Example:Windows11_25H2_English_x64.iso
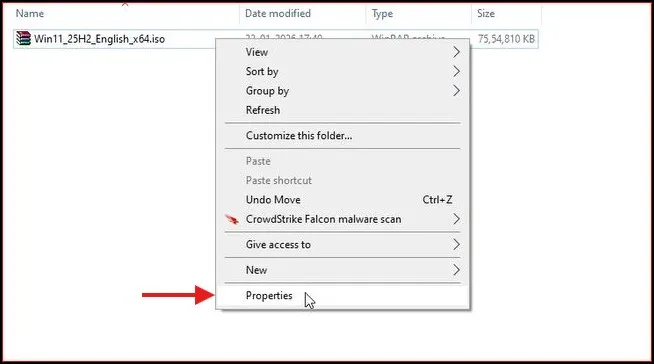
Step 2: Open ISO File Properties
Right-click on the ISO file. Click Properties. The Properties window will open.
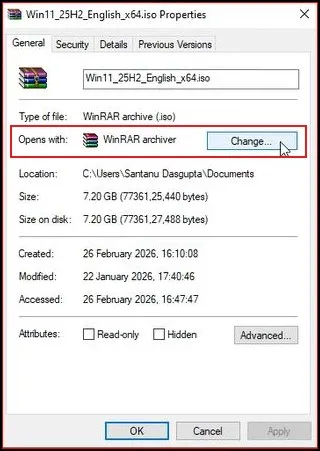
Step 3: Check “Open With” Setting
Inside the General tab, look for: Open with. This shows which program is currently set as default. If you see something like:
- WinRAR
- 7-Zip
- Any other archive software
Then that is the problem. Now we will change it.
Step 4: Change Default App to File Explorer
Click the Change button next to Open with. A new window will appear showing available apps. Select: Windows Explorer.
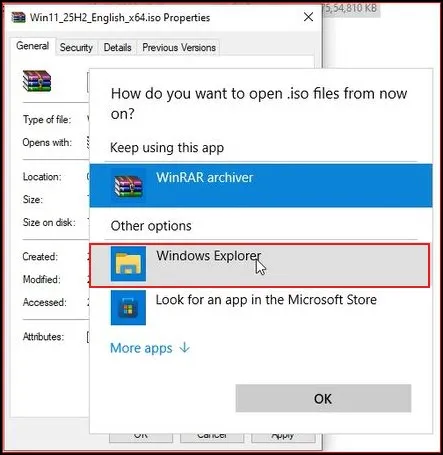
Then click: Set default
or click OK (depending on your Windows version).
Now File Explorer is set as the default program for ISO files.
What If Windows Explorer Is Not Showing?
Sometimes Windows Explorer is not listed. No problem. Do this:
- Click Choose another app
- Click More apps
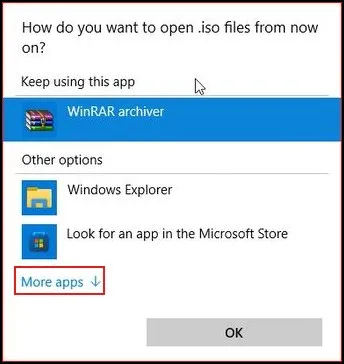
- Scroll down and click
Look for another app on this PC
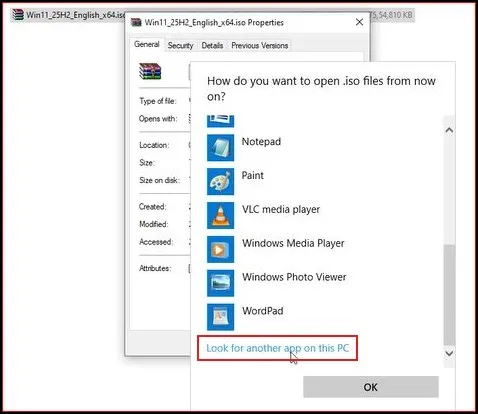
Now browse to:
This PC → Local Disk (C:) → Windows
Inside the Windows folder, find:
explorer.exe
Select it and click Open. Then click Set default.
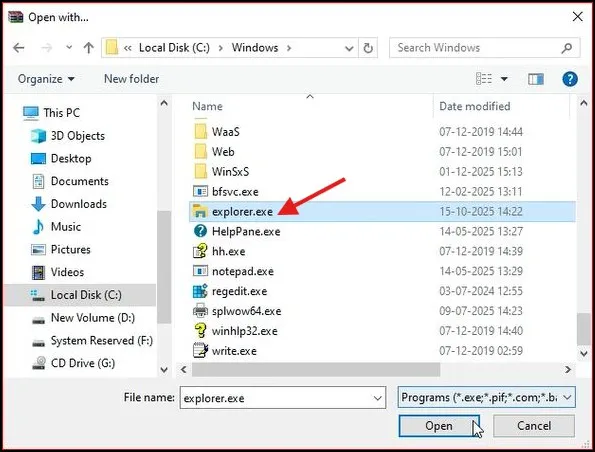
Now Windows Explorer is properly assigned.
Step 5: Check the Mount Option Again
Go back to your ISO file. Right-click on it. Now you should see: Mount Click it.
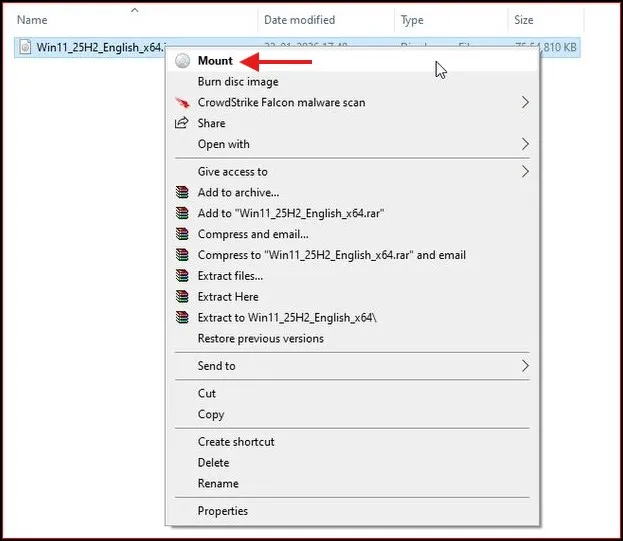
After clicking Mount:
- Open This PC
- You will see a new DVD Drive created automatically
- Open it
- Run setup.exe if needed
Problem solved
Why This Problem Happens?
Let me explain in simple words. Earlier versions like: Windows 7 did not support ISO mounting directly. Users had to install third-party software. Later, Windows 10 and Windows 11 added built-in ISO mounting support.
But when archive software becomes default for ISO files, Windows assumes you want to “extract” instead of “mount.” So it removes the Mount option from the context menu. This is why the issue happens.
Alternative Quick Method (If You Don’t Want to Change Default)
There is another simple trick.
Instead of right-clicking:
- Select the ISO file (single click)
- Look at the top menu bar in File Explorer
- You may see a Mount button there
Click it. Sometimes this works even when right-click Mount is missing.
Third-Party ISO Mounter Software
If the Mount option is still missing or you are using an older Windows version, you can use third-party ISO mounting tools. These programs allow you to mount ISO files as virtual drives easily.
Some popular ISO mounter tools work on both Windows 10 and Windows 11 and provide additional features like multiple virtual drives and advanced disk image support.
If you want a detailed feature, check out my complete guide: Top 10 ISO Mounter Tools for Windows 11
Final Words
This issue looks confusing at first, especially when you are following a tutorial and your screen looks different. But the fix is very simple. Most of the time, it is just a default app setting problem.
Now you know exactly why Mount option disappears, how to restore it and how Windows handles ISO files. Next time when you download a Windows ISO or any software image file, you won’t get stuck.
Frequently Asked Questions (FAQs)
Why is the Mount option missing in Windows?
It’s usually missing because ISO files are set to open with another program instead of Windows Explorer.
How do I fix Mount option missing in Windows 11?
Right-click the ISO file → Properties → Change “Open with” to Windows Explorer.
Can Windows 10 mount ISO files?
Yes. Windows 10 has built-in ISO mounting support.
Does Windows 7 support ISO mounting?
No. Windows 7 does not support ISO mounting natively.
Can I mount ISO without right-click?
Yes. Select the ISO file and click the Mount option from the top menu in File Explorer.