
Whether you are a beginner learning to code or you are a senior developer getting a new system installed, the right code editor is a must-have on you or your developer’s computer. VS Code stands for Visual Studio Code, a very nice and relatively lightweight editor you can use on Windows. It’s not-compile against many programming languages, it has a ton of extensions and is fully free.
Install Visual Studio Code on Windowsis simple and only takes a few minutes. Here’s everything you need to know to get started with Visual Studio Code on Windows 10 or 11 PC.
What is Visual Studio Code and Why Use It?
Why people are so keen on VS Code as a code editor
VS Code has been shaking up the industry because of its speed and flexibility combination. While you’ll enjoy its lightness, you’ll still have great features including IntelliSense code completion and built-in Git commands. The huge extension store means you can tailor your experience exactly how you want it.
System Requirements to Install Visual Studio Code on Windows
In fact, your computer doesn’t require that much for VS Code to run well:
- 1.6 GHz processor or better
- 1GB RAM (2GB or more recommended for optimal performance)
- 200MB free storage space
- 1024×768 display resolution
Compatible Windows versions
You can download VS Code under development almost on any recent version of Windows, such as Windows 8, Windows 10, and Windows 11. Even Windows 7 is usable — not that Microsoft supports it any longer. For the best experience, stick with the latest Windows 10 or 11 updates
How to install Visual Studio Code on Windows
Let’s go step-by-step. No heavy tech talk — just easy-to-comprehend instructions anyone can follow.
Step 1 – Download the Visual Studio Code Installer
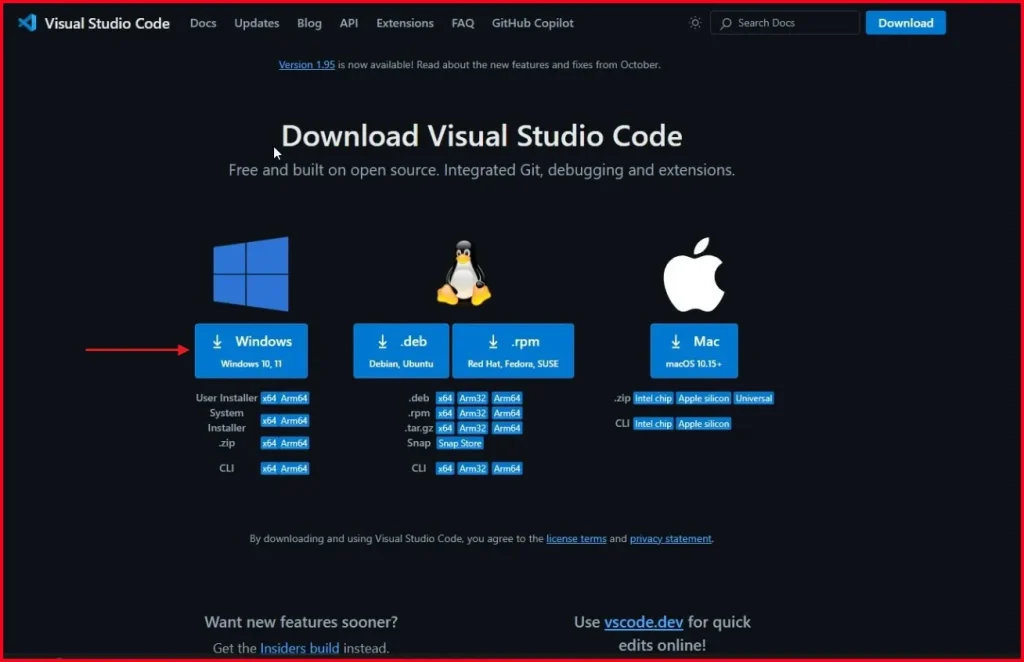
First of all, we need to download Visual Studio Code installer. Open your web browser and go to the official VS Code website:
https://code.visualstudio.com/
Click the button that says “Download for Windows.” This command will download the VS Code installer. exe file to your system.
Step 2 – Run the Installer
Just right-click on the installer of VS Code when you are done downloading, and “Run as administrator”. That should avoid permission problems. This ensures everything gets installed without surprises later.
The Visual Studio Code Setup Wizard will appear.
Step 3 – Windows License Agreement
You need to accept the license agreement. Once the installer is open, you will be asked to agree to the Visual Studio Code terms and conditions. Click I accept the agreement then click the NEXT button.

Step 4 – Choose Installation Location
You get to pick where on your PC VS Code lives. Usually you can leave this as the default, but if you’re running low on C: drive space, you may want to use another drive. Click Next to continue.

Step 5 – Choose More Tasks to Include
Tick the boxes that say:
- Add “Open with Code” action to Windows Explorer
- Register Code as an editor for supported file types
- Add to PATH (important for terminal use)
These settings are useful for everyday coding. Click Next

Step 6: Begin Installation
It will afterwards request to start the installation process. Click on the Install button

Now just wait for it to install — it only takes about a minute.

Step 7: Complete the Setup
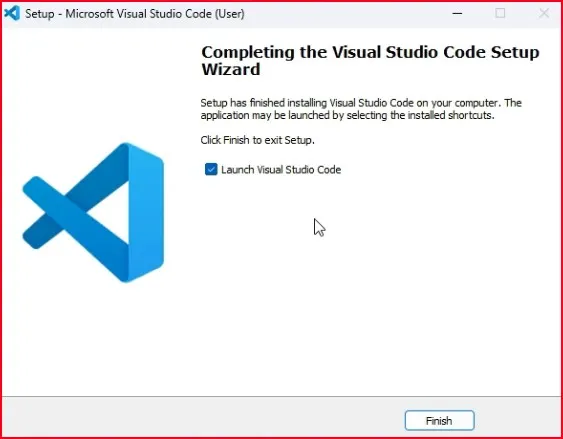
After the progress bar reaches 100%, it will display “Setup Completed.” Check the box that says “Launch Visual Studio Code” if you’d like to open it immediately. Then click Finish.
Step 8: Verify Installation and Explore Basic Settings
Now, let’s verify that Visual Studio Code is installed correctly by checking its version through the Command Prompt.
Finally, make sure Visual Studio Code is properly installed by looking at its version on the command prompt.
- Type cmd on the Windows search bar.
- Click the context menu on Command Prompt and choose Run as Administrator.
- Open a Command Prompt and enter the following command: code -v
- You should see the version number of the VS Code you have just installed.
So, it seems that everything is working great on your system

Step 9: Launch VS Code
Now double-click the Visual Studio Code icon on your desktop (or from the Start menu). Start up the application, and the main editor widow appears.

From here, you can:
- To start writing some code, go to File → New File.
- Pick your programming language: Save the file with the correct extension as follows:.py for Python,. html for HTML, or. js for JavaScript.
- You may see that VS Code detects the language automatically and highlights the syntax.
Now you can write a new file and select a language to suit your coding ambitions!
If you’re more of a visual learner, don’t forget to watch my YouTube video on how to install Visual Studio Code on Windows 11.
Final Thought
With just a few easy steps, you now know how to install Visual Studio Code on Windows. If you follow those few simple steps how to check system requirements, download from the official webpage, install properly and final initial checkout, you would get a code editor that has everything that developer may wish for a tool in this kind.
FAQ: Install Visual Studio Code on Windows
Can I install Visual Studio Code on Windows 11?
Yes, absolutely. It runs smoothly on Windows 11 and is fully supported.
How much space is required to install Visual Studio Code on Windows?
It requires around 200MB of free disk space, but more may be needed for extensions.
Is Visual Studio Code free to use?
Yes, it is 100% free and open-source.
Does VS Code work on both 32-bit and 64-bit Windows?
The standard installer supports 64-bit. For 32-bit systems, download from the older builds section.
Do I need internet to install Visual Studio Code on Windows?
You need internet to download the installer and extensions. But once installed, VS Code can work offline.