
Hey there, tech enthusiasts! Do you have a bootable drive you don’t use anymore? Perhaps it’s an ancient USB stick, or even an external hard drive you once used to install an operating system but now wish to repurpose for regular file storage. For that you have to change bootable drive back into normal storage. And you have come to the right place!
You can sometimes do the regular formatting option, but it won’t be successful, especially if it’s a bootable drive. You may be thinking, “Why not just format the drive and be done with it?” Well, it’s not that simple. Making a drive bootable means writing some extra bits of information to it that a standard format won’t touch. Removing data from the drive is like trying to clean a permanent marker with non-permanent date eraser – you need a little something with a bit more punch!
The Distinction Between Bootable and Non-bootable Storage Devices
A bootable drive has an arrangement that encompasses a boot sector and specific partitions. Regular storage drives are much more simple, though. They’re just services to hold your files, like a digital filing cabinet. By unbooting a bootable drive, we need to get rid of all those boot related parts and make it ready for daily usage.
Why Can’t You Use Your Bootable Drive Like Normal?
When you create a bootable drive, the process modifies its structure. It adds partitions and makes it ready to boot an operating system instead of acting like a regular USB drive. Unfortunately, this means the drive doesn’t function as standard storage anymore—at least not without a little work. That’s why we need to clean and reformat the drive.
The good news? It’s not hard to do, and you don’t need any special software. Windows has a built-in tool called Diskpart that can help you reclaim your drive in no time.
What is Diskpart?
When you have issues with persistent drive letters in Windows, you can check them and change easily with a command line tool called Diskpart. It’s dependable, simple, and just what we need for our job today. Just read through, and you’ll have your bootable drive returned to normal storage in a few minutes.
Important Note: If you choose to use Diskpart, it will format and delete everything on the USB drive so back up any important files before doing this.
Learn More: Bootable USB: 3 Easy Steps to Create a Windows 11 Bootable Drive Using the Media Creation Tool
How to Make a Bootable Drive back into Normal Storage using Diskpart CMD:
Step 1: Plug in Your Bootable Drive
Insert your bootable USB drive into your computer. Ensure its connected correctly and detected by Windows.
Step 2: Run Command Prompt as Admin
Diskpart requires you to open up command prompt with administrative privileges. Here’s how to do it:
Open the Start menu or press the Windows key. Type cmd in the search bar.
Then right-click on “Command Prompt” and choose Run as administrator.
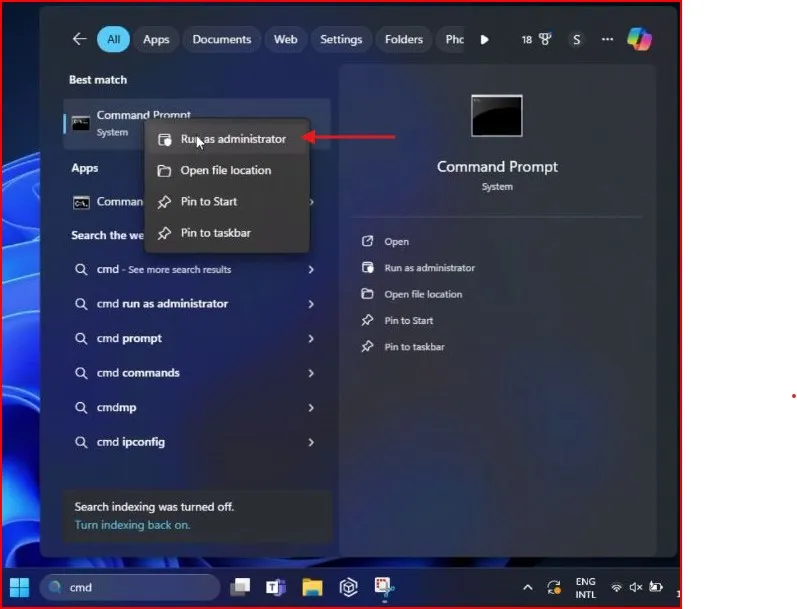
Note: If prompted, click Yes to allow changes. You should now see a black command-line window.
Step 3: Launch Diskpart
Type the following command diskpart and press Enter:
This will start the Diskpart tool. You’ll notice the prompt changes to something like this:
DISKPART>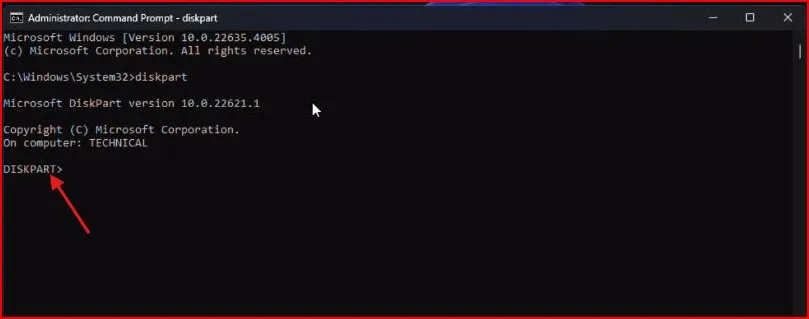
Step 4: List All Drives
To see all the drives connected to your computer, type this command: list disk
Diskpart will show a list of all disks, including your USB drive. You’ll see information like disk numbers, sizes, and statuses.

Step 5: Select Your Bootable Drive
Identify your USB drive from the list by checking its size. Once you’re sure which one it is, select it using its disk number. For example, if your USB drive is Disk 2, type:
select disk 2Diskpart will confirm your selection:
Disk 2 is now the selected disk.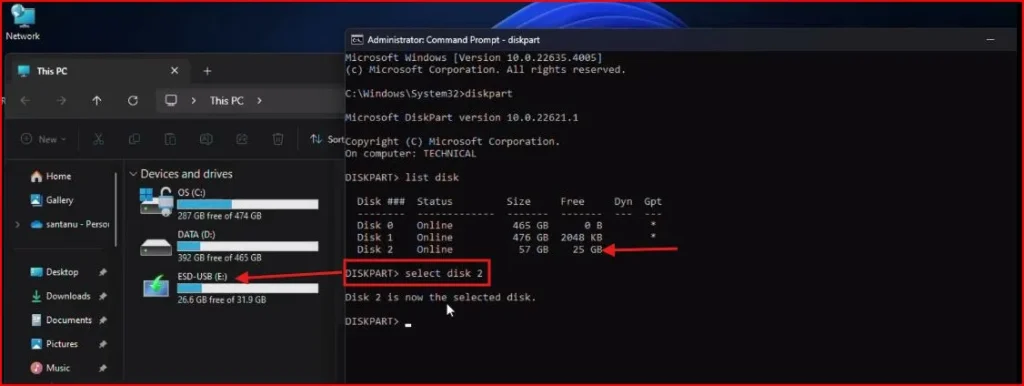
Step 6: Clean the Drive
To erase all data and partitions from the USB drive, type the following command:
clean and press Enter
Diskpart will clean the drive and display a success message:
DiskPart succeeded in cleaning the disk.
Step 7: Create a New Partition
Now, we need to create a new partition that can be used for regular storage. Type this command:
create partition primaryOnce the partition is created, you’ll see this confirmation:
DiskPart succeeded in creating the specified partition.
Step 8: Format the Drive
Next, format the drive to make it usable. We’ll use the NTFS file system for this example, but you can use FAT32 if you prefer. Type:
format fs=ntfs quickThe “quick” option speeds up the process. Once the formatting is complete, you’ll see:
DiskPart successfully formatted the volume.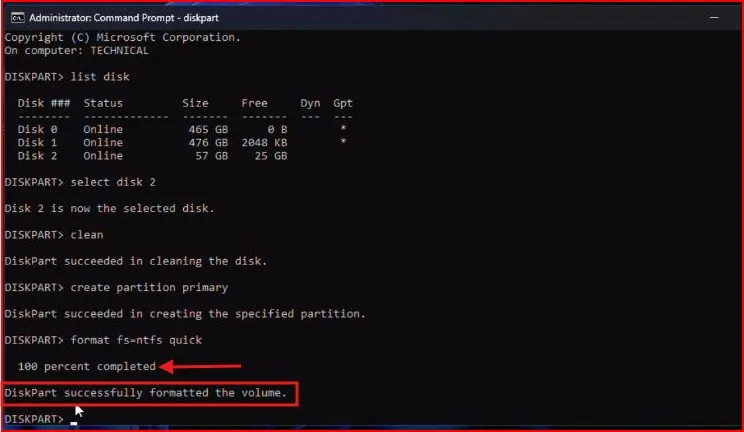
Step 9: Assign a Drive Letter
Finally, assign a drive letter so you can access the USB drive in File Explorer. Type:
assignDiskpart will confirm the assignment:
DiskPart successfully assigned the drive letter or mount point.
Step 10: Exit Diskpart
To exit Diskpart, simply type: exit
Then close the Command Prompt window. Congratulations—your bootable drive is now regular storage again!

Why Use the Diskpart Method?
The Diskpart method is reliable and doesn’t require downloading any third-party tools. It’s built into Windows and works on all versions, making it a great option for anyone looking to turn their bootable drive back into regular storage.
Learn how to convert a bootable drive to regular storage:
Conclusion
And there you have it! And you’ve successfully converted your bootable drive back into standard storage with the help of the Diskpart method. You can now use it for all your everyday file-storage needs. This is a simple procedure that will hardly take you any time to do, and it is a great way to resurrect your USB drive.
The next time you make a bootable drive, you’ll know how to undo what you’ve done when you’re through with it. If you liked this guide, make sure to tell your friends who may need it. Happy computing!
Frequently Asked Questions (FAQs)
Is it possible to make my main boot drive normal storage?
If the drive is the one that your operating system is currently running, be wary about converting it. This procedure is only for things like secondary drives or external storage devices.
If I convert the bootable drive to a normal drive will it delete everything?
Yes, this action wipes the drive clean. That’s why backing up any important data beforehand is so important.
How long does the conversion process usually take?
Depending on your drive size and computer speed, this process varies and takes approximately 10-15 minutes.
Can I boot from that drive again and reverse the process?
Yes, you can turn your drive bootable again later whenever you want. To create a bootable drive, you’d need to do the reverse of what we’ve done here.
What are the risks of converting a bootable drive?
The biggest risk here is losing data, which is why we always say make sure to back up your data first. If this process is interrupted, there’s a small chance of something going wrong with your hardware, so ensure that your computer is plugged in and won’t power down unexpectedly while conversion takes place.