
Creating a bootable USB drive is perfect for setting up a fresh installation of Windows 11 or you can use it for trouble shooting purpose. This guide will walk you through the process using the Windows 11 Media Creation Tool, ensuring you’re prepared for any installation needs.
Introduction
Have you ever found yourself in a situation where your computer starts acting up, and a fresh installation of Windows seems like the best solution? Or perhaps you’re looking to upgrade to the latest Windows 11 on multiple devices? Creating a bootable USB drive is the crucial first step. In this article, we will explore step-by-step instructions on how to use Microsoft’s Media Creation Tool to prepare a Windows 11 bootable USB drive. By the end, you’ll have the tools and confidence to tackle installations with ease.
Why Create a Bootable USB Drive?
Before diving into the how-toes, let’s explore why having a bootable USB drive is beneficial.
- Portability: Easily carry your installation media everywhere you go.
- Speed: USB drives can install Windows faster than traditional CD/DVDs.
- Versatility: Use the same USB for multiple installations.
- Solving Problems: Handy for troubleshooting and recovering PCs.
Prerequisites
Before we start, make sure you have the following items ready:
- USB Flash Drive – At least 8GB of storage.
- Stable Internet Connection – To download the Media Creation Tool.
- PC with Windows – Running Windows 7 or later.
- Product Key (if upgrading) – Necessary for activation.
Step 1: Download the Windows 11 Media Creation Tool
- Visit the Microsoft Website: Head over to Microsoft’s official download page.

- Click on ‘Download Now’: Under ‘Create Windows 11 Installation Media,’ find and click the ‘Download Now’ button.

Step 2: Preparing Your USB Flash Drive
Before proceeding, ensure the USB flash drive is either blank or doesn’t contain necessary files, as this process will erase it.
- Insert USB Drive: Connect it to your PC.
- Backup Important Files: If the USB contains important data, back it up elsewhere.
Step 3: Using the Media Creation Tool
- Run the Tool: Locate the downloaded Media Creation Tool file and double-click to run it.
Tip: Running as administrator may help avoid permission issues.
- Accept License Terms: Read and agree to the software license terms.

- Select Desired Action: Choose ‘Create installation media (USB flash drive, DVD, or ISO file) for another PC.’
- Select Language, Edition, and Architecture: Either choose the recommended options or customize according to your needs. Check the box “Use the recommended options for this PC” and click Next

- Choose USB Flash Drive: When prompted, select the “USB Flash Drive” option and click “Next.”

- Select correct USB Flash Drive: The tool will now list all the available USB drives connected to your system. Carefully select the correct drive you want to use for the installation media, then click Next.
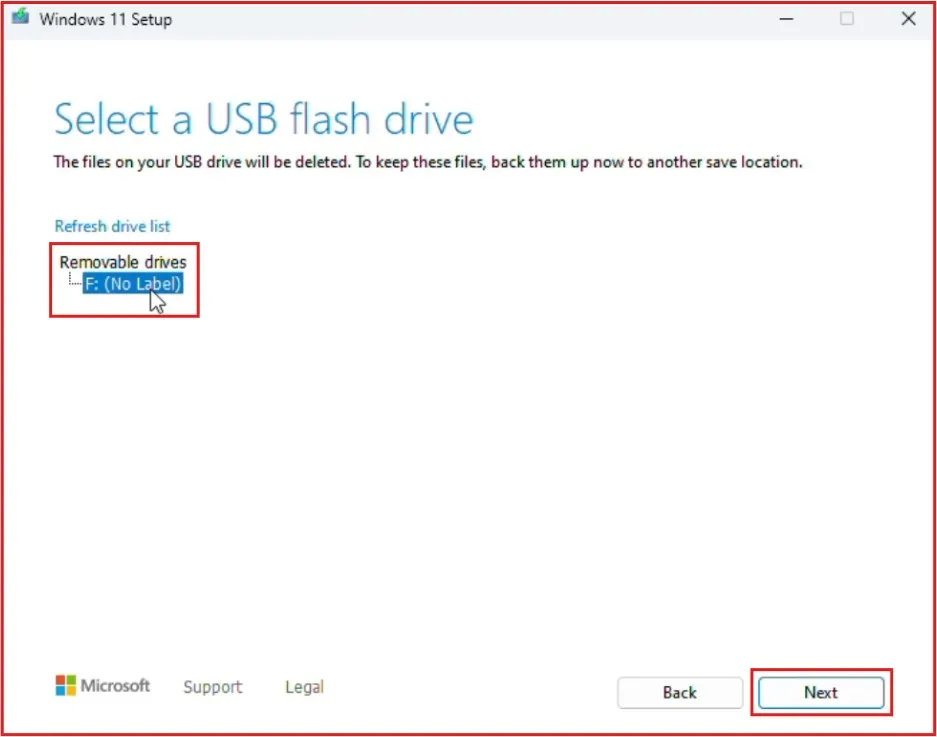
Now, the Media Creation Tool will start downloading Windows 11. This might take a while, depending on your internet speedt. The tool will download the files and then create the bootable USB automatically.
- Finish: Once the process is complete, you’ll see a message saying Your USB flash drive is ready. Click on Finish.

- Check: Now that the bootable USB has been created, you can verify it by checking the name of the USB drive. Your normal USB drive should now be converted into a bootable USB drive and renamed to ESD-USB.

Verifying the Bootable USB Drive
- Eject USB Safely: Once the process completes, safely remove the USB drive.
- Test the Boot Drive: To ensure it works, restart a computer and enter the boot menu (often F12 or Delete) to check if the USB boots up.
If you prefer a video guide, watch the complete step-by-step tutorial here! This video will show you exactly how to Create a Windows 11 Bootable Drive Using the Media Creation Tool.
Troubleshooting Common Issues
Even with careful adherence to instructions, issues may arise. Here are some common problems and solutions:
USB Drive Not Recognized
- Check Connection: Try a different USB port or restart the computer.
- Format USB: Ensure the drive is formatted as FAT32.
Installation Fails to Start
- Security Software: Temporarily disable antivirus programs that may interfere.
- Correct Boot Order: Ensure the USB is the primary boot device in BIOS settings.
Conclusion
Creating a Windows 11 bootable USB drive may initially seem intimidating, but with the Windows 11 Media Creation Tool and this straightforward guide, you can manage it with ease. Whether for personal use, or helping friends, this bootable USB allows for quick installations or upgrades. Now, with your new technical skill, you’re ready to tackle any issues that come your way and help others along the same path.
Final Thought: Always keep your bootable USB handy. You never know when it might be your tech-savvy knight in shining Armor.
For further details or issues not covered here, you might want to consult Microsoft’s official support for more tailored solutions or updates. Happy computing!
If you’re planning to run Windows 11 in a virtual environment, check out our guide on enabling virtualization in Windows 11 to ensure compatibility.
FAQ:
What is a bootable USB?
A bootable USB is a flash drive that can install or repair an operating system on a computer.
Why do I need a bootable USB for Windows 11?
It’s useful for installing Windows 11 on a new device or troubleshooting existing installations.
What is the Media Creation Tool?
The Media Creation Tool is an official Microsoft utility to download and create Windows installation media.
Where can I download the Media Creation Tool?
You can download it directly from the Microsoft website.
What size USB do I need for a Windows 11 bootable drive?
At least 8GB, but 16GB is recommended for space.
Do I need an internet connection?
Yes, to download the Windows 11 files through the Media Creation Tool.
Will creating a bootable USB erase my data?
Yes, it will format the USB drive, so make sure to back up any important files first.
Can I use this bootable USB on any PC?
Yes, as long as the PC meets Windows 11’s system requirements.
Is the Media Creation Tool free?
Yes, it’s free to download and use from Microsoft.
How long does it take to create a bootable USB?
Typically, it takes 15-30 minutes, depending on your internet speed and USB type.