
Have you ever wanted to know why your PC can’t run some software? Solution – May be Enable Virtualization? A lot of people are dealing with this problem but do not know about the easy solution which we will explore here today.
Problem: Why My PC Cannot Run this Software
Imagine installing a new app, or maybe you are trying to setup your new virtual machine for work/play but whenever you tried running it on your PC and all the PC does is freeze. Other times, you will receive an error message, or the software simply does not function as expected. Annoying, right?
This is actually a common problem for many Windows 11 users. Your PC is powerful enough, but one key setting might be missing—Enable Virtualization.
Agitate: Missing Out on Your PC’s Full Potential
Think of Virtualization as a hidden power your PC already has but doesn’t use until you give it permission. By enabling Virtualization, you unlock the ability for your computer to handle virtual machines, run some emulators, and even boost productivity for certain applications.
For example, if you want to try a new operating system without removing your current one or if you’re a tech specialist, who loves testing different virtual environments, enable Virtualization is your secret weapon. The good news is that you don’t need to be a tech genius to do this—it just takes a few simple steps, and I’ll guide you every steps in this guide.
Solution: Enable Virtualization in Windows 11 PC in Simple Steps
Here’s how to enable Virtualization in Windows 11 PC for those who are facing the same difficulties is enabled with just a few easily understandable steps. I promise, it’s easier than it sounds. Let’s get started!
Step 1: Check If Virtualization Is Enabled on Your PC
Before diving into enabling Virtualization, let’s see if it’s already on. Sometimes it’s enabled by default, and that would mean you’re all set! Here are the two methods you can check.
Method 1: Use System Information
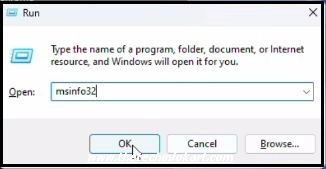
Press Windows + R to open the Run application. After that, you need to type msinfo32 and hit Enter.
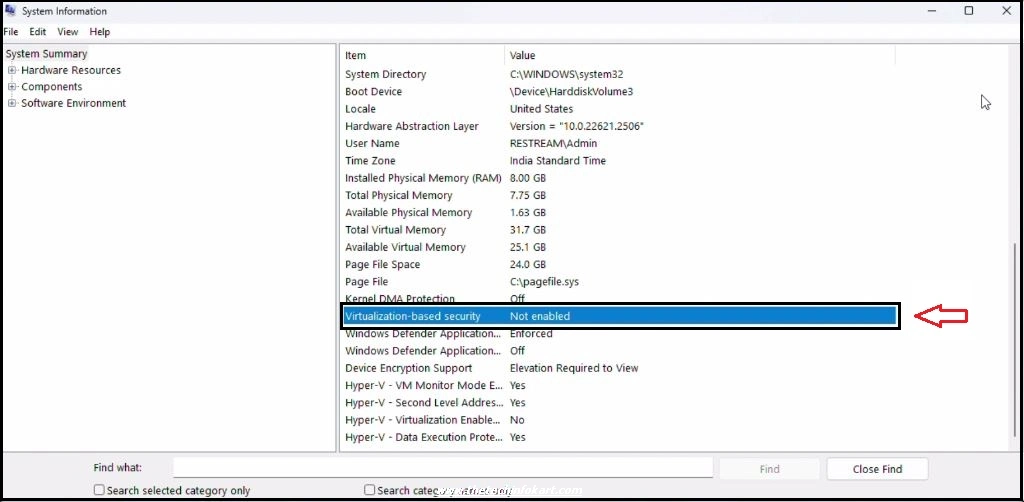
In the System Information window, look for “Virtualization-based security.” If it says Not enabled, we need to turn it on.
Method 2: Use Task Manager
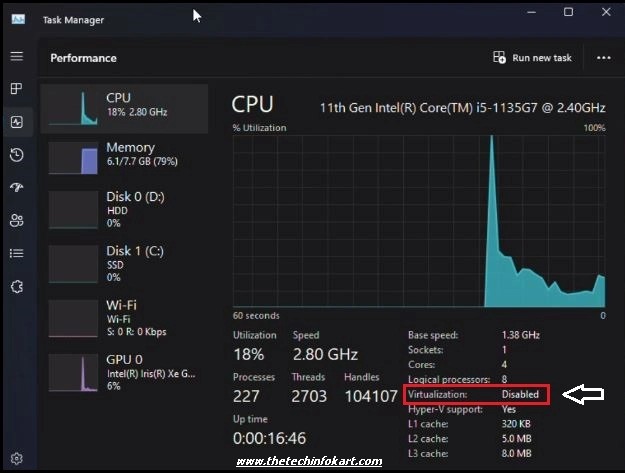
Right-click the Start button and select Task Manager. Once Task Manager is open, go to the Performance tab. Under the CPU section, look for virtualization. If it says Enabled, then you’re good to go! If it says Disabled, keep reading for the next steps.
Step 2: Restart Your PC and Access the BIOS/UEFI Settings
To enable virtualization, we need to enter the computer’s BIOS or UEFI settings. This sounds a little techy, but it’s quite simple.
Click Start, then select Settings. On the left panel, click System and scroll down to find Recovery. Under Advanced startup, click Restart now. Your PC will restart and you’ll see some options on the screen.

Step 3: Enter UEFI Firmware Settings
Once your PC restarts, you’ll see the Choose an Option screen. Select Troubleshoot.

On the next screen, click on Advanced options.

Choose UEFI Firmware Settings from the list and click Restart.


Your computer will restart again and open up the BIOS/UEFI settings. Don’t worry, we’re almost there!
Step 4: Enable Virtualization in BIOS
This is where the magic happens. The layout of BIOS settings may look different depending on your PC’s manufacturer, but here’s what you should look for:
- Once inside the BIOS, navigate to a tab called Advanced, Configuration, or CPU Settings.
- Look for a setting named Intel Virtualization Technology (VT-x) or AMD-V (depending on your processor).
- Use the arrow keys to highlight it, and press Enter to enable it.
On my Dell laptop, I found this under Virtualization Support. All I had to do was enable Intel Virtualization Technology and VT for Direct I/O. Once enabled, click on Apply Changes (often a function key) and then Exit. Your PC will restart.
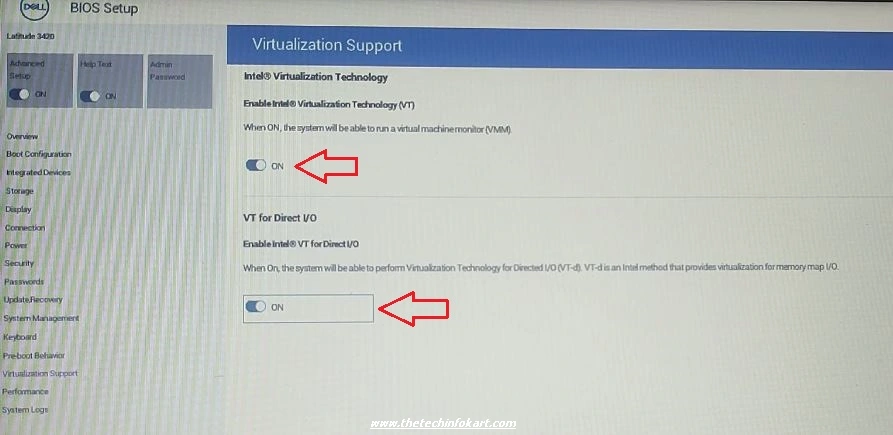
Note: Getting into the BIOS can be a little different depending on your computer brand. Even if you have two laptops from the same manufacturer, the steps might vary a bit based on the model or how old the computer is. So don’t worry if your screen looks a bit different—just look around for similar options!
Step 5: Enable Virtualization in Windows Features
Even after enabling it in BIOS, you still need to enable it in Windows settings. Click on Start and search for Windows Features. Select Turn Windows features on or off. Scroll down and find Virtual Machine Platform. Make sure it’s checked and then click OK.

Windows will install the necessary components. This might take a couple of minutes, and your computer will ask you to restart.
Step 6: Verify That Virtualization Is Enabled
Now that everything is enabled, let’s make sure it actually worked. Open Task Manager again (right-click the Start menu and select Task Manager). Go to the Performance tab. Under CPU, it should now say Virtualization: Enabled.

And just like that, Virtualization is now enabled on your Windows 11 PC!
Watch the Full Tutorial on YouTube
If you want a simple step-by-step guide, watch my YouTube video where I show you how to enable virtualization (VT) on Windows 11 PC:
Step 7: Enjoy the Full Power of Your PC!
With Virtualization turned on, you can opt for software like VMware or VirtualBox to extend the use of this computer’s resources into many virtual boxes. This is the best way of installing additional operating systems without tampering with the primary system. It is also suitable for software developers or anyone who wishes to run several environments on a single machine. After enabling virtualization, you can explore tools like VMware workstation Pro to create and manage virtual machines easily.
For example, the other day I wanted to try out Linux on my Windows laptop without installing it. I was able to do that by turning on Virtualization Technology and using Virtual Box, and I made no changes to my current system. It was nice and simple, I mean it felt great being a techie!
What’s Next? Move Forward, Have a New Look!
Now that you know how to enable virtualization on a Windows 11 PC, the next steps are further improvement of the knowledge base. It can be work-related, recreational, or simply for the sake of knowing the operating system.
You can develop applications, and therefore, easily set up and administer various virtual infrastructure. In case you are like me, you can run different versions of the operating system, use applications that require a virtual environment, or even run various emulator programs to investigate additional operating systems without modifying the primary system.
Personal Experience
I remember the first time I tried to enable virtualization on my PC. I was pretty nervous about changing the BIOS settings because it felt like I could mess something up. But honestly, it ended up being much easier than I thought. After I got everything set up, I was able to run a Linux virtual machine right next to my Windows 11. It was like having two computers on the same screen! This setup has been super helpful for trying out new software and learning new things without worrying about breaking anything on my main system.
For a step-by-step visual guide, check out this YouTube video where I demonstrate how to generate and analyze a battery report.
Conclusion
Enabling virtualization on your Windows 11 PC opens up a world of possibilities. From running different operating systems to testing new software, the benefits are immense. So, go ahead and follow these steps to unlock the full potential of your PC.
Ready to get started? Enable virtualization in Windows 11 PC today and take your computing experience to the next level! Feel free to share your experiences or any questions if you have in the comments below. Happy virtualizing!
What is virtualization?
Virtualization allows your PC to run multiple operating systems or virtual machines at the same time.
Why should I enable virtualization in Windows 11?
It’s needed for running virtual machines, emulators, or sandbox environments like VMware or VirtualBox.
How do I check if virtualization is enabled?
Open Task Manager > Performance > CPU. If it says “Enabled” under Virtualization, it’s already active.
What if virtualization is disabled?
You’ll need to enable it through the BIOS or UEFI settings of your PC.
How do I access the BIOS/UEFI settings?
Go to Settings > System > Recovery > Advanced Startup > Restart Now, then select UEFI Firmware Settings.
Is virtualization safe to enable?
Yes, it’s safe and doesn’t harm your system. It just unlocks more features for advanced tasks.
Can I enable virtualization on all PCs?
Most modern PCs support it, but it may not be available on older systems or entry-level models.
What if I don’t see virtualization settings in BIOS?
The setting might be named differently, like Intel VT-x or AMD-V. Check the CPU-specific section.
Do I need virtualization enabled for VMware or VirtualBox?
Yes, both require virtualization to create and run virtual machines smoothly.
Will enabling virtualization slow down my PC?
No, it won’t affect normal performance unless you’re actively using virtual machines.