
Sometimes while trying to install some game, video editing software or graphics-intensive application you wonder “does my PC have the correct graphics card?”. Have you ever tried installing some game, video editing software or graphics-intensive application and wondered whether your PC has the right graphics card?
Many users of Windows ask about how to check graphics card in Windows 11. The best part is that you have got some built-in ways to check your graphics card information on Windows 11. Without using any third-party application, you can now easily check your exact graphics card model, your GPU memory, and verify whether your PC even has a dedicated graphics card or not.
In this guide, I will give you various easy methods to check your GPU specs on Windows 11 PCs as I also use personally.
Method 1: Check Graphics Card Using Task Manager
The fastest way to check for some essential info of your GPU is Task Manager:
Right-click on the Start button and click Task Manager. If Task Manager loads in compact mode, hit More details at the bottom.
Then on the left, you’ll see a Performance tab. Scroll all the way down till you reach something like GPU 0, GPU 1 etc.
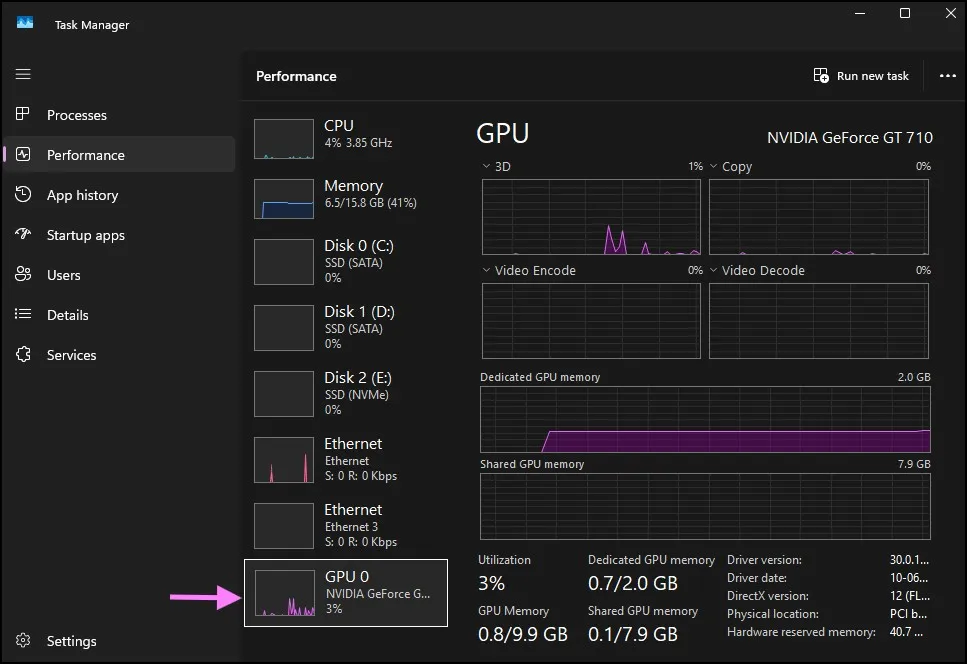
– When you click on GPU section, Windows provides a host of useful information such as:
- GPU model name
- GPU utilization
- Dedicated GPU memory
- Shared GPU memory
- Driver version information
This is usually my preferred method when I simply want to check graphics card Windows 11 without digging through multiple settings.
Method 2: Use Device Manager
Another simple method to find out your graphics card is using the device manager:
Press windows + X and then choose Device Manager
Once you have opened Device Manager you should see something like:
Display Adapters/Graphics cards:
NVIDIA GeForce GT 710
AMD Radeon RX 7600
Intel UHD graphics
Just click the ‘graphics cards‘ tab and you will be given the graphics card in your computer.
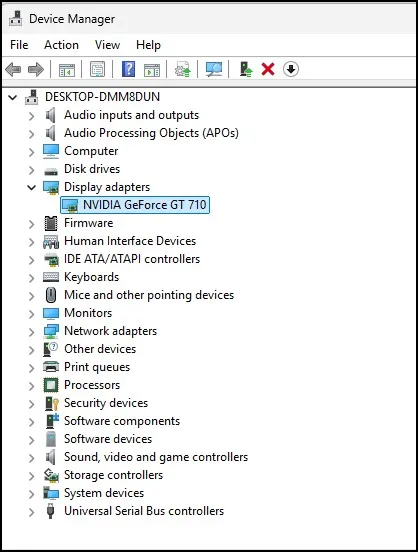
If you also have graphics within your processor you will find two graphics card names.
This method can be used to find your graphics card.
Method 3: Check GPU Details Using DirectX Diagnostic Tool
Windows includes a built-in utility called the DirectX Diagnostic Tool, often known as DxDiag.
Press Windows + R to open the Run dialog box.
Type: dxdiag
Then press Enter.

After the tool opens, click the Display tab. Here you can find various GPU-related information, including:
- Graphics card name
- Manufacturer
- Display memory
- Driver details
- DirectX features

Moreover, this tool actually gives more technical GPU information than Device Manager. You can definitely get better details about your graphics card here.
We are seeing that DxDiag is very useful for fixing graphics problems because it only shows driver details in a simple and clear way.
Method 4: Check Graphics Card Through Windows Settings
Windows Settings also provides GPU information, although many users don’t realize it’s there.
Open Settings by pressing Windows + I.
Go to System, then click on Display

After that open Advanced Display
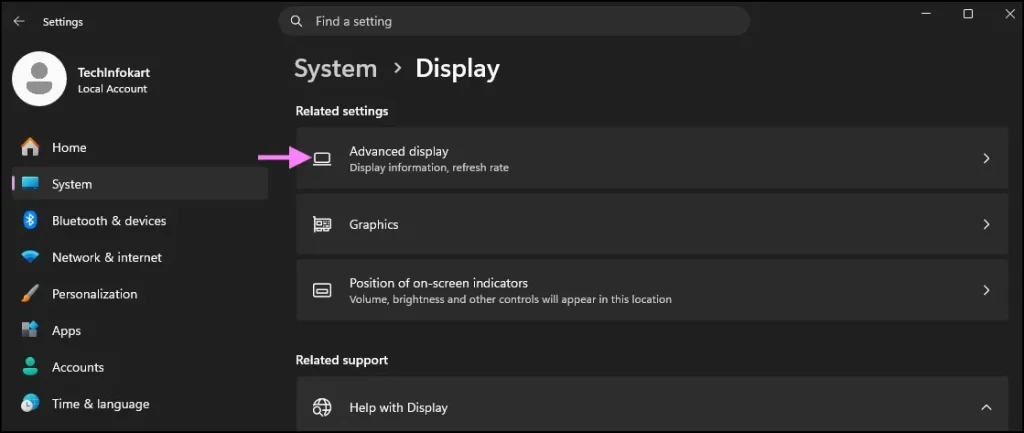
Now scroll down and click Display Adapter Properties.

A new window will appear showing details about your graphics adapter.
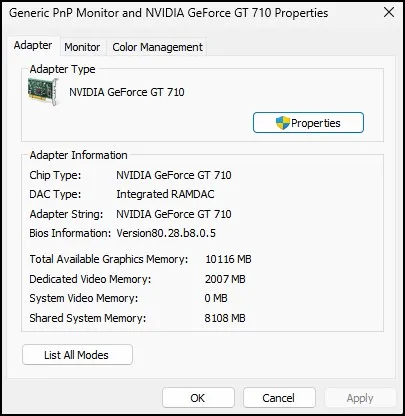
You can view information such as:
- Adapter type
- Dedicated video memory
- Shared system memory
- Total available graphics memory
This method is useful if you want to see memory-related GPU information without opening other utilities.
Method 5: Use System Information
System Information is another built-in Windows tool that contains hardware details.
Press Windows + R.
Type: msinfo32
Then press Enter.

In the System Information window, expand:
Components > Display
After selecting Display, Windows will show extensive information about your graphics hardware.

You’ll find details like:
- Adapter description
- Installed drivers
- Resolution
- Memory information
- Hardware identifiers
This method is not the fastest, but it helps when you need to check your graphics hardware further. The process itself gives complete information about your system.
When people actually ask me how to check graphics card in Windows 11 for fixing problems, I definitely recommend this method.
Method 6: Check GPU Information Using Windows Search
Sometimes the simplest methods are the easiest.
Click the Search box on the taskbar and type: Display Adapter Properties
Open the matching result.
This shortcut takes you directly to graphics adapter information without navigating through multiple settings pages.
Similarly, you can search for:
- DxDiag
- Device Manager
- Task Manager
- System Information
and access GPU-related details quickly.
It’s a small trick, but it saves a few clicks.
Which Method Should You Use?
If you just need the model name then Device Manager is the best tool.
If you want to monitor performance then Task Manager is the most logical tool.
If you want more information such as driver information and VRAM then DxDiag and System Information is required.
Personally I tend to use Task Manager more as a starting point, as I find it’s a good middle ground between too complex and not enough information.
Ultimately, no matter what you choose, Windows 11 gives it to you relatively simply without requiring any software to be downloaded.
Conclusion
If you have been wondering on how to check graphics card in Windows 11, any of the above methods can get the task done.
For a basic overview, Task Manager and Device Manager will often suffice. If you want more information, DxDiag and System Information can give you more of the details. Use whichever method is most comfortable for you and you will be able to know exactly what graphics hardware is in your PC.
Also Read: How to Check RAM Type and Speed in Windows 11
Frequently Asked Questions (FAQs)
How do I check my graphics card in Windows 11?
You can use Task Manager, Device Manager, DirectX Diagnostic Tool, Settings, or System Information to view graphics card details.
How can I check GPU details in Windows 11?
Open Task Manager and go to the Performance tab, or run DxDiag to see detailed GPU specifications and driver information.
Can I see GPU memory in Windows 11?
Yes. Task Manager and Display Adapter Properties both show dedicated and shared GPU memory.
Why do I see two graphics cards on my PC?
Many laptops and some desktops include both integrated graphics and a dedicated graphics card, so Windows displays both devices.
What is the easiest way to check graphics card Windows 11?
Task Manager is usually the fastest and easiest method because it displays the GPU model and performance information in one place.