
You’re certainly not alone in facing this issue: If adobe premiere pro won’t uninstall on your Windows PC and a message constantly appear that says Adobe Creative Cloud is running. I encountered the same issue recently when uninstalling Premiere Pro from a Windows 11 machine. Regardless of uninstallation I attempted, whether uninstalling it through Settings or Apps & Features, the process would not proceed to finish the uninstallation due to Adobe services still active in the background.

This problem can be solved easily itself. No further complications are involved. In this guide, two practical methods are discussed further, which have proven useful in itself for many users.
Why Does This Error Happen?
As per the design, Adobe applications require external dependencies regarding full functionality. They are working only with some background services that we are seeing get installed together with Adobe Creative Cloud. Basically, these services keep running in the background even when Premiere Pro is closed
Windows itself detects active Adobe processes during uninstallation and further blocks the removal of Premiere Pro. This actually causes the Adobe Creative Cloud is running error message to come, which is definitely a very common problem.
Actually, you can manually stop those services or definitely use Adobe’s official clean up tool to fully remove the software.
Method 1: Force Kill Adobe Services via Windows Task Manager
This is usually the quickest solution and should be your first attempt.
At first, you should close Adobe Premiere Pro and Adobe Creative Cloud first if they are open on your system.
Next, press Ctrl + Shift + Esc keys together on your keyboard. This will open the Windows Task Manager itself.
If Task Manager opens in compact mode, click More Details at the bottom.
Now look through the list of running processes and check for Adobe-related services. Depending on your installation, you may see entries such as:
- Adobe Creative Cloud
- Adobe IPC Broker
- Adobe Desktop Service
- Creative Cloud Core Service
- Adobe Crash Processor
- Adobe CEF Helper
Basically, select each Adobe process one by one and click End Task.

Further, please take some time only and make sure all Adobe processes are fully closed down properly. Sometimes we are seeing that a service is restarting only on its own. If it is actually happening again, you should definitely stop it one more time.
If we are still seeing the Adobe Creative Cloud running error only, then we need to stop the Adobe services also.
Just press Win + R, then type services.msc, and hit Enter. This will open the Windows Services console.

scroll through the list and find all the services that have Adobe in the name, like these below:
- AdobeUpdateService
- Adobe Genuine Monitor Service
- Adobe Acrobat Update Service
- Any other Adobe-related service
If the Status column shows Running, right-click on the service and select Stop.
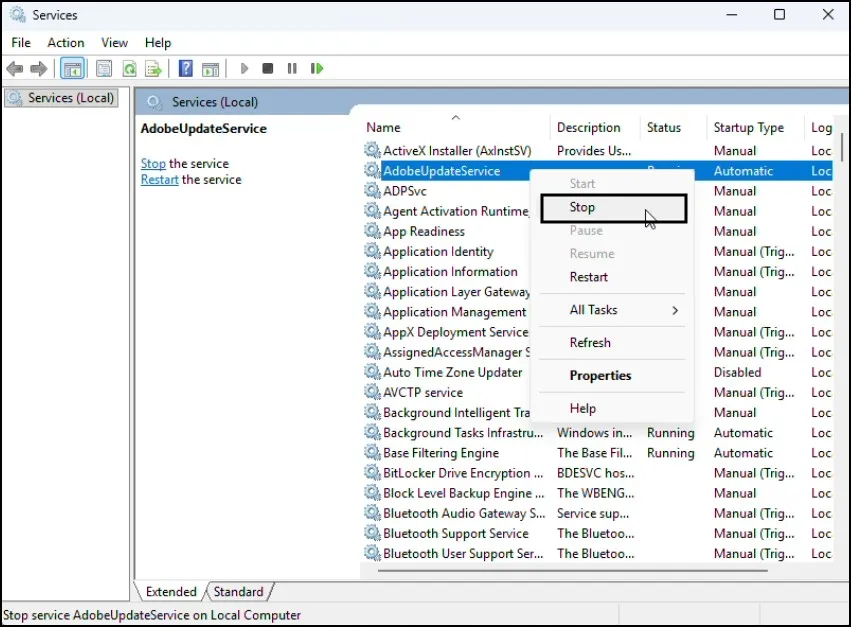
Once all Adobe services have been stopped, close the Services window and try uninstalling Premiere Pro again.
Now open Settings, then go to Apps, and then Installed Apps only.
In the list, we are seeing Adobe Premiere Pro only, so click the three-dot menu next to it and select Uninstall.
For many users, stopping the Adobe processes and services itself is enough to fix the issue, with no further steps required. If adobe premiere pro won’t uninstall even after doing this, one must proceed to Method 2 and use Adobe’s official Cleaner Tool.
Method 2: Use the Official Adobe Creative Cloud Cleaner Tool
if Premiere Pro is partially corrupted or Adobe services fail to stop, one must use the Adobe Creative Cloud Cleaner Tool. Moreover, this dedicated utility is officially provided by Adobe to resolve such persistent issues.
This tool is made only for removing broken Adobe installations and leftover files that normal uninstall is not able to clean properly.
Before you go ahead, kindly save your work and close all the applications that are only running in the background.
Go to Adobe’s official website only and download the Creative Cloud Cleaner Tool from there itself.

Once downloaded, you should right-click on the file and definitely choose the Run as Administrator option.
The tool will open in a command-line style window. This may seem difficult, but it is not that complicated in itself
Actually, you should definitely follow whatever instructions are showing on the screen, one by one.
The screen will first ask you to select a language choice. Type e for English and press Enter.
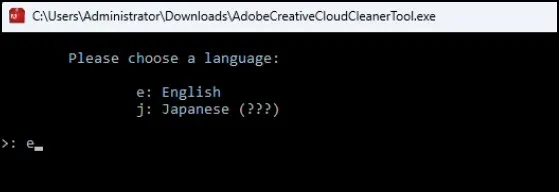
Next, an End User License Agreement will display. Type y to accept the terms and hit Enter.

The tool will present an indexed list of cleaning options. Look closely at the numbers printed on the screen. Type 4 (which corresponds to CC Apps) and hit Enter.

The utility will now display a custom list of all Adobe Creative Cloud applications detected on your storage drive. Find the line that lists your version of Adobe Premiere Pro. Note the specific number assigned to it on the left. Type that specific number into the choice field and hit Enter.
Finally, the screen will ask you to confirm your decision; type y and hit Enter one last time.
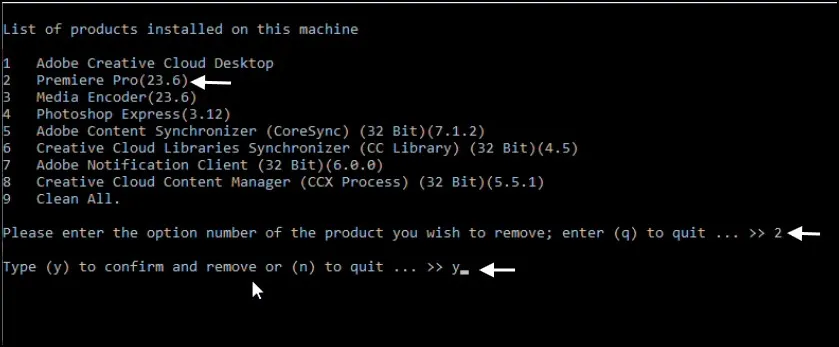
The utility will execute a clean purge, scraping away the stuck files and restoring your system configurations.
As per your system’s speed, this may take a few minutes regarding the completion of the process.
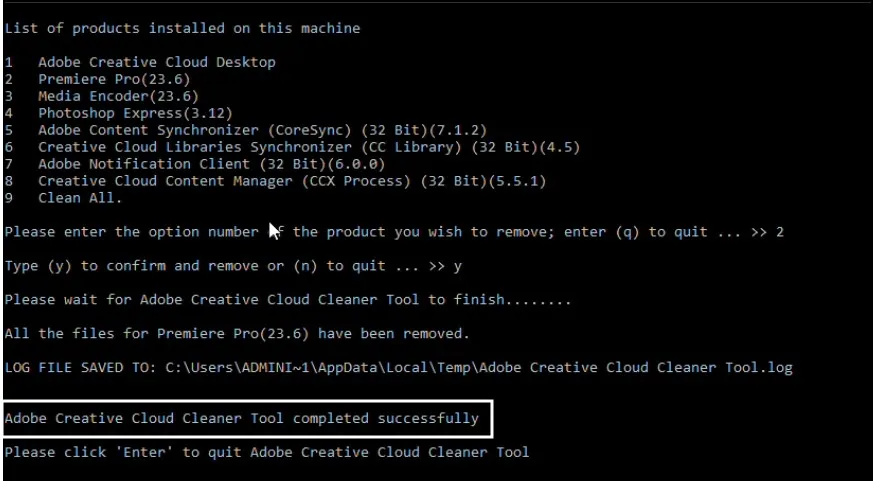
Surely, once the process has completed, one must restart the computer; moreover, this step is essential for the changes to take effect.
After restart, check if Premiere Pro is removed or the same issue is still there.
In my experience, this method works extremely well when users need to force uninstall Premiere Pro after standard uninstall procedures fail.
Even after a software uninstaller announces that a program has been successfully removed, many software suites leave behind massive cache files, internal logs, custom user preferences, and temporary scratch disks scattered across your system partition.
Open your Windows File Explorer and navigate to C:\Program Files\Adobe. Take a close look at the folders inside. If you see a standalone folder labeled Adobe Premiere Pro [Year], you can safely right-click and delete it completely.
You might also see a folder called Adobe Media Encoder. Media Encoder is a companion application that installs automatically alongside Premiere Pro to assist with rendering video files. If you are not utilizing other video editing software like After Effects, you can safely wipe out the Media Encoder folder too.

Final Thoughts
We are seeing this Adobe Creative Cloud error come only when we are trying to uninstall the software, which is very frustrating thing. The fix itself is simple, and further steps are not required.
As per the first step, close all Adobe services through Task Manager. Regarding this process, make sure all Adobe programs are fully stopped. Basically, if that is not working, use Adobe’s official Creative Cloud Cleaner Tool to remove the application and do the same reinstallation process again.
These two methods itself are enough to solve the problem. No further steps are needed to uninstall Premiere Pro.
Once you’ve successfully removed Premiere Pro, you may want to verify that the application was completely removed from your system. If you’re not sure how to do that, check out our guide on how to check uninstalled programs history in Windows 11.
Frequently Asked Questions
Why does Adobe Premiere Pro say Creative Cloud is running?
Adobe background services are still active even after closing Premiere Pro. These services prevent the uninstall process from starting.
How do I force uninstall Premiere Pro?
You can force uninstall Premiere Pro by ending Adobe services in Task Manager or by using Adobe’s Creative Cloud Cleaner Tool.
Is the Adobe Creative Cloud Cleaner Tool safe?
Yes. It is an official utility provided by Adobe for removing damaged or stubborn Adobe installations.
Will uninstalling Premiere Pro delete my project files?
No. Your Premiere Pro project files are normally stored separately and are not deleted during uninstallation.
What should I do if adobe premiere pro won’t uninstall after using the Cleaner Tool?
Restart your PC and try uninstalling again. If the issue persists, run the Cleaner Tool once more with administrator privileges.