
You are working on a major project on your Windows 11 PC when you find that a recent change you made has caused everything to go haywire. It’s a nightmare many PC users have faced. The good news is that Windows 11 has a native safety net called System Restore Points. Here, we will guide you through creating a System Restore Point in Windows 11 to ensure your data and settings remain secure in the face of an unexpected mishap.
What is a System Restore Point?
System Restore Point is a snapshot of your Windows system settings & registry at a particular moment. If something goes wrong, and you get a failed update or a software conflict, this restore point can help you return your PC back to its previous state before trouble happened. This will not touch personal files but will undo system-level changes.
Why Create a System Restore Point?
System Stability: Having a restore point can help reverse unwanted system changes without affecting your personal files.
Software Installation: New software or drivers can sometimes cause unexpected issues. A restore point makes it easier to return to a stable state.
Post-Update Reliability: Windows updates can occasionally bring bugs. A restore point ensures you can revert back if needed.
Note: System Restore doesn’t affect your personal files, but it does remove apps and drivers installed after the restore point was created.
Before we dive into creating a System Restore Point, if you’re looking to analyse your PC’s performance, check out my step-by-step guide on How to Generate a System Performance Report on Windows 11. This can help you understand your system’s health before making any changes.
How to Create a System Restore Point in Windows 11
Step 1: Open System Properties
- Click on the Start menu (Windows icon) and type Create a restore point.
- Select the Create a restore point option from the search results. This will open the System Properties window.
Step 2: Enable System Protection
If System Restore is disabled on your PC, you need to enable it before creating a restore point.
- In the System Properties window, under the System Protection tab, look for your system drive (usually C:).
- If Protection is Off, select the drive and click on Configure.
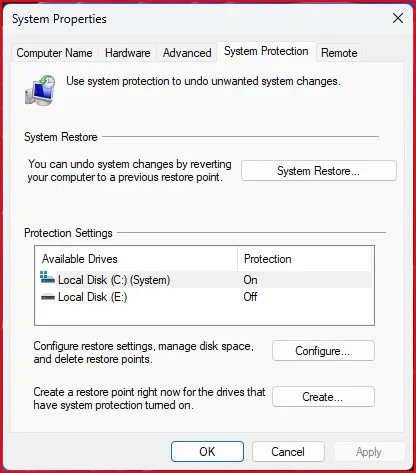
- In the new window, choose Turn on system protection.
- Adjust the Max Usage slider to allocate storage space for restore points (10% is usually good).
- Click Apply, then OK.

Step 3: Create a Restore Point
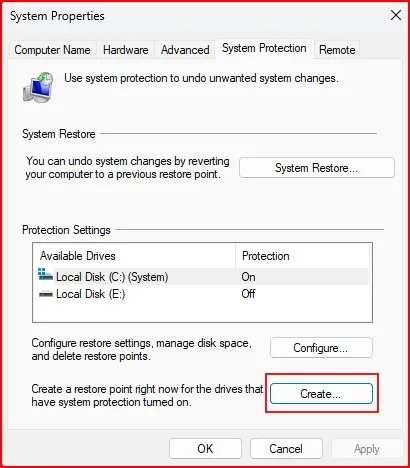
- Back in the System Properties window, click on Create.
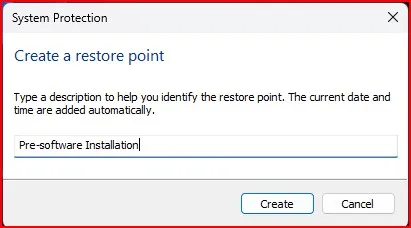
- A small pop-up will appear asking for a name. Enter a meaningful name like Pre-software Installation.
- Click Create and wait for Windows to complete the process.
- Once done, you’ll see a message saying The restore point was created successfully.
- Click Close, then OK to exit the window.

Reminder: It might be useful to create a restore point before making any major changes to your system.
How to Use a System Restore Point
If something goes wrong with your PC, you can restore it to a previous working state using your restore point.
Steps to Restore Your PC Using a System Restore Point:
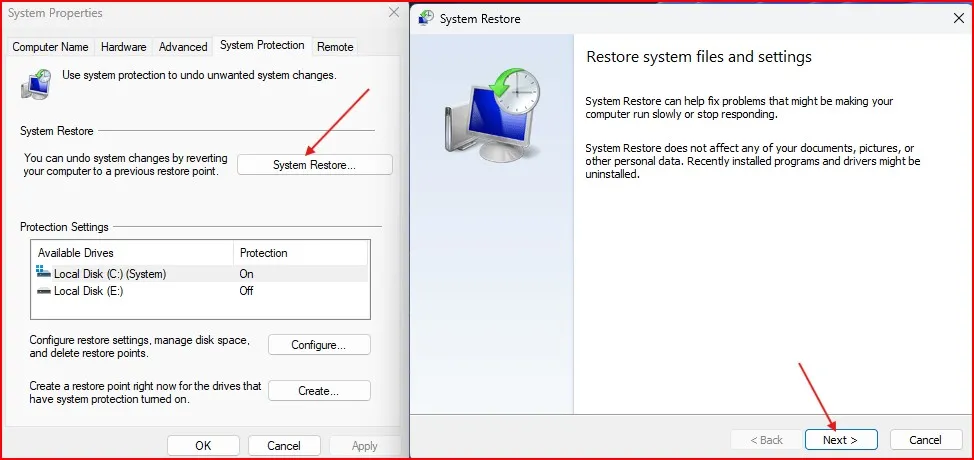
- Open System Properties (just like before, type Create a restore point in Start Menu search and open it).
- Click on System Restore.
- In the new window, click Next.
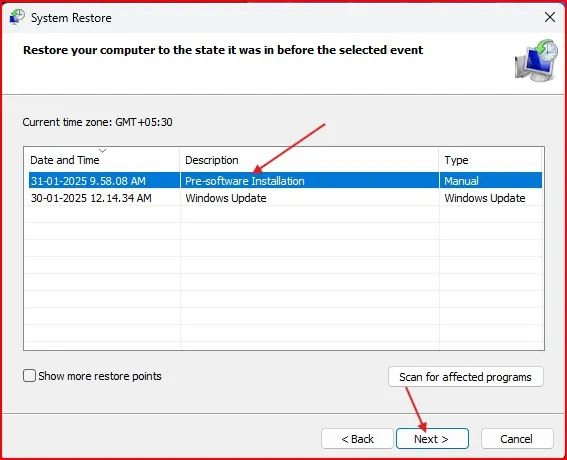
- You’ll see a list of restore points. Select the one you created before the issue started.
- Click Next, .
- Then Finish. Windows will restart and restore your system.
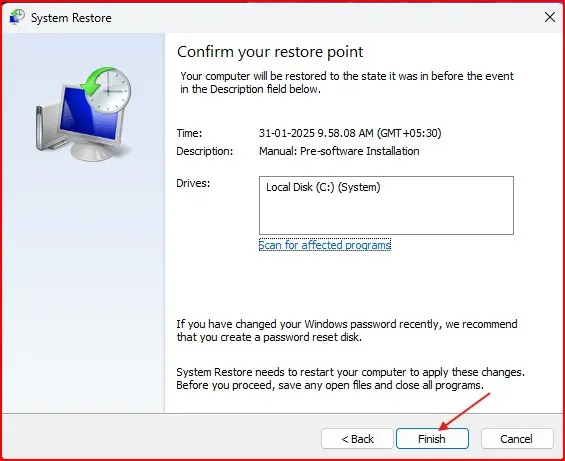
After the process is complete, your PC will be back to the state it was in when you created that restore point. If the problem persists, you can try an older restore point.
Caution: Your PC will need to restart to complete the restoration.
Conclusion
One of the easiest ways to backup the Windows 11 system from any hiccups is to create a System Restore Point in windows 11. So whether you are changing settings, installing new software, or updating drivers, a restore point can save you from a shit ton of headache.
So before doing anything drastic, take a few minutes to set up a restore point — it’s effectively a parachute for your PC!
Did this guide help you? Drop me a comment below, and be sure to pass this along to anyone who would find it helpful!
Interested in more Windows 11 tips? Feel free to explore Microsoft’s official resources for additional guidance.
Frequently Asked Questions (FAQ)
Will a System Restore Point Delete My Files?
No, System Restore Point is almost nothing but to restore the system settings or registry changes. Your personal files — such as documents and pictures — aren’t affected.
When to Make a System Restore Point?
Whenever you make a significant modification, such as installing new software, updates, or drivers, it’s wise to create a restore point beforehand. You can also configure Windows to create automatic restore points at regular intervals.
How to Remove Old Restore Points (Windows 10)
Deleting old restore points will clear up space:
1. Open System Properties.
2. Click Setting under the System Protection tab.
3. Then select Delete to delete all outdated restore points.
What to Do If System Restore Isn’t Working?
If System Restore doesn’t work:
1. Boot into Safe Mode and try running System Restore again.
2. Confirm that System Protection has not been turned off.
3. Restore your PC using the Windows Recovery Environment (WinRE)