
Computer security is an utmost importance in today’s world. Manufacturers and software developers are always working on new safeguards to keep users systems safe as cyber threats evolve. Secure Boot: One of the most talked-about hardware security features. In this article, we will discuss in detail what is Secure Boot, how it works, and more importantly, how to enable or disable Secure Boot in Windows OS.
What is Secure Boot?
Secure Boot is a security standard developed by members of the PC industry to help ensure that a device boots using only software that is trusted by the Original Equipment Manufacturer (OEM). It’s a mechanism to help protect the system from malicious software and unauthorized operating systems that attempt to load before the system has properly started.
How Secure Boot Works
When you first boot your computer with Secure Boot enabled, it verifies the firmware and software that boot the system. This encompasses firmware drivers, operating system bootloaders and UEFI drivers. Secure Boot checks the digital signature of those components against a database of known, trusted signatures stored in firmware.
If valid, it allows the system boot to proceed. If they are not authenticated or they have been modified, Secure Boot denies them permission to execute and that protects the system from threats.
The Importance of Secure Boot
Secure Boot plays a crucial role in maintaining the integrity of your system. Here are some of the main reasons why this is important:
- Preventing Rootkits: Rootkits are malware that can be very nasty, infecting a system before the operating system itself has been booted up. Secure Boot helps prevent these by ensuring only trusted software can run during startup.
- Protection Against Bootkits: Bootkits are similar to rootkits that infect before the operating system loads. Secure Boot’s verification technique mitigates such exploits.
- Ensuring System Integrity: Secure boot proves system integrity by validating the components that create the boot course of action, assuring that your system wasn’t compromised since the last boot.
- Industry Standard Compliance: Numerous organizations implement Secure Boot as an integral part of their security compliance framework.
Secure Boot and Windows
Microsoft has been a big proponent of Secure Boot, even making it a Windows 8 and beyond requirement. This means every PC that ships with Windows pre-installed will have Secure Boot on by default.
Compatible Versions of Windows
- • Windows 8 and 8.1
- • Windows 10
- • Windows 11
These Windows releases are compatible with Secure Boot and ensure added security at startup.
How to Verify Secure Boot is Enabled
Before you try to enable Secure Boot or disable Secure Boot, it helps to know if it’s enabled on your system right now. Here’s how you can check:
- Press the Windows key + R to open the Run dialog.
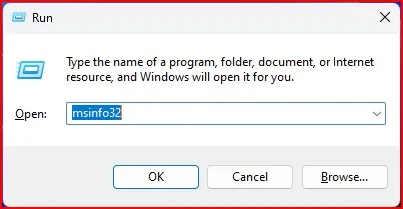
- Type “msinfo32” and press Enter to open System Information.
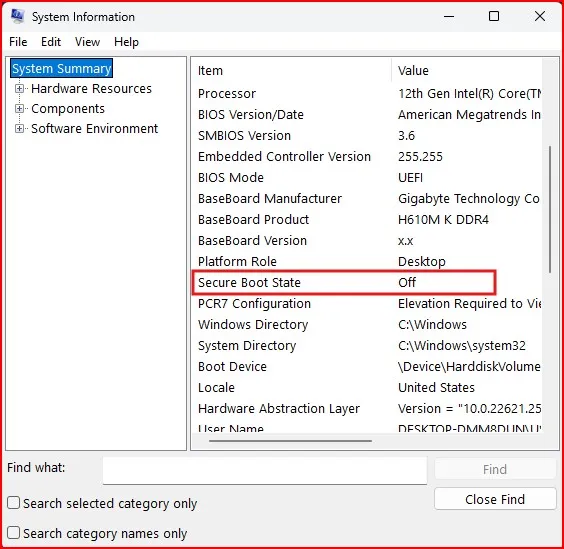
- In the System Summary section, look for “Secure Boot State”.
- If it says “On”, Secure Boot is enabled. If it says “Off”, it’s disabled.
How to Enable Secure Boot in Windows
Most users will need to access their computer’s UEFI (Unified Extensible Firmware Interface) or BIOS (Basic Input/output System) settings to enable Secure Boot. The exact process can vary depending on your computer’s manufacturer, but here’s a general guide:
- Restart your computer and enter the UEFI/BIOS setup. This usually involves pressing a key like F2, F12, or Delete during startup.
- Look for a section called “Boot” or “Security”.
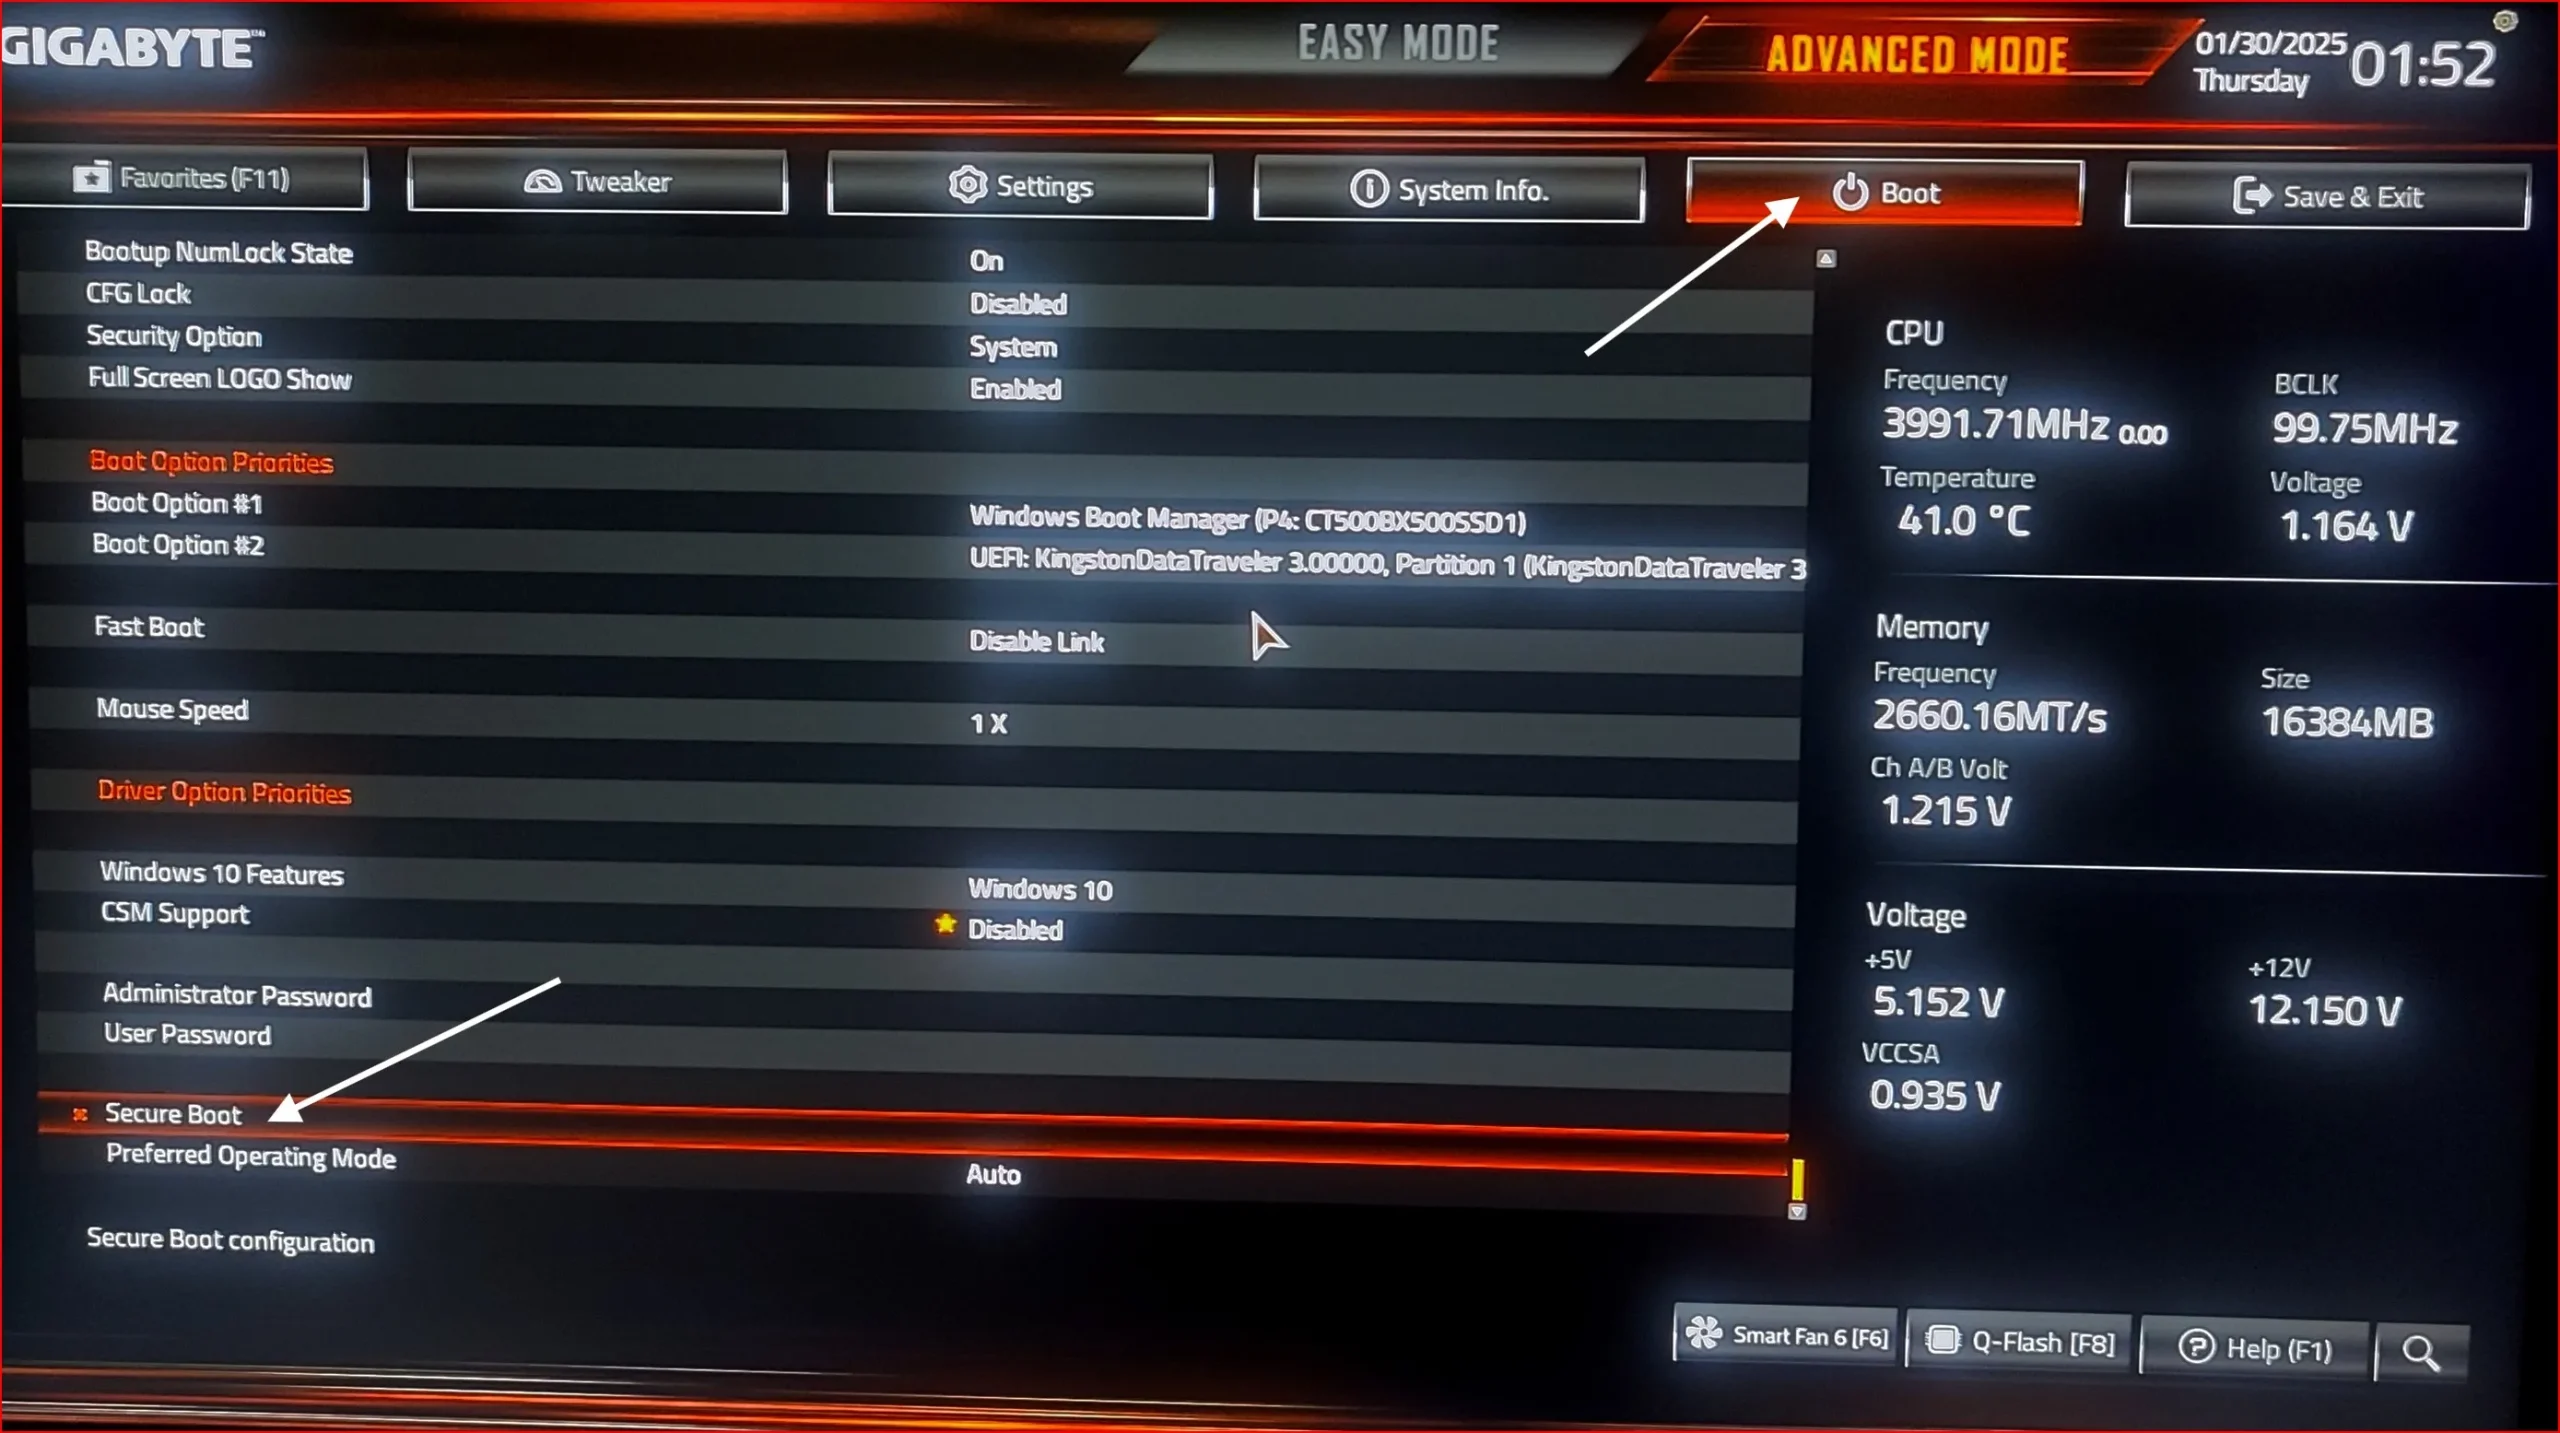
- Find the Secure Boot option and set it to “Enabled”.
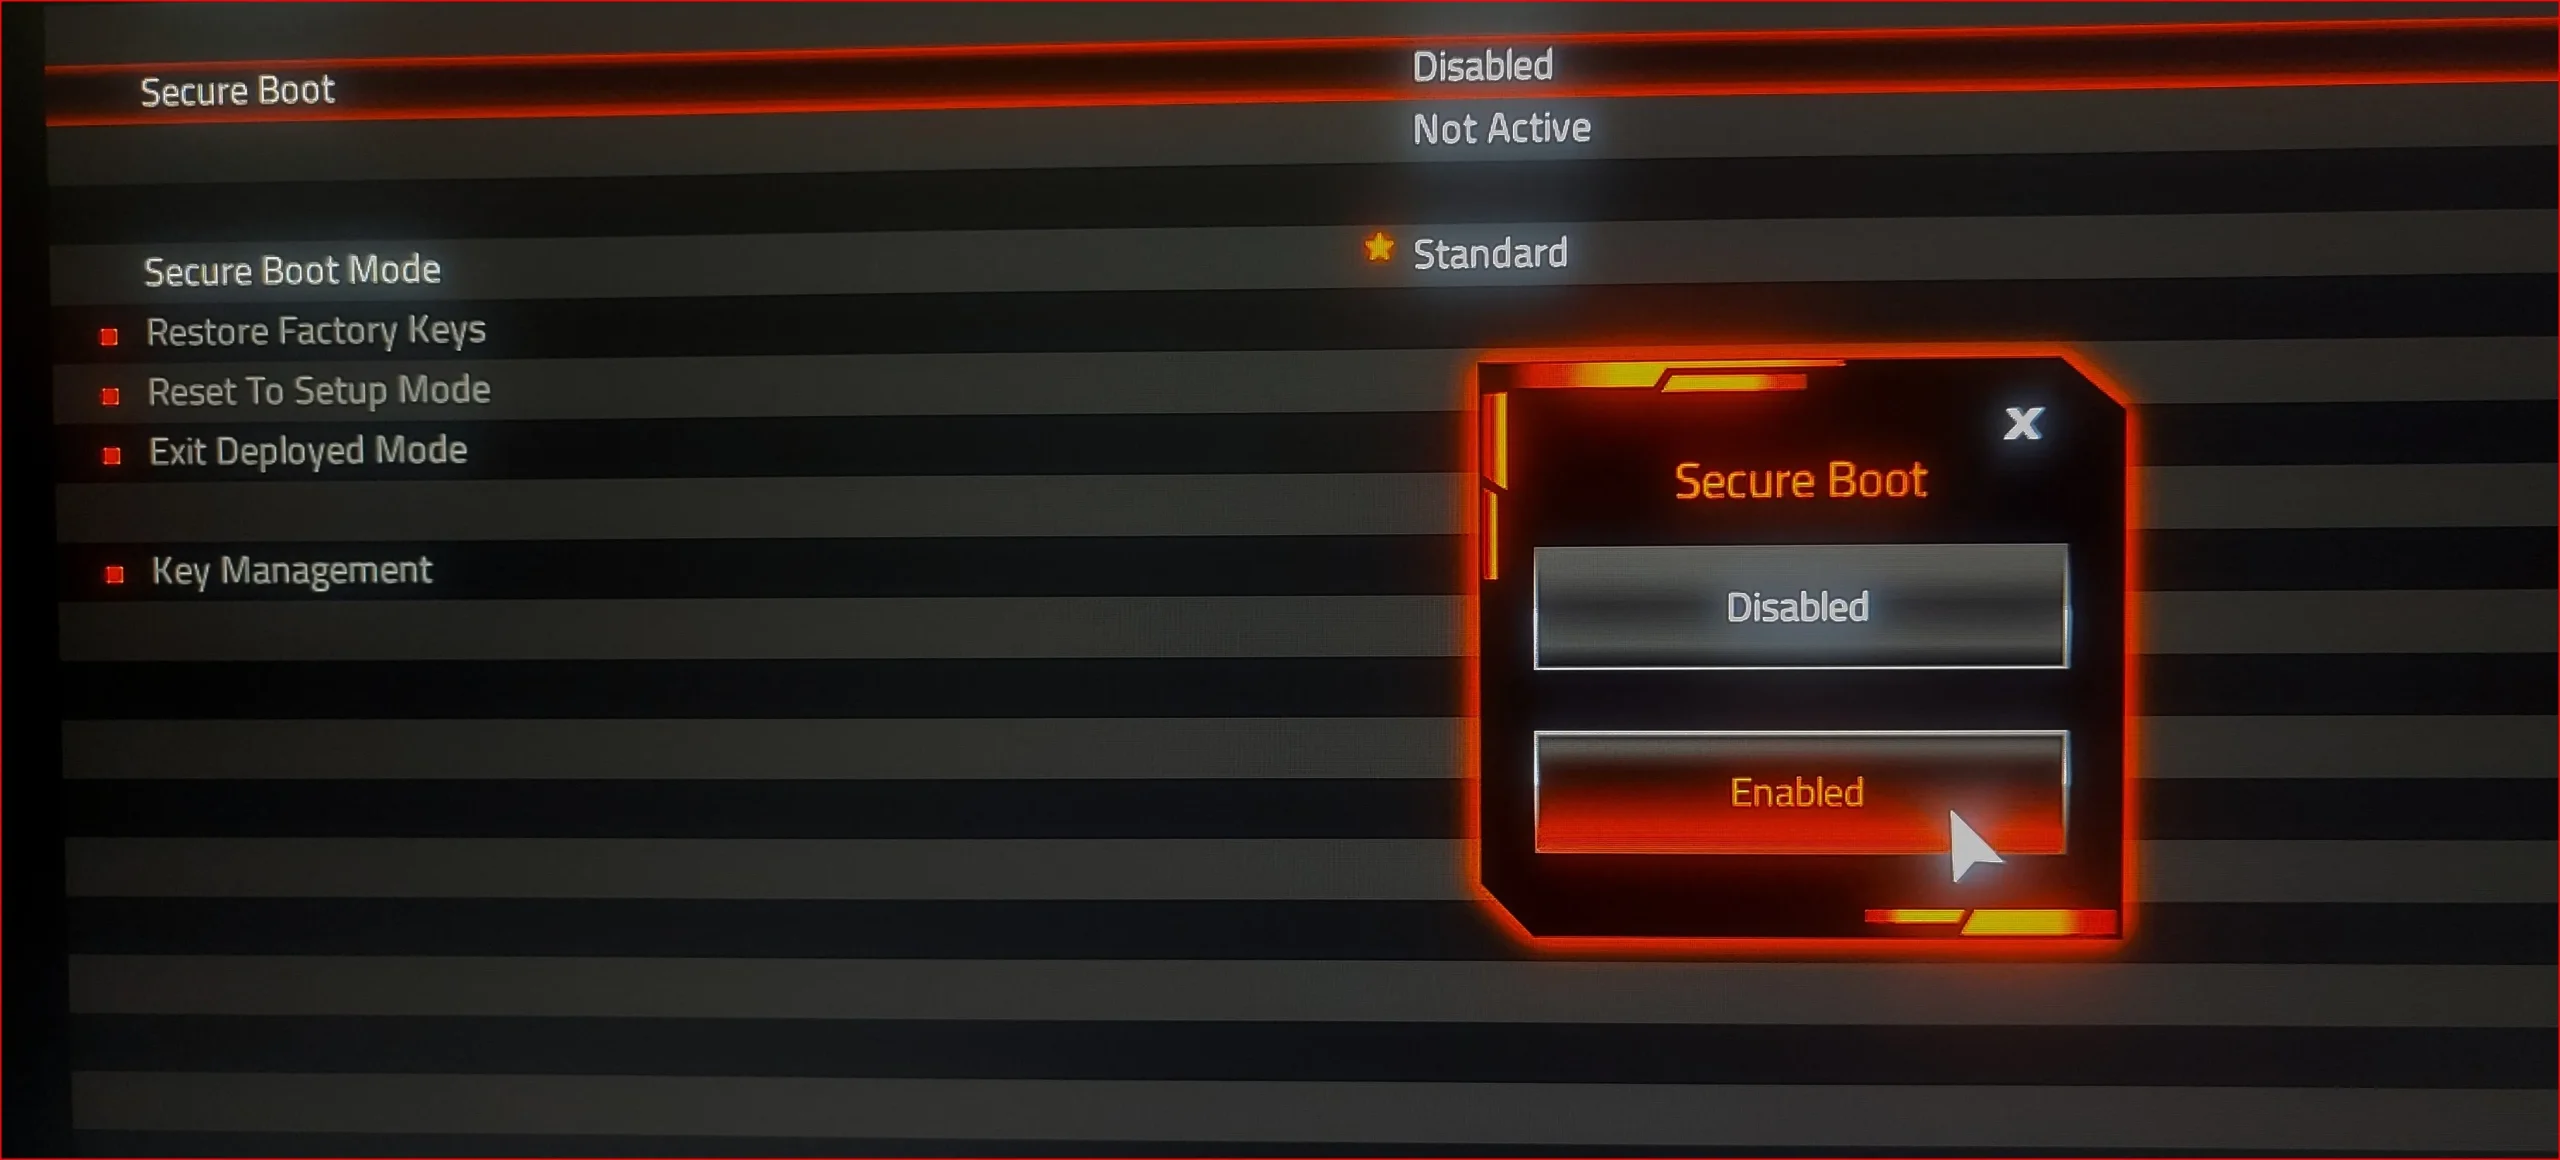
- Save your changes and exit the UEFI/BIOS setup.
- Your computer will restart, and Secure Boot will be enabled.
If your system was previously booting in Legacy BIOS mode, you might need to convert your boot drive to GPT and enable ‘UEFI boot mode’ first before you can enable secure boot option
How To Disable Secure Boot in Windows
In some cases, it may be necessary to turn off Secure Boot. Such as, if you’re installing an operating system that doesn’t support Secure Boot, or if you’re using hardware that requires legacy boot mode. Here’s how you can disable Secure Boot:
- Enter your UEFI/BIOS setup as described in the previous section.
- Navigate to the “Boot” or “Security” section.
- Find the Secure Boot option and set it to “Disabled”.
- Save your changes and exit.
- Your system will restart with Secure Boot disabled.
Cautions When Disabling Secure Boot
Disabling Secure Boot is sometimes a necessary step, but it’s essential to consider the risks involved:
- Increased Vulnerability: Your system is more vulnerable to specific categories of malware, especially the ones that work at the boot level.
- Loss of Some Windows Features: Features like Windows Defender Device Guard require Secure Boot and will not work when Secure Boot is disabled.
- Boot Problems: Certain Windows updates may expect Secure Boot to be enabled, potentially leading to boot issues in its absence.
When to Enable or Disable Secure Boot
Secure Boot is a feature most commonly found on UEFI-based machines, it is a valuable tool in the security arsenal, but there are times when it needs to be turned off in order to facilitate a particular task.
Scenarios for Enabling Secure Boot
- General Usage: For the average user, particularly on Windows systems, Secure Boot should be enabled as it significantly improves OS security.
- Corporate Environments: Secure Boot is commonly required by many organizations as part of their security policies.
- Post Windows Installation: When you install or reinstall Windows, turning on Secure Boot is an extra measure of protection.
Scenarios for Disabling Secure Boot
- Dual Boot: You may wish to disable Secure Boot if you are dual-booting with an OS that does not support Secure Boot (e.g., certain Linux distributions).
- Older Hardware: Certain types of old hardware or drivers are not compatible with Secure Boot.
- Development and Testing: Developers or Information Technology (IT) professionals may need to turn off Secure Boot to test or work with a custom boot loader.
Once Secure Boot is disabled, you can install software like VirtualBox and VMware Workstation without restrictions. If you’re interested in setting up a virtual machine, follow my guide on creating your first VirtualBox VM or installing VMware Workstation Pro.
Troubleshooting Secure Boot Issues
Sometimes, Secure Boot can cause you some troubles. Here are some common problems and their solutions:
- Secure Boot Cannot be Enabled: Make sure your computer is booting under UEFI mode and your boot disk is formatted under GPT
- After Enabling Boot Failures: If your system fails to boot after enable Secure Boot, it can be due to the presence of unsigned boot loaders or drivers. Check whether you boot in safe mode and update your drivers.
- Windows Won’t Install: If you’re unable to install Windows with Secure Boot on, go ahead and disable it to get the installation completed and re-enable afterward.
- Error Messages: You might encounter error messages like “Secure Boot Violation” or “Image Failed Verification” when loading an unsigned or corrupted component. Check for malware, and make sure all of your drivers and software are up to date.
Conclusion
Secure Boot is a really powerful security feature that helps protect your system from boot-time malware and from running unauthorized operating systems. Even though it’s mostly best practice to leave Secure Boot enabled, specific situations exist where you may have a valid reason to turn it off.
By knowing how to turn on and off Secure Boot in Windows, you can better understand whether to leave your system secure. When considering whether to enable Secure Boot, always balance its potential security benefits against your particular requirements.
Keep in mind, Secure Boot is a segment of a full security battle plan. Using alongside common security such as applying software updates, maintaining strong password policies, along with trusted anti-malware products, will help confirm your system stays protected from the majority of threats.
Frequently Asked Question (FAQ)
Is it safe to turn off Secure Boot?
This means you are also removing an important security measure against bad bootloaders, as Secure Boot is disabled. If you do turn this off, it’s important to only install operating systems and software that you trust.
What if I disable Secure Boot?
Disabling Secure Boot allows your PC to boot any operating system or bootloader, including unsigned software. Although it adds convenience, it also opens your system up to a malware attack.
I don’t see the Secure Boot option in my BIOS / UEFI.
Here we will list some common reasons causing Secure Boot to be missing or grayed out:
• Your system is in Legacy Mode rather than UEFI Mode.
• Setting an Administrator Password in the BIOS may be necessary to enable Secure Boot settings.
• Secure Boot might not be supported on your PC.
Secure Boot Only Works In UEFI Mode, How To Switch From Legacy Mode To UEFI?
Open BIOS/UEFI settings.
Locate Boot mode and change the settings from Legacy to UEFI.
Click on Save changes and restart the PC.
Re-enter BIOS and turn on Secure Boot.
Is it possible to turn back on Secure Boot once I have turned it off?
Yes, you can switch Secure Boot back on at any time, through the same steps in your UEFI settings, setting it to Enabled. If you have installed an unsupported OS, you’ll need to reinstall Windows before you can enable it again.
Impact of Secure Boot on Gaming Performance
Secure Boot does not affect gaming performance. It simply makes sure that only trusted software runs on boot, so it only affects its startup process.