
In some cases, you might want to experiment with more than one OS: Windows, Linux or Android. Usually, you have to boot one USB Flash drive from each ISO file which takes time. But what if you don’t have a pen drive available?
However, you should not worry as here is the good news; Instead of creating new bootable USB drive every time, you can now be able to boot multiple ISO files from hard drive. This a step by step guide on how to create a simple multiboot on Windows 11 UEFI/GPT.
Why Boot Multiple ISO Files from Hard Drive?
Most users create a bootable USB drive whenever they want to install Windows or test Linux. While that works well, it also means formatting the USB drive repeatedly and copying a different ISO each time.
Once the multiboot setup is ready, all your ISO files will be available in one place. Just choose the one you want from the boot menu and boot it directly.
Some advantages of this method include:
- No USB flash drive required.
- Store multiple ISO files in one location.
- Boot Windows, Linux, Android, and recovery tools.
- Save time by avoiding repeated USB creation.
- Your normal Windows installation remains unchanged.
What You’ll Need
Before you begin, make sure you have the following:
- A Windows 11 PC using UEFI/GPT.
- At least 1 GB of free space on a data drive.
- A separate partition such as D: or E: to store ISO files.
- GRUBFM.
- BootIce.
Tip: Try to save your ISO files on a drive other than C: This helps keep them safe even if you need to reinstall Windows later.
Step 1: Organize All Your ISO Files
First, create a folder on your data drive.
For example:
D:\All ISO
Now copy all your ISO files into this folder.
You can store:
- Windows 11
- Windows 10
- Kali Linux
- Linux Mint
- HBCD PE
- Bliss OS
- Android TV OS
- Any other supported ISO
Keeping everything inside one folder makes it much easier to find the correct ISO during boot.

Step 2: Create a Small FAT32 Boot Partition
Now we need a dedicated partition that will store the boot files.
Right-click the Start button. Open Disk Management.

Right-click your data drive. Select Shrink Volume.

Enter 1024 MB. Click Shrink.

You’ll now see 1 GB of unallocated space.
Next:
Right-click the unallocated space. Select New Simple Volume.

Assign any available drive letter (for example, F:).

Select FAT32 as the file system. Give the partition a name like MultiBoot. Click Next.

Your boot partition is now ready.
Step 3: Download and Prepare GRUBFM
GRUBFM is the boot manager that allows you to browse and launch ISO files directly from your hard drive.
To prepare it:
Search for GRUBFM on Google. Open its GitHub Releases page. Download the latest English (US) version.
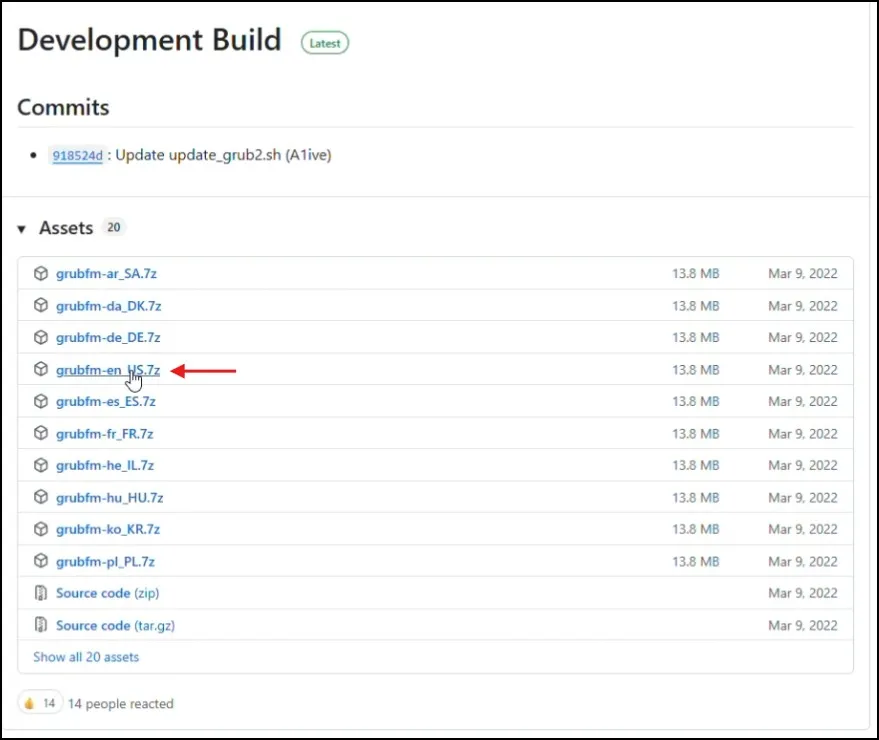
Extract the ZIP file. Locate grubfm_x64.efi.

Rename it to boot.efi.

Copy boot.efi to your new FAT32 partition. That’s all you need to do for GRUBFM.
Step 4: Add the Boot Entry Using BootIce
Next, we need to tell Windows where to find GRUBFM during startup.
Download BootIce. Extract the ZIP file. Run BootIce as Administrator.

Open the UEFI tab. Click Edit Boot Entries.
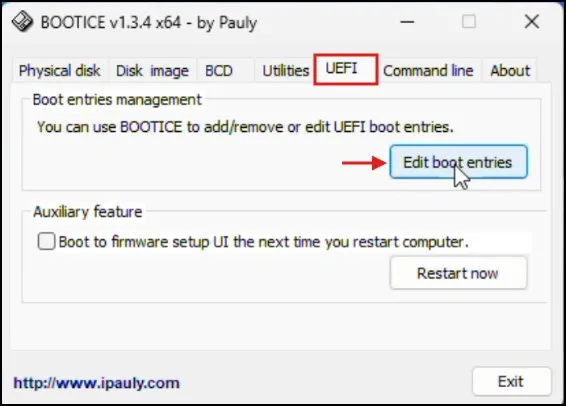
Select the disk containing the FAT32 partition. Click Add.
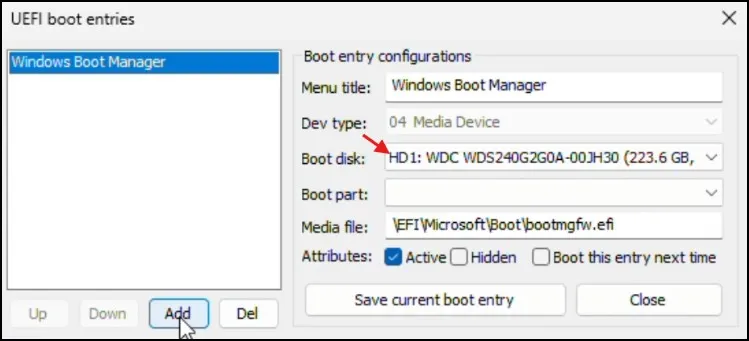
Browse to boot.efi inside the FAT32 partition. Enter a boot entry name such as MultiBoot ISO. Verify that the correct boot partition is selected. Click Save Current Boot Entry.
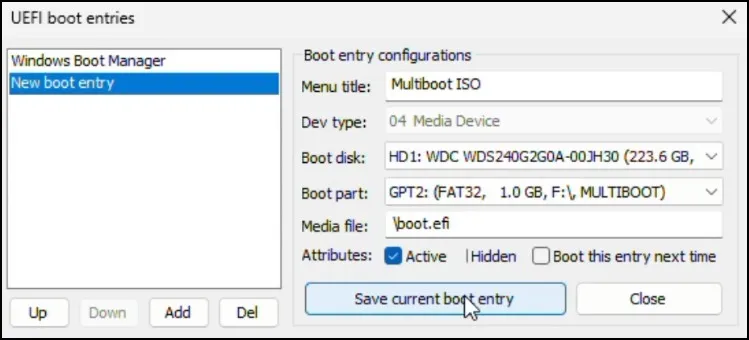
The new UEFI boot entry has now been created successfully.
Optional: Hide the Boot Partition
If you don’t want the boot partition to appear in File Explorer:
Open the Physical Disk tab. Click Parts Manage.

Select the FAT32 partition. Click Remove Drive Letter.

This doesn’t affect its functionality. It simply keeps the partition hidden.
Step 5: Boot an ISO File
Now comes the exciting part.
Restart your computer.
While the system is starting, press your motherboard’s Boot Menu key.
Depending on your PC, it may be:
- F12
- F11
- F8
- ESC
Select the MultiBoot ISO boot entry.

GRUBFM will now load.
Navigate to the drive containing your All ISO folder.
You’ll see all your ISO files listed.

Simply select the ISO you want and choose Boot ISO.
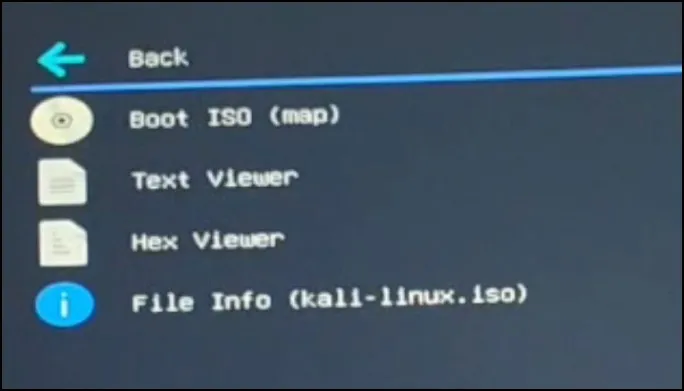
The selected operating system will now boot directly from your hard drive.
Testing Kali Linux
I tested this setup using the Kali Linux ISO.
After selecting Boot ISO, Kali Linux launched successfully without any USB drive connected.
From there, I could either use Kali Linux in Live Mode or begin the installation process.
Testing HBCD PE
I also tested HBCD PE.
It booted perfectly from the hard drive.
Once loaded, I had access to a complete Windows PE environment containing useful troubleshooting tools.
You can use it to:
- Recover important files
- Reset Windows passwords
- Remove malware
- Check disk health
- Repair Windows startup problems
This confirms that the multiboot setup is working correctly.
Will This Affect My Existing Windows Installation?
No. This is one of the biggest advantages of this setup. Your existing Windows installation stays exactly the same. If you turn on your PC normally, Windows will boot normally. You won’t see any extra boot menu during normal startup.
Whenever you want to boot an ISO, simply restart your computer, open the Boot Menu, and select MultiBoot ISO.
Things to Remember
- Keep your ISO files on a separate drive.
- Do not delete the FAT32 boot partition.
- Use the Boot Menu only when you want to boot an ISO.
- Back up important data before making disk partition changes.
- This guide is intended for Windows 11 UEFI/GPT systems.
Conclusion
Installing boot multiple ISO files from hard drive will provide a big time saving as you traditionally do not require to prepare a bootable USB stick for every operating-method. When the setup is finished, you can directly boot Windows, Linux, Android and other supported ISO files from your hard drive anytime needed.
Also Read: How to create a Multiboot USB drive with Multiple Bootable ISO
Frequently Asked Questions
Can I boot Windows 11 ISO directly from my hard drive?
Yes. After completing the setup, you can boot supported Windows ISO files directly from your hard drive without using a USB drive.
Will this remove my existing Windows installation?
No. Your current Windows installation remains untouched unless you intentionally start a new operating system installation.
Can I boot Linux ISO files using this method?
Yes. Kali Linux, Linux Mint, and many other Linux distributions can be booted directly from the hard drive.
Do I need to keep the FAT32 boot partition?
Yes. It contains the GRUBFM boot files required to launch your ISO files.
Do I have to select MultiBoot ISO every time I start my computer?
No. Windows starts normally. You only choose MultiBoot ISO from the Boot Menu when you want to boot an ISO file.