
Ever notice that your windows PC has some random name like DESKTOP-7A3F2XK? It does work, but tells you little about the computer. Alternatively, if you have too many PCs connected to a single network or simply want a more unique approach, knowing how to change computer name in Windows 11 would be an excellent opportunity. This is so easy to do and requires no third-party software. Below are some easy ways to rename Windows 11 PC.
Before You Rename Your PC
Here are few things to note before going ahead:
• You’ll need administrator privileges.
• Computer names may also contain letters, numbers and hyphens.
• Avoid spaces and special characters.
• Once you change the name, you will require restarting your PC for the new name to go into effect.
And now we move forward with different methods to do that.
Method 1: Modify Computer Name by Windows Settings
This is by far the easiest way for most users.
1. Open Settings like Windows + I
2. Click System from the left pane.
3. Scroll down and select About.
4. Near the top of the page, you should see your current device name. Click Rename this PC.

5. Type your preferred computer name.
For example:
• Home-PC
• OfficeLaptop
• TechInfoKart-PC
Click Next.
6. Then Windows is ready to prompt you for a reboot.
Click Restart now, or choose Restart later if you’re working on something important.
The new computer name should now be in effect when any PC restarts.
This is the method I usually suggest when someone asks how to change computer name in Windows 11, it’s fast and good for beginners.
Method 2: Rename Windows 11 PC with System Properties
This is a solution that has been around since previous versions of Windows and works flawlessly even today.
1. Press Windows + R. Type: sysdm.cpl and Press Enter.

2. The System Properties window opens. Go to the Computer Name tab. Click Change.
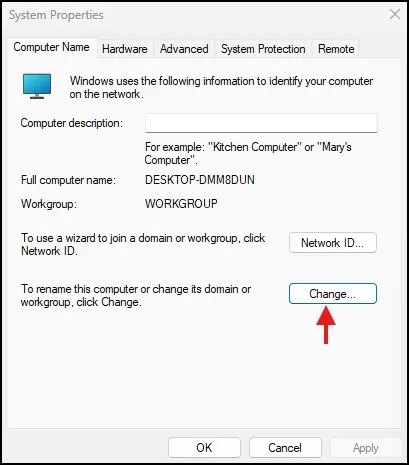
3. Enter your new computer name. Click OK.

4. Windows will show a welcome letter saying the adjustment was made. Click OK.
5. Restart your computer. After you restart, the new computer will use new name in Windows.
A lot of IT pros still like this old school method because it is simple and works on any version of Windows.
Method 3: Change Computer Name Using Windows Terminal (PowerShell)
If you enjoy using command-line tools, PowerShell makes the process very quick.
1. Right-click the Start button. Choose Windows Terminal (Admin).
2. Run the following command:
Rename-Computer -NewName “Office-PC” -Restart
Change Office-PC to whatever name you desire. Press Enter.
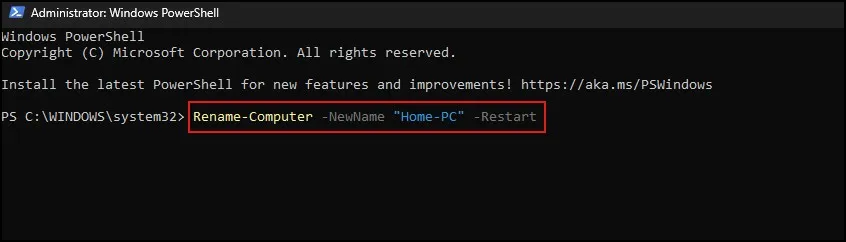
3. And Windows will restart your PC automatically, and it applies the new name.
If you feel comfortable with PowerShell, this is possibly the quickest method to rename Windows 11 PC.
Method 4: Rename Computer Using Command Prompt
Changing it from Command Prompt is another way, but that’s a bit roundabout.
Run for the following commands with Command prompt being opened as Administrator:
WMIC computersystem where caption=”%COMPUTERNAME%” rename “New-PC-Name”
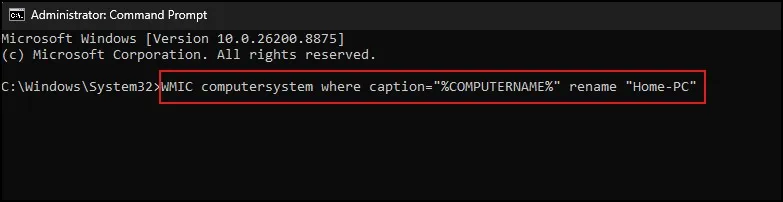
Replace New-PC-Name with your preferred computer name.
Wait for the command to finish, and restart your computer.
Microsoft deprecated WMIC on supported Windows releases, it works on many Windows 11 installs. If not, use one of the other methods in place of it.
If you’d like another reference, Pureinfotech also has a detailed guide on renaming a Windows 11 PC using different methods.
How to Check Whether the Computer Name Changed
It’s a good practice to check the new name after reboot.
The easiest way is:
• Press Windows + I
• Open System
• Select About
By making this change, you will see the device name now reflected.
You can run Command Prompt and write:
hostname
Press Enter.
You get your system hostname immediately from this command.
Conclusion
That’s all you need to do. After learning how to change PC name on Windows 11, it only takes a couple minutes. I normally change my PC name just after I set it up as it helps you identify your device easily on a network or if you’re sharing files with another device. Pick the one that suits your needs, restart your PC and you will be good to go with the new name!Also
Read: How to Reset Windows 11 Login Password When Forgotten
Frequently Asked Questions
Does changing the computer name delete my files?
No. Renaming your computer only changes the device name. Your files, apps, and settings remain unchanged.
Do I need to restart my PC after renaming it?
Yes. Windows requires a restart before the new computer name becomes active.
Can I rename my computer more than once?
Yes. You can change the computer name whenever you like.
Can two computers have the same name?
It’s not recommended. Devices on the same network should have unique names to avoid conflicts.
What’s the fastest way to change the computer name?
Using the Settings app is the easiest method for most users, while PowerShell is the fastest for advanced users.