
Have you ever reinstalled Windows, where you’ve spent hours re-installing all your favorite software? It can take at least half a day to make your PC feel like it is back to its old self — browsers, Office, media players, drivers, utilities.
Fortunately, there is a way better avenue. This tutorial will teach you how to Create custom Windows 11 ISO from installed apps and drivers. No more installing Windows from scratch each time — you will instead create a custom Windows image that can restore whenever needed.
I researched this method by implementing it on my PC with Windows 11, and honestly, it worked more than anticipated. You install Windows again using the modified installation media and pretty much everything is already there. It seemed more like restoring my machine, than a clean install of Windows.
Why Create a Custom Windows 11 ISO?
What most of us do is to reinstall Windows when the OS becomes slow, corrupt or after swapping out an SSD. That is all fine and dandy, but the worst part is reinstalling every application and changing every setting again.
Creating a custom Windows installation image solves that problem.
Instead of installing Windows first and then spending hours configuring everything, you simply reinstall your own customized Windows image.
This means you can keep:
- Installed desktop applications
- Device drivers
- Windows settings
- Personal customizations
- Registry changes
- Installed utilities
That’s pretty much the biggest advantage of this method.
Things You Should Know Before Starting
Before creating your custom Windows image, there are a few things worth checking.
First, this method works best if you’re restoring Windows on the same computer or another computer with very similar hardware. Since the captured image already contains installed drivers, moving it to completely different hardware may cause compatibility issues.
You’ll also need:
- A Windows 11 PC
- A second partition or USB drive with enough free space
- Windows 11 ISO downloaded from Microsoft
- A bootable USB creation tool like Rufus
- Administrator access
One more thing…
The bigger your Windows installation, the more you will need time to capture. If your C drive has lots of software or games, don’t be surprised if it takes an hour or even more.
Capture Your Existing Windows Installation Using DISM
This is the easiest and most reliable method because it uses Microsoft’s own deployment tool.
The idea is simple. Rather than copying files manually, DISM will capture your entire Windows partition and write it to a compressed install.wim image file. After that you will overwrite the default install.wim in the windows installation media with your own.
Basically, when Windows Setup runs, it takes all of your custom windows and installs them rather than a fresh installation from Microsoft.
Step 1 – Clean Up Your Windows Installation (Recommended)
While this step is just optional, my recommendation is to do it before the backup image creation.
Everything in your Windows drive will be part of the backup. This includes temporary files, browser cache, residual data from Windows Updates, even previous downloads.
So, spend few minutes for cleaning of your PC. Clean up unnecessary files, empty the Recycle Bin, uninstall programs you do not use anymore and run a Disk Cleanup.
This will only take a few minutes and will obviously reduce the final install.wim size by a significant amount.
Step 2 – Check Free Space on the Backup Drive
After that, plug in the USB drive or select another partition to store the image on.
This can take up a fair bit of space, the captured windows image.
Take note that the install.wim file can run anywhere from 8 GB to 25 GB, or more.
Before proceeding ensure that the destination drive has enough space.
For my case, I use an external USB drive just because it has the backup separate from the Windows partition — Which in my opinion is a more secure option.
Step 3 – Boot into Windows Recovery Environment
Now comes an important part.
Windows cannot properly capture the running system partition while Windows itself is active.
That’s why we need to boot into Windows Recovery Environment, also known as WinRE.
To open WinRE using Windows Settings, follow these steps:
Press Windows + I to open Settings. Click System from the left pane. Scroll down and select Recovery. Under Recovery options, find Advanced startup. Click the Restart now button.

When prompted, click Restart now again to confirm.

Your computer will restart and display the Choose an option screen.
From here, click:
Troubleshoot → Advanced options → Command Prompt

Once the Command Prompt window appears, you’re ready to verify the correct drive letters and capture your Windows installation using DISM.
Step 4 – Verify the Correct Drive Letters
First, you have to find the right letters of drives before executing the DISM command.
This step is critical because drive letters often change in Windows Recovery Environment. This means your usual C: drive will show as D:, and USB drives may be assigned E:, or whatever.
One easy way to verify this is with Notepad.
In the Command Prompt window, type the Notepad and press Enter.

When Notepad opens, click File > Open.
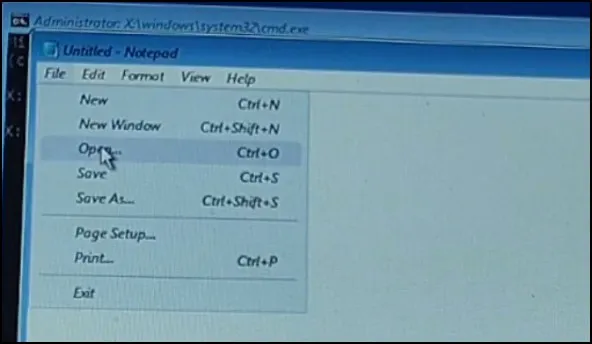
In the Open window, click This PC from the left pane. You’ll now see all available drives connected to your computer.

Double-click each drive to identify them:
- Open one drive and look for folders such as Windows, Program Files, and Users. If you see these folders, that’s your Windows installation drive.
- Open another drive to locate your USB drive or backup drive where you’ll save the install.wim file.
For example, in my case:
- D: is the Windows partition.
- E: is the USB drive where I’ll save the backup image.
Once you’ve confirmed the correct drive letters, close Notepad and return to the Command Prompt.
Step 5 – Capture Windows Using DISM
Now it’s time to create the actual Windows image.
If your Windows partition is D: and your USB drive is E:, run the following command:
dism /Capture-Image /ImageFile:”E:\install.wim” /CaptureDir:D:\ /Name:”Windows11_Backup” /Compress:max
Press Enter.

DISM will immediately begin scanning the Windows partition and creating the install.wim file.
Don’t worry if the percentage seems to stay on one number for several minutes.
That’s completely normal.
The process can take anywhere between 30 minutes and over an hour depending on:
- CPU speed
- SSD or HDD performance
- Amount of installed software
- Compression level
Step 6 – Understand What DISM Actually Creates
Once the DISM process reaches 100%, you’ll see a message indicating that the operation completed successfully.

At this point, open your backup drive. You’ll notice something interesting.
There won’t be a new ISO file waiting for you. Instead, you’ll only see a single file named install.wim.
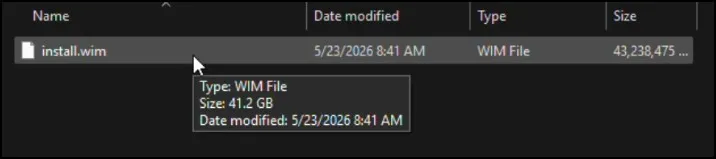
This is completely normal.
A lot of people expect DISM to generate a bootable Windows ISO automatically, but that’s not how it works.
DISM only captures your Windows installation and stores it inside the install.wim image. It doesn’t create Windows Setup files or make a bootable installer.
Think of the install.wim file as the “heart” of the Windows installation. It contains your Windows installation, installed software, drivers, registry settings, user profiles, and most of your personal Windows configuration.
The boot files and setup environment still come from Microsoft’s original Windows ISO.
Step 7 – Download a Fresh Windows 11 ISO
As per the requirement, you will need to download a clean Windows 11 ISO file from Microsoft’s official website.
Basically, you have to go to Microsoft’s official website and download the latest Windows 11 ISO file.
As per best practices, using the official ISO ensures you get the latest Windows files. Regarding setup, this will help you avoid unnecessary problems during installation.
once the download is complete, one must right-click the ISO file and select the Mount option; moreover, this step is essential to proceed further.
Windows will automatically create a virtual DVD drive regarding your disc image file. Just open that drive and you will see all the Windows installation files right there.
Step 8 – Copy the ISO Contents to a Folder
Instead of editing the mounted ISO directly, create a new folder on one of your drives.
For example:
D:\Windows11_CustomISO
Now copy everything from mounted ISO to this new folder.
This typically takes only a few minutes, depending on how fast your SSD is.
Once the copy is done, you are left with your fully editable Windows installation folder.
Step 9 – Replace the Original install.wim Using AnyBurn
Now that your custom install.wim file prepared, it is time to swap out the original install. wim within the Windows 10 / Windows 11 ISO.
We are going to be using AnyBurn, it is a simple and lightweight tool for ISO editing.
Visit official AnyBurn website and download the latest version of software.
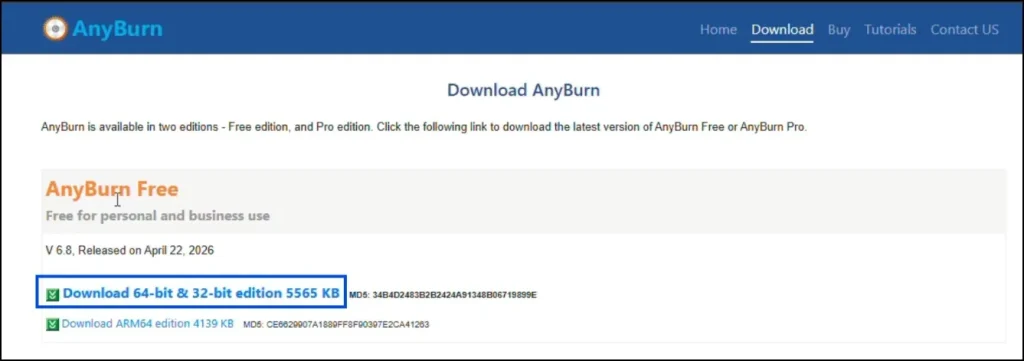
After the download has finished, launch the installer and proceed with on-screen instructions to install it. The installation is simple and takes a minute or two.
After installing, launch AnyBurn.
Step 10 – Replace the Original install.wim Inside the ISO
On the AnyBurn home screen, click Edit Image File.

Browse to your original Windows 11 ISO file and click Next.

AnyBurn will display all the files and folders inside the ISO. Open the sources folder and locate the original install.wim file. Click on install.wim and choose Remove.

Click Add, browse to the custom install.wim file that you created using DISM, and add it to the sources folder.
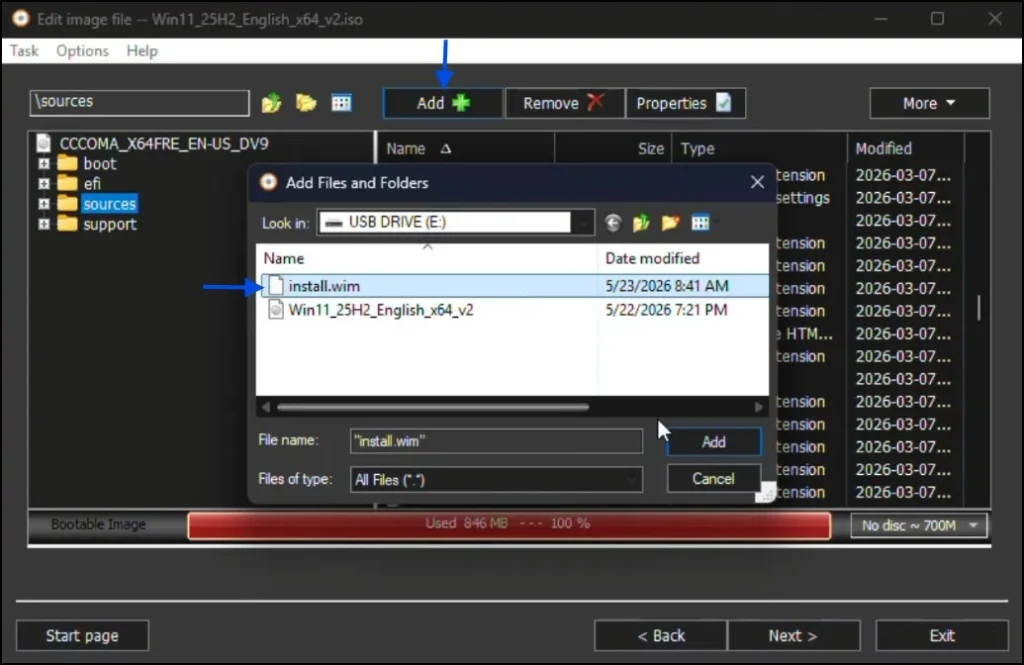
After confirming that the new install.wim has been added successfully, click Next.
Now give your ISO a name and click Create Now.

Depending on your computer’s performance, it may take several minutes to create the new ISO.
Once the process is complete, you’ll have a new Windows 11 ISO containing your installed applications, drivers, and settings.
Step 11 – Create a Bootable USB Drive Using Rufus
By this point you will have a Custom Windows 11 ISO. All you have to do now is make it a bootable USB.
To do this I’m going to be using Rufus. Download the latest version from the official Rufus website if you do not already have it. Also, it’s portable so you don’t need to install anything, just open App.
Now plug in your USB flash drive. Note that Rufus will format the drive during this process, so if you have anything important on it make sure to back it up first!
After opening Rufus, it should automatically detect your USB drive. Make sure the right one is chosen under Device.
Now, hit the Select button and locate the custom Windows 11 ISO that we created in the last step.
Once you choose the ISO, Rufus will fill in most of these settings for you. Unless you have a specific intention to modify them, just leave everything as it is.
Now click Start.

When you start the process, a warning will pop up saying everything on that USB drive will be wiped out. As would be expected, OK to continue.

For some of you, depending on your system, there may be one more confirm window to approve. If it pops up, hit OK once more.
Just sit back while Rufus copies all the files plus makes your boot USB. This normally takes a few minutes, and can take a bit longer if you are on an older USB drive or if it is slow.
Once completed, you’ll see the Status turn READY with a green bar.
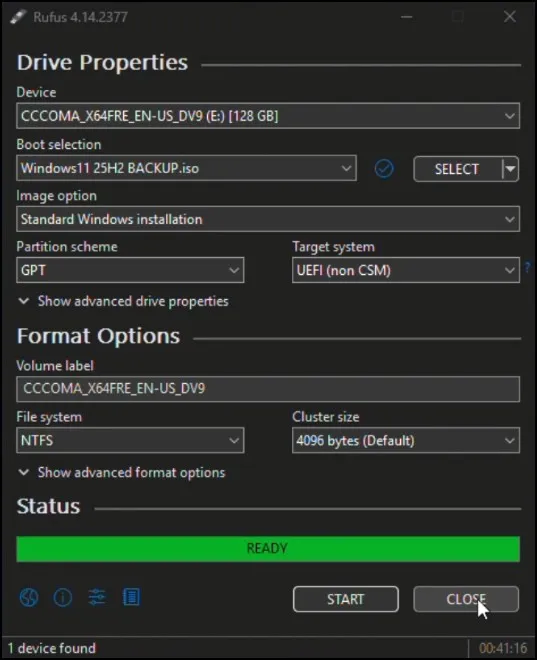
That’s it. You can now close Rufus. There you have it, your Windows 11 bootable USB is ready to go.
Step 12 – Reinstall Windows Using Your Custom USB
Next is the fun bit, install Windows with your custom image.
Enter in Boot Menu when computer restarting or go to BIOS/ UEFI setting. The key that you need to press depends on your computer maker. On most systems it’s F12, F9, Esc, or Delete.
Select your USB stick from the boot menu and hit Enter.
Shortly after, you will be greeted by the same Windows Setup screen.
Choose your language and time format along with keyboard layout → next.
Click on Install Now and proceed with the installation as you usually do.
There is absolutely nothing extraordinary you have to do from this point. Now just follow the on-screen instructions until Windows is fully installed.
When the installation completes and your computer genuinely boots for its first occasion, you start to see the distinction.
Rather than a brand-new Windows installation, many of your installed applications and drivers as well as some of your Windows settings were already there. That’s somewhat gratifying because you will not spend the good part of the day getting browsers, Office, utilities and tweaking Windows ever again.
Truly, it is what makes this way of method very handyperson. Taking the time to create the image once can save you a lot of time whenever you have to reinstall Windows down the road.
Common Mistakes and How to Fix Them
Most people don’t run into major problems, but there are a few common mistakes worth mentioning.
“The wrong drive was captured.”
This usually happens because drive letters change inside Windows Recovery Environment.
Always verify the correct partition before running the DISM command.
Never assume Windows is still on the C: drive.
“My install.wim file is huge.”
That’s perfectly normal.
If you’ve installed lots of applications, your install.wim can easily exceed 10 GB or even 20 GB.
Cleaning temporary files before capturing the image helps reduce its size.
“The USB doesn’t boot.”
Usually this happens because:
- The bootable USB wasn’t created correctly.
- The BIOS is using Legacy mode instead of UEFI.
- Secure Boot settings need adjustment.
- The ISO wasn’t rebuilt properly after replacing the install.wim.
Using Rufus usually avoids most of these issues.
Advantages
There are several reasons why I like this method.
- You can Backup Windows 11 with Apps and Settings instead of just backing up personal files.
- Windows reinstalls become much faster.
- Drivers and most configurations are already included.
- Everything is done using Microsoft’s built-in DISM tool.
- Great for restoring the same computer after formatting or replacing a drive.
- No need to reinstall dozens of applications every time.
Limitations
Like any method, it also has a few limitations.
Keep in mind that, as the custom image includes hardware-specific drivers and settings, it is most useful when used on the same PC.
After creating the image, if you install lots of new software, you will need to take a fresh install.wim, if you want them to get pulled in.
Likewise, when Windows ships a large feature update, make a new image in order to have an up-to-date backup.
In fact, these aren’t really cons just things to be aware of.
Final Thoughts
Making a custom Windows 11 ISO is looking a bit difficult only in the beginning, but once we are doing it one time, it is actually very simple only.
When you Create Custom Windows 11 ISO, your apps, drivers and settings are already there. So, at the next time when you reinstall Windows, you do not have to set up all from scratch again.
As per your needs, this trick is very useful if you reinstall Windows often, change your SSD, or want a backup regarding your system setup.
Frequently Asked Questions
Can I create a custom Windows 11 ISO without using third-party software?
Yes. You can use Microsoft’s built-in DISM tool to capture your Windows installation. You’ll still need a Windows 11 ISO and a tool like Rufus to create the final bootable USB.
Does this method keep installed programs?
Yes. The captured install.wim includes installed desktop applications, Windows settings, drivers, and user configuration present at the time the image is created.
Can I use the custom ISO on another computer?
It’s possible, but it’s recommended only for computers with similar hardware. Different hardware may require additional drivers or a Sysprep-prepared image.
Why doesn’t DISM create an ISO file directly?
DISM only captures the Windows partition into an install.wim image. The Windows setup files and boot environment come from the original Windows 11 ISO.
How often should I update my custom Windows image?
Whenever you install important software, make major configuration changes, or after a significant Windows feature update, creating a fresh image is a good idea.