
For most of us, MAC addresses are something we don’t think about until something goes wrong with the internet, and we need to avoid a network restriction. A MAC address is essentially a computer’s fingerprint on a network. Very occasionally you’ll want to change it — to sort out an annoying Wi-Fi problem, get a little more privacy, or even get onto a network that restricts devices.
The great news is that Windows 11 actually makes it pretty straightforward to do. And in this guide, you will follow the step-by-step procedures to change MAC address Windows 11. We’ll show the easy way first using Device Manager and then we’ll show a more advanced way to do it using Command Prompt if you want more control.
What’s a MAC Address?
Your MAC (Media Access Control) address is a 12-character unique identifier assigned to the network adapter of your Wi-Fi device and is used to define your device’s network address for communications. Your MAC (Media Access Control) address is like a social security number for your computer’s network card. All network cards have them, and a home Wi-Fi router uses it to identify your device. You don’t need to worry about it under normal circumstances, but there are certain situations in which changing it (also known as “MAC spoofing”) can give you some privacy, allow you to test your network, or bypass a network restriction.
Why Someone Might Want to Change MAC Address Windows 11
You may have a good reason to change your MAC address in Windows 11.
- MAC addresses connect devices to a network, and they can be used to track a device or ban it from a network; some internet service providers limit the number of devices that can be connected to the service by device type or MAC address — changing the address can be a workaround.
- You might encounter situations where you need to use MAC filtering for the network you are joining as the administrator has used MAC filtering on their network for security reasons and you ought to emulate some authorised address etc.
- And of course if you’re having connectivity problems or are concerned about the security of a public network, you might find MAC address spoofing useful.
- Just curious or figuring out how it works
Checking your current MAC address
Before you change MAC address Windows 11, you will need to know what yours currently is. Run windows key + R, type “cmd” and enter: In the command line, type ipconfig /all and press Enter. Go to your active network adapter, and find “Physical Address” – it’s your MAC address. Take it down or screenshot it, because you may need to go back if something goes wrong.
Creating a system restore point for safety’s sake
Go to Control Panel>System and Security> System, then click “System Protection” on the left. Click “Create” and name your restore point something like “Before MAC Address Change.” This safety net lets you roll back your system if the change MAC address Windows 11 process causes network connectivity issues. The process takes just a few minutes and could save you hours of troubleshooting later.
Friendly Step-by-Step: How to Change MAC Address Windows 11
Let’s break it down — step by step.
Step 1: To open the Device Manager
- You can do this by clicking the Start button or by pressing the Windows key.
- Type Device Manager and press Enter.
- You’ll be presented with a list of devices — worry, it’s friendlier than it looks.
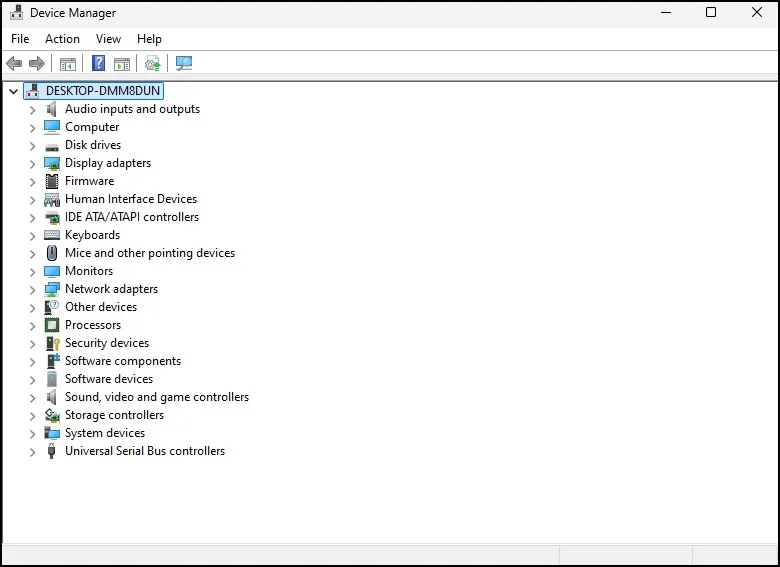
Step 2: Find Your Network Adapter
- In Device Manager, search for Network adapters.
- Click the tiny arrow to the right of the list to open it up.
- Find the adapter that you use to connect (Wi-Fi or Ethernet).
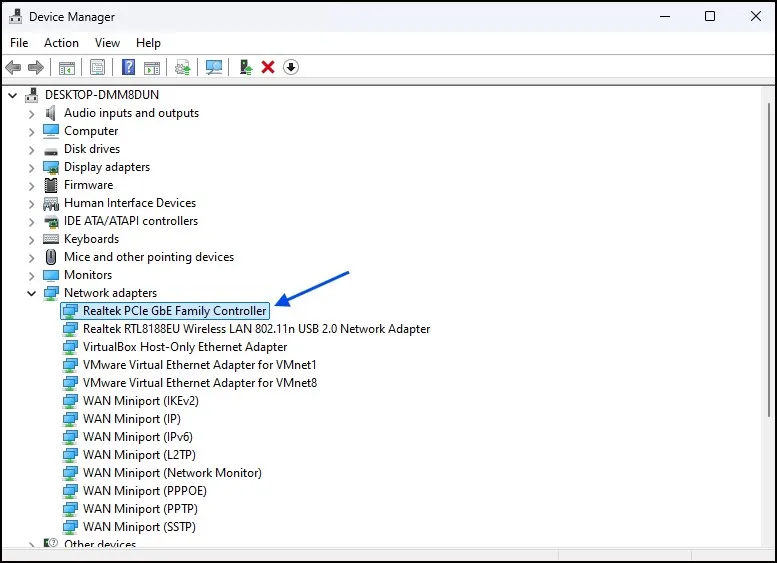
Step 3: Type: View its Properties
- Right click on your adapter and select Properties.
- Go to the Advanced tab.
- In the menu that appears, under property, click or tap Network Address, Local Administered Address or MAC Address (varies depending on manufacturer).
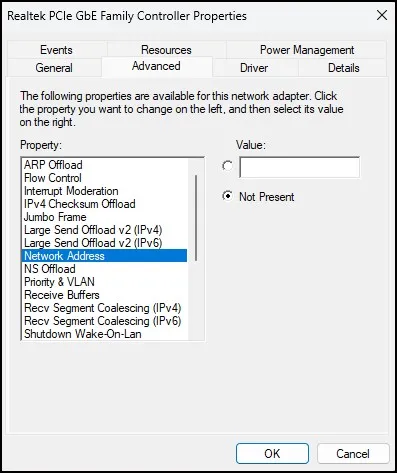
Step 4: Enter a New MAC Address
- Select that property.
- Select the radio button that reads Value.
- Enter a new MAC address in the field (12 hex characters, no colons, no spaces, no hyphens). Example:
021A3B4C5D6E. - Click OK.

Step 5: Restart the Adapter (or your pc)
- Easiest way: restart your PC.
- Or try turning off, and back on, the network adapter in Device Manager.
Step 6: Verify the Change (Optional)
- Open Command Prompt: Get to the Windows key, type cmd to open the command line interface.
- Run getmac /v /fo list and press Enter.
- The new MAC will now be displayed next to your adapter. If not, try again or reboot.
Change MAC Address Windows 11 with Technitium (Freeware)
OK, so digging around in Device Manager or sending commands isn’t the way you personally get down—cool. The good news: There’s a super simple tool to do this work for you. It’s called Technitium MAC Address Changer, and best of all, it’s free! You can download it right from the official website: Technitium MAC Address Changer.
Once it’s downloaded and installed, open the program and select the active network adapter in the list. At the bottom of the window you will see all of the information for that adapter. There’s a box that says Change MAC address — and that’s where the magic happens.
If you already know one you want, type it in. If so, click on Random MAC Address and it will generate one for you. Then, click on the Change Now! button, and boom— your shiny new MAC address is active.
And the best part is that you don’t have to worry that you will mess things up. If something doesn’t work right, or if you just want your old MAC address back, there’s a straightforward Restore Original button that rolls everything back. No fuss, no scary edits, just two clicks.
A Few Friendly Warnings
- Ensure the new MAC address for your device does not conflict with another device on your network.
- Certain networks or services may block MAC changes—however, for small home or social use you’ll probably be okay.
- If things get weird, simply go back to Device Manager and reset the setting to the default.
Final Thoughts on change MAC address Windows 11
You likely won’t go around changing your MAC address in Windows 11 every day, but it’s good to have this trick in your back pocket. Whether you’re troubleshooting a weird problem with your Wi-Fi, looking to connect devices, or trying to secure your network, you’ll need to know your device’s MAC address—and find it’s easy to do once you know where to look. And if you don’t care for it, well, you can always return to good old Word, no harm, no foul.
So, whenever you want to change MAC address Windows 11, you can do it easily using above guide. It is simple, it is safe and you have a little more control over your device’s connection to networks. Try it once and you’ll find: It’s easier than it sounds.
Frequently Asked Question (FAQ)
Why would I want to change MAC address Windows 11?
Sometimes it helps fix Wi-Fi issues, bypass network restrictions, or add an extra layer of privacy.
Is it safe to change my MAC address?
Yes, it’s safe. If something doesn’t work, you can easily switch back to the original address.
Can I change MAC address Windows 11 permanently?
Not really—Windows only lets you override it. If you reset Windows or reinstall drivers, it goes back to default.
Do I need third-party software to change my MAC address?
No, you can do it with Device Manager or Command Prompt. But tools like Technitium make it quicker and easier.
Will changing my MAC address improve my internet speed?
No, it won’t affect speed. It’s more about network access and privacy, not performance.