
But, if you’re having trouble sharing files, printers, or the PC itself isn’t showing up to other devices on your local network, switch back to using a more permissive “Private” network type for best local compatibility.
And on Windows 11, it’s really simple to change network type between Public and Private based on what you’re working on.
Understanding Network Types in Windows 11
Before changing anything, let’s understand the difference between the two network types:
- Private Network:
Choose this when you trust the network (like your home or office). It allows device discovery, file, and printer sharing. - Public Network:
Choose this for networks you don’t trust (like a café or airport Wi-Fi). It hides your PC from other devices and turns off sharing for better security.
Here I’ll show you four different methods — using Settings, Control Panel, PowerShell and Registry Editor.
Method 1: Change Network Type Using Windows Settings
It’s the easiest one to access in Settings.
Click the Start button and select Settings, or press Windows + I on your keyboard.

On the left-hand side, click Network & Internet.

If you are on Wi-Fi, tap Wi-Fi → then the name of the connected Wi-Fi. If you are connected to Ethernet, click Ethernet instead.
Select either Private or Public from Network profile type, depending on what you need.

Method 2: Change Network Type Using Control Panel
And if you’re more of an old-school type, you can change your network type using Control Panel.
Type control panel in the Windows search bar and hit Enter.
Click Network and Internet, then click Network and Sharing Center.

You will be shown your active network and whether it is called Public or Private next to “Network.”

To change it, click on your Wi-Fi (or Ethernet) connection name → then click Properties.
You will be taken to the same settings screen that Method 1 sends you to. After that, you will just need to switch between Private and Public.
For more details on Windows 11 network and sharing settings, you can check the official Microsoft Network and Sharing Center guide.
Method 3: Check Network Type Using PowerShell
With PowerShell, it is easy to check network type.
Type in PowerShell into the Start menu → right-click and select Run as administrator.
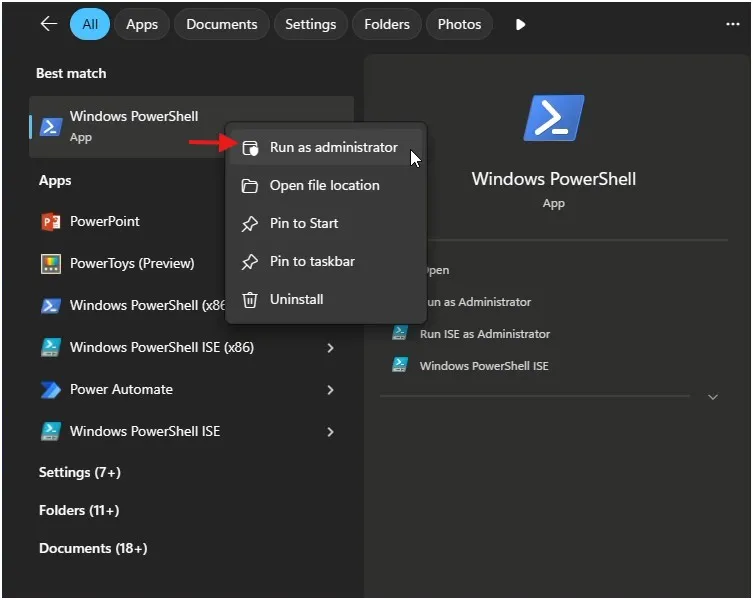
Just type this in and hit enter: Get-NetConnectionProfile
This will show your network name, interface and current type (Public or Private).

Method 4: Change Network Type Using Registry Editor
For power users, we can modify the network type through Windows Registry.
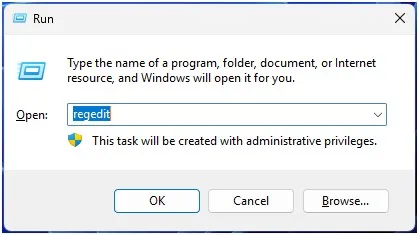
Press Windows + R, type regedit, and then hit Enter. Click Yes on the User Account Control prompt.
Go to this path:
HKEY_LOCAL_MACHINE\SOFTWARE\Microsoft\Windows NT\CurrentVersion\NetworkList\Profiles

Each folder under Profiles represents a saved network. Click on each profile folder and look for the ProfileName entry to identify your connected network.
Double-click the Category entry and change its Value data to:
- 0 = Public
- 1 = Private
- 2 = Domain (for domain-connected networks)
Close the Registry Editor and restart your PC to apply changes.

Also Read: How to Check All Connected Devices on WiFi Using CMD
Wrapping Up
That’s it! And that’s four different methods you can use to check network type between Public and Private in Windows 11! Set it to Private if you’re connected in a trusted home or office environment, and Public when connected on an unknown network to protect your system.
Frequently Asked Question (FAQ)
Is it safe to change my network type to Private?
Yes, Private networks are safe for trusted networks like home or office, as they allow file and printer sharing while hiding from untrusted networks.
Can I change network type for Ethernet connections?
Yes, Ethernet users can change network type using Settings, PowerShell, or Registry Editor.
Why should I change network type on Windows 11?
Changing network type helps improve security on public networks and enables file and printer sharing on trusted private networks.
Can I change network type without admin rights?
No, you need administrator privileges to change network type in Windows 11.
Does changing network type affect internet speed?
No, changing network type does not affect your internet speed; it only changes sharing and visibility settings.