
Imagine this, your computer goes to sleep, then refuses to wake up, leaving you with nothing but a black screen and deepening frustrations. Scary, right? Well, this is how a Windows 11 recovery drive comes in helpful! Like a digital first-aid kit for your Windows 11 PC.
A recovery drive can help you troubleshoot system crashes and serious problems, and even can allow you to reinstall Windows. Here’s a step-by-step guide to create a recovery drive in Windows 11 and using it when required. Let’s get started!
What is a Recovery Drive in Windows 11 and Why Do You Need One?
A Windows 11 recovery drive is a bootable USB drive that has essential system files to allow you to troubleshoot or reinstall Windows when required. This drive can help restore your system if your PC ever runs into trouble without losing important files (assuming you have backups, of course!)
Here’s why it’s a good idea to create one:
- It helps troubleshoot startup issues, in case Windows doesn’t want to load.
- For instance, you can reset your PC and reinstall Windows without an internet connection.
- Reduces recovery time from system failures
All you have to do is make a USB flash drive (at least 16GB, although 32GB is better) and then take a few minutes out of your life.
How to Create a Recovery Drive in Windows 11
Step 1: Insert Your USB Drive: Insert a USB flash drive in your computer before you proceed. Make sure it’s either blank or doesn’t have any important files on it as this process will wipe everything from it.
Stage 2: Open the Windows 11 Recovery drive Tool: Select the Search icon (magnifying glass) from the taskbar. Search for Recovery Drive and Choose Create a recovery drive from the search result.
If User Account Control (UAC) prompts you, click Yes to allow the tool to run.
Steps 3: Configures the Recovery Drive Settings: A window will pop up asking if you want to Back up system files to the recovery drive. Tick this box and press Next.

The application will search your PC for all essential system files. This process might take a minute or two.
Step 4: Choose Your USB drive for Windows 11 recovery: Once it’s finished scanning, you will see a list of USB drives. Now select the right drive and click on Next.
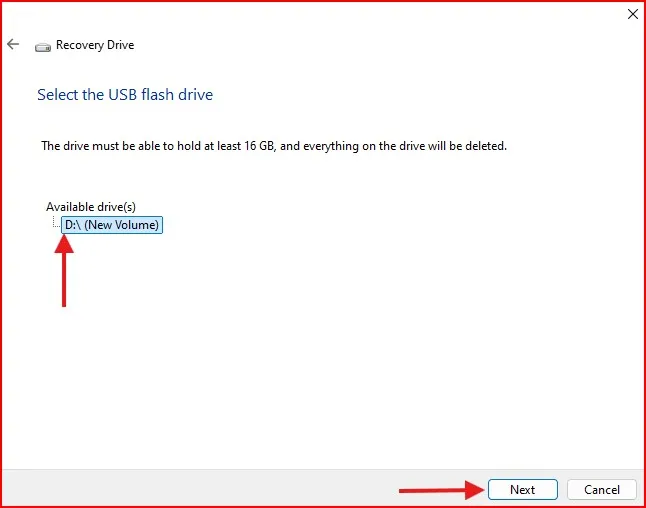
step 5: Create the Windows 11 recovery drive: You’ll be shown a final confirmation that everything on the USB drive will be erased. Select Create and Windows will copy the system files to your USB.

The speed of copy depends on your pc and usb and it takes about 15–30 mins to complete this process. Once done, click Finish.

How to Use the Recovery Drive in Windows 11
In case your PC runs into issues, you can boot from the Windows 11 recovery drive and troubleshoot the problems. Here’s how to do that, step by step:
Step 1: Plug in the Recovery USB Drive and Boot Up Your Computer: Insert the Windows 11 recovery USB stick into your PC. Restart your PC. If your system is totally unresponsive, press and hold the power button until the computer shuts down, then turn it back on.
Step 2: Enter the Boot Menu or BIOS: As your computer starts up, press the required key to enter the BIOS or Boot Menu. The key varies between manufacturer but is generally F2, F12, Esc or Del. And you can get a message on the screen telling you which one to press.
- Enter the BIOS and now look for Boot Order/Boot Priority.
- Adjust the boot order to make USB Recovery Drive as first boot device.
- Press your key to save the changes and exit BIOS (F10 usually, confirm with Yes).
Here’s a quick reference table for different manufacturers:
| Manufacturer | Boot Menu Key | BIOS Key |
| Dell | F12 | F2 |
| HP | F9 | Esc, F10 |
| Lenovo | F12 | F1, F2 |
| Acer | F12 | F2 |
| ASUS | Esc, F8 | F2 |
| MSI | F11 | Del |
| Toshiba | F12 | F2 |
| Samsung | Esc | F2 |
| Sony Vaio | Assist Button | F2 |
Step 3: Select the Windows 11 Recovery Options: You will start WinRE, the Windows Recovery Environment, from the USB drive on your PC. Then choose your keyboard layout when you are asked to.

You’ll now have multiple recovery options available to you:
Troubleshoot: To use advanced utilities such as System Restore, Command Prompt, or Startup Repair.
Reset this PC: To reinstall Windows and keep or remove your files.
Recover from a drive: To clean reinstall Windows (which clears everything from the PC).
Step 4: Perform the Necessary Recovery Steps: If your PC isn’t booting properly, choose Troubleshoot > Startup Repair to see if Windows can fix it.

Choose option Reset this PC > Keep my files if you wish to restore Windows without losing personal files.
For a clean installation, choose Recover from a drive and follow the on-screen instructions.
Step 5: Remove the USB and Restart: After the recovery process is complete, disconnect the USB drive and reboot your PC. Your PC should be restored and functioning properly now!
While a recovery drive is useful, another great way to protect your system is by creating a System Restore Point in Windows 11. This allows you to revert your PC to an earlier state in case of issues
Conclusion on Creating Windows 11 Recovery Drive
Create a recovery drive in Windows 11 is one of those things you don’t think to do until disaster strikes. But believe me, having one prepared will relieve you tons of stress! It takes only a few minutes, and it’s a small effort for the peace of mind it offers.
Well then, create a recovery USB in Windows 11 right now! And if you ever found this guide useful, then pass it to someone who might need it.
If you need to reinstall Windows 11, you can use Microsoft’s Media Creation Tool.
Frequently Asked Question (FAQ)
What is a Windows 11 Recovery Drive?
A Recovery Drive is a bootable USB that helps troubleshoot issues, repair Windows, or reinstall the OS if your PC fails to start.
How much storage do I need for a Recovery Drive?
You need at least a 16GB USB drive, but 32GB is recommended if you include system files.
Can I use the Recovery Drive on another PC?
No, the Recovery Drive will only work on the PC where you created it because it has files specific to that computer.
How long does it take to create a Recovery Drive?
It typically takes 15 to 30 minutes, depending on your system speed and USB performance.
Can I create a Recovery Drive in windows 11 without a USB?
No, a USB drive is required.
How often should I update my Recovery Drive?
It’s good practice to create a new one after major Windows updates to ensure it includes the latest system files.