
We all want our computers to stay safe, and that’s exactly what Windows Defender is designed for. It protects your system from viruses, malware, and suspicious programs. But sometimes, you might need to turn it off — maybe you’re installing trusted software that keeps getting blocked or you’re running a performance-heavy game or tool.
In this blog, I’ll walk you through how to disable Windows Defender, both temporarily and permanently, in a way that’s easy to follow, even if you’re not super tech-savvy.
When Should You Disable Windows Defender?
Before we get to the steps, let’s understand why you need to tell Windows Defender to take a short break:
- Maybe you’re installing specialized software that keeps getting flagged as suspicious (but isn’t)
- perhaps you’re running performance-intensive tasks and need every bit of processing power.
- Developers often disable it while testing applications to avoid interference.
- Gamers could temporarily turn it off for an expected performance bump while gaming hard.
Fully disabling Windows Defender is about as smart as leaving your front door open in a bad neighbourhood. Without real-time protection, malware can lurk in your system undetected through downloads, email attachments, or compromised websites.
A very quick note: Don’t leave your PC permanently without protection unless you have an alternative antivirus solution running.
How to Disable Windows Defender Temporarily (Recommended for Short Tasks)
Using Windows Security settings
Sometimes you need to temporarily turn off Windows Defender – maybe you’re installing software that’s getting flagged incorrectly or running a program that doesn’t play nice with it. Here’s how to do it properly:
- Open Windows Security by clicking the shield icon in your taskbar or searching for “Windows Security” in the Start menu
- Select “Virus & threat protection”
- Under “Virus & threat protection settings,” click “Manage settings”
- Toggle off “Real-time protection”
Windows 11 and 10 will automatically turn this back on after a restart or usually within a few hours. That’s by design – Microsoft doesn’t want you running unprotected for too long.
Quick disable through the system tray
Need to disable Windows Defender in a hurry? The system tray method is your fastest option:
- Look for the shield icon in your system tray (bottom right corner)
- Right-click it and select “Virus & threat protection”
- Follow the same steps as above to toggle off real-time protection
This method is perfect when you just need a quick temporary shutdown to install something quickly.
Re-enabling Windows Defender after your task
Done with whatever needed Defender off? Turn it back on ASAP:
- Return to Windows Security
- Go back to “Virus & threat protection settings”
- Toggle “Real-time protection” back on
Or simply restart your computer – Windows will automatically re-enable protection.
Remember that leaving your system unprotected for extended periods puts your computer at serious risk. Always re-enable Windows Defender as soon as possible after completing your task.
How to Disable Windows Defender Permanently (Advanced Method)
To permanently disable Defender, you’ll need to use either Group Policy Editor or the Registry Editor. Let me show you both.
Method 1: Using Group Policy Editor (Windows 11/10 Pro)
Want the nuclear option for Microsoft Windows Defender? If you’re running Windows 10/11 Pro or Enterprise, Group Policy Editor is your best friend.
Here’s how to permanently kick Defender to the curb:
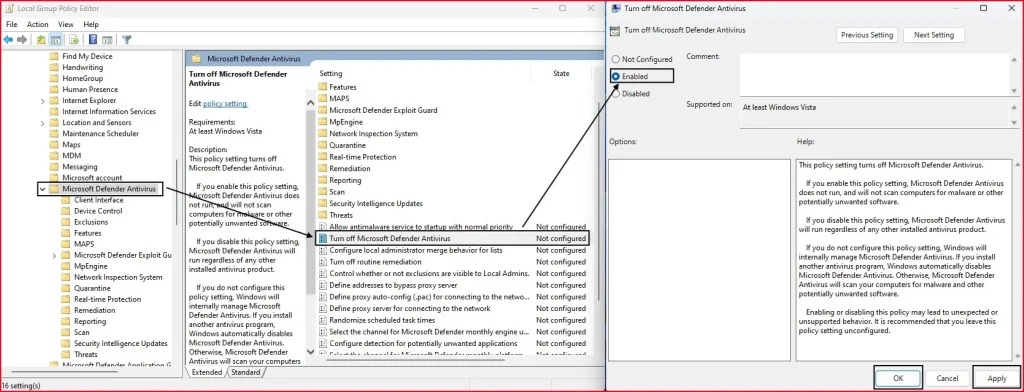
- Press Win + R, type gpedit.msc, and hit Enter
- Go to: Computer Configuration > Administrative Templates > Windows Components > Microsoft Defender Antivirus
- Double-click “Turn off Microsoft Defender Antivirus“
- Select “Enabled” and click “Apply“
- Restart your computer
That’s it! Defender won’t bother you again unless you reverse these steps.
Method 2: Using Windows Registry (For All Editions Including Home)
This is a bit technical — be careful while editing the Registry.
- Press Win + R, type regedit, and hit Enter
- Navigate to: HKEY_LOCAL_MACHINE\SOFTWARE\Policies\Microsoft\Windows Defender
- Right-click in the right pane, select New > DWORD (32-bit) Value
- Name it “DisableAntiSpyware“
- Double-click it and set the value to “1“
- Restart your PC

Warning: Messing with the registry can break things if you’re not careful. Maybe back up your registry first?
To re-enable Defender, just delete the DisableAntiSpyware key or set its value to 0.
Re-enable Windows Defender
Whether you turned it off temporarily or permanently, you can always bring Defender back.
Just go back to the same setting and turn on real-time protection — or reverse the Group Policy or Registry changes.
Final Words
Windows Defender settings should be easy to adjust. Whether you want to disable it temporarily or permanently, Windows 10 and 11 provide several ways to customize your protection.
Even though Windows Defender is a great security solution, you may need to customize it according to your requirements. Always ensure you have alternative protection in place if you choose to disable windows Defender permanently. Hope this guide helped you! If you found it useful, feel free to check out some of my other tutorials linked below.
Read More:
- How to Customize the Start Menu in Windows 11
- How to fix high disk usage in windows 11
- Windows 11 Update Stuck? Here’s How to Fix It
- How to Fix Slow Internet Speed in Windows 11
- How to Fix Windows 11 Not Booting or Stuck at Logo Screen
Frequently asked question (FAQ)
Is it safe to disable Windows Defender?
It’s safe if you know what you’re doing and have an alternative antivirus solution installed.
Will Windows Defender turn back on automatically?
Yes, if you disable it temporarily. For permanent disable, you need to use Group Policy or Registry.
Can I disable Windows Defender without any third-party software?
Absolutely. The methods shown above use built-in Windows tools.
Why does Windows keep turning Defender back on?
It’s a security feature. Windows wants to make sure you’re always protected.
Do I need to restart after disabling Defender permanently?
Yes, for the changes to take full effect.