
Want to connect to your PC from another location? Maybe you’re working from home, or perhaps you just want to access your files on the go. In this post, I’ll walk you through how to set up Remote Desktop in Windows 11 using simple language and clear steps — no tech degree required!
Understanding Remote Desktop Protocol (RDP) for Windows 11
What is Remote Desktop?
Remote Desktop is a built-in feature in Windows that allows you to access your computer from other devices. It is the equivalent of sitting at the home computer (though you are actually doing it from a laptop or other computer somewhere else). It’s really useful if you want to use your computer from afar whether you’re working remotely, grabbing a file from your desktop, or helping someone troubleshoot something.
How RDP differs in Windows 11 vs previous versions
Windows 11’s Remote Desktop brings sleeker visuals and better touch support than older versions. Microsoft improved security with enhanced encryption and added multi-monitor support that actually works well. The connection process is more straightforward, making remote work less of a headache for everyone.
Preparing Your Windows 11 Computer for Remote Access
Before setting things up to enable remote desktop, make sure of the following:
- You’re using Windows 11 Pro or Enterprise (Remote Desktop is not available in Windows 11 Home).
- The PC you want to connect to is turned ON and connected to the internet.
- You know the name of your PC and your Microsoft account password or local login credentials.
Step-by-Step: How to Set Up Remote Desktop in Windows 11
Step 1: Check Windows Version
Go to Settings > System > About and look for the Edition under “Windows specifications“
If it says Windows 11 Home, you won’t be able to use Remote Desktop as a host — but you can connect to another PC that supports it.
Step 2: Enable Remote Desktop Right-click the Start button and choose “Settings,” which will open the Windows 11 settings menu. Go to “System” and scroll down to find “Remote Desktop” in the sidebar. This lets you easily get to all of your remote connection settings without diving through tons of menus. Turn ON the toggle that says Remote Desktop. You’ll see a confirmation box — click Confirm.
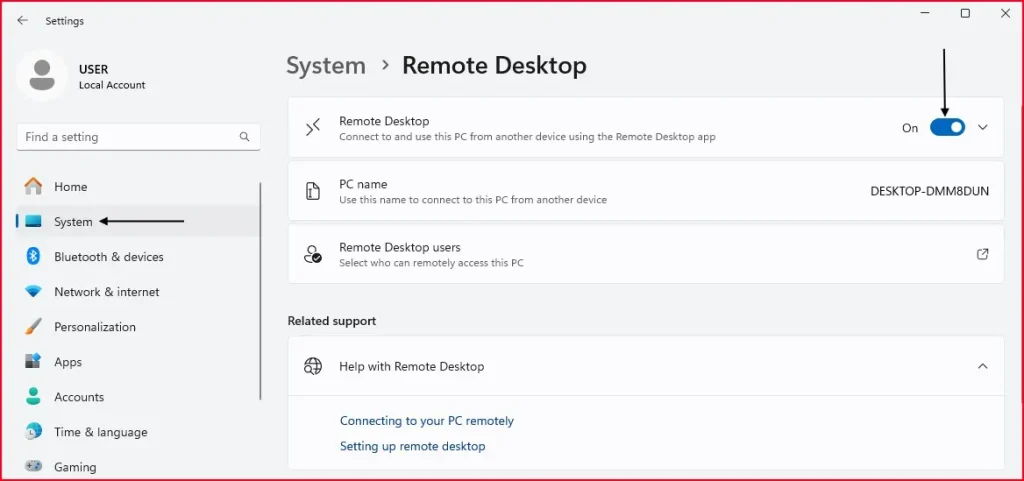
Note down the PC name shown under “How to connect to this PC”
Step 3: Allow Remote Connections Through Firewall
Windows usually takes care of this automatically when you enable Remote Desktop. But just to be safe — or in case you’re having trouble connecting — it’s a good idea to check if Remote Connections are allowed through the firewall. Here’s how to do it.
Press Windows Key + S, search for Windows Defender Firewall. Click on “Allow an app or feature through Windows Defender Firewall”.

Make sure Remote Desktop is checked for both Private and Public networks

Step 4: Connecting to Your Windows 11 PC Remotely
Connecting to your Windows 11 PC from anywhere is surprisingly easy. Just launch the Remote Desktop app or Remote Desktop Protocol on your device.
Note: For Windows users, the official app comes pre-installed, but if you need it, you can also download it from the Microsoft Store. Using a phone or tablet? You can get the app for Android or iOS too. Just install, log in with your credentials, and you’re good to go.
Then enter your PC’s name or IP address noted earlier. Login with the username and password of the host PC. Boom — you’re connected.

Make sure you’ve set up proper permissions beforehand or you’ll just get frustrating connection errors.
Advanced Remote Desktop Protocol Features in Windows 11
Using multiple monitors
Windows 11 Remote Desktop takes multi-monitor setups to the next level. You can spread your work across all screens just like you’re sitting at your physical desk. Simply click “Use all my monitors” in the connection settings before connecting, and your entire display setup is mirrored remotely.
Configuring resource sharing options
Sharing local resources between machines is a game-changer. Want your remote PC to access your local printer? Need your USB drive available on both systems? Just open Remote Desktop Connection, click “Show Options” then the “Local Resources” tab. Check the boxes for what you need shared.

Want to make sure your PC runs smoothly for a better remote experience? Check out our guide on How to Speed Up Windows 11 PC for Better Performance to get the most out of Remote Desktop.
Some Extra Tips
- Keep the PC plugged in and not in sleep mode to ensure it’s accessible.
- Use a strong password on your account to keep your data safe.
- You can use a static IP or configure dynamic DNS if you’re connecting over the internet frequently.
If you’re having trouble booting your PC or it’s stuck at the logo screen, Remote Desktop won’t work. Here’s a helpful fix: How to Fix Windows 11 Not Booting or Stuck at Logo Screen.
Final Thoughts
Here’s a quick and easy guide on how to set up Remote Desktop in Windows 11. By understanding the basics of Remote Desktop Protocol (RDP), preparing your PC correctly, enable remote desktop with right settings, and keeping security in mind, you can create a reliable and secure remote access setup. Once everything is in place, connecting is straightforward and quick. So, whether you’re in a different room, or in a different city, Remote Desktop can definitely set the stage for working remotely. I hope you enjoyed this guide, and if you did, you can share or leave a comment, if you have a question.
Frequently Asked Questions (FAQs)
Can I use Remote Desktop with Windows 11 Home?
No, Windows 11 Home can’t act as a host, but you can use it to connect to another PC running Windows 11 Pro or Enterprise.
Is Remote Desktop free?
Yes! It’s a built-in feature in Windows 11 Pro and doesn’t require any extra payment.
Is Remote Desktop safe to use?
Yes, as long as you use a secure password and keep your system updated, it’s safe for personal use.
Can I use Remote Desktop over the internet?
Yes, but you’ll need to configure your router to allow external connections (port forwarding), or use VPN for a safer approach.
What to do if Remote Desktop isn’t working?
Check if the PC is ON, connected to the internet, and that you’re using the correct username and PC name. Also ensure the firewall is not blocking it.