
We are seeing that when we try to delete a file and it will not go away, you know how annoying it can be. I have faced this problem while cleaning storage or removing files after software uninstallation, which further creates issues. when you press delete button and suddenly Windows popups errors like “file is in use” or “access denied” appear.
Being stuck in a situation is surely a normal experience that students encounter. Moreover, such moments should not cause unnecessary worry or stress. In this guide, I’ll show you how to force delete file Windows 11 using practical methods that actually work. These are things I’ve tried myself—not just random theory.
Why Windows Won’t Let You Delete Certain Files
Before attempting solutions, you must know the same background process that is in action.
Chances are, the file is still in use by something. Well, it can be a background app, hidden process or Even Windows itself. Other times, it’s just a permission issue.
Basically, Windows doesn’t clearly show what’s causing the same problem most of the time. As per the situation, you have to make some guesses regarding the answer, and that is where these methods become useful.
Method 1: Restart Windows Explorer (First Thing I Always Try)
This is honestly the first method I always try when any file won’t delete properly. As per most cases, the problem is not regarding the file itself—it is Windows Explorer keeping hold of it in the background.
As per the system design, Explorer keeps running even after closing all programs regarding its role in managing desktop, taskbar, and file operations. Sometimes it actually locks a file and you definitely don’t realize it’s happening.
Here’s what I usually do:
you need to press Ctrl + Shift + Esc keys together on your keyboard. This will further open the Task Manager itself directly. If the view opens small, click “More details” at bottom to see further information itself.
Scroll through the list of processes and find Windows Explorer. This is typically found in the “Processes” tab and should be relatively easy to locate.
Go ahead and search for Windows Explorer, then right click on it and Restart.
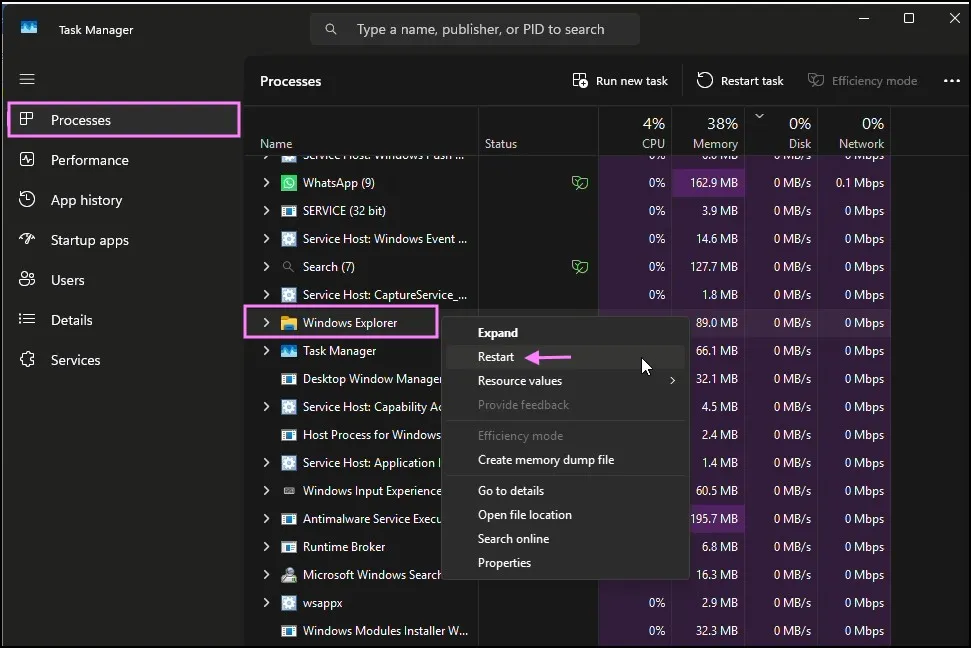
Your screen will definitely blink for a moment and the taskbar may disappear only to appear again.
Moreover, this behaviour is completely normal during the process. Basically, Windows Explorer restarts and clears the file locks it was holding.
After that, go back and do the same thing – try deleting the file again.
In my experience, this method surely works quite often, especially when the error message shows “file is in use.” Moreover, it is like giving Windows a quick reset without restarting the complete system.
If it still doesn’t work, then yeah—you’ll need to move on to the next method. But honestly, this method is fast enough that you should try it first regarding any problem.
Method 2: Use Command Prompt to Force Delete the File
This point surely marks where the analysis becomes more compelling. If normal delete doesn’t work, Command Prompt usually does.
I know Command Prompt sounds a bit technical, but honestly, for this kind of problem, it’s one of the most reliable ways to force delete file Windows 11. Basically, it skips the normal Windows screen and tells the computer the same thing – just remove the file directly.
Here’s how I do it:
First, search for Command Prompt in the Start menu itself to proceed further. You need to right-click on it and then choose Run as administrator. This part itself is important—without admin rights, the command may further fail.
Once the window opens, you need the exact path of the file. The easiest way is to go to the file, right-click it, click on Copy as path. Then just add the file name at the end.
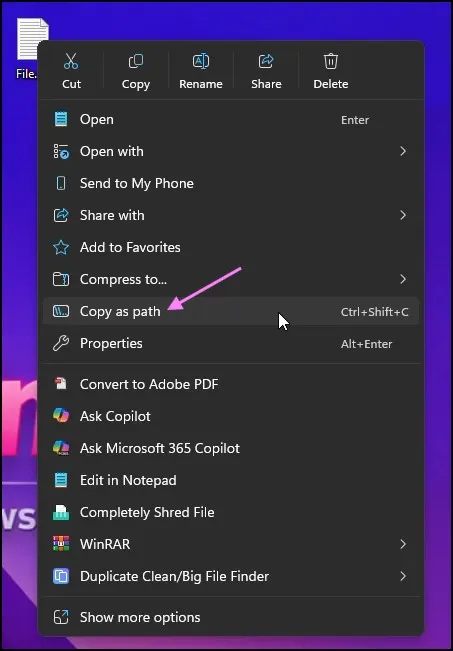
Now type the delete command using that path which is something like this:
del /f /q “C:\Users\USER\Desktop\File.txt”
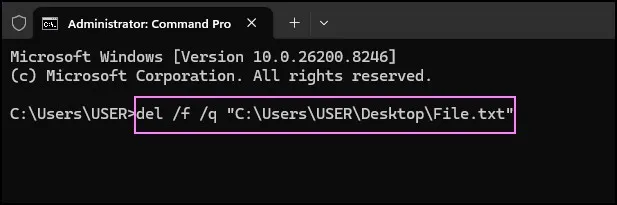
Here’s what those commands mean (just so you know):
- /f forces deletion
- /q runs quietly (no confirmation)
Hit Enter, and in most cases, the file is gone instantly.
If you’re dealing with a folder instead of a file, the process is similar, just with a slightly different command.
rmdir /s /q “C:\path\to\folder”
The idea is to use a force parameter so Windows doesn’t ask questions—it just deletes.
After pressing Enter, the file usually disappears instantly. No confirmation, no recycle bin—it’s just gone.
From my experience, when you try to force delete file Windows 11 using this method, it works in most stubborn cases. If it still fails, then something deeper is locking the file.
Method 3: Boot into Safe Mode and Delete the File
If Command Prompt does not work, some background service itself is further using the file actively.
As per this situation, Safe Mode is helping regarding the problem.
As per Windows system design, Safe Mode operates with only basic drivers and services that are needed. Regarding system functionality, it runs with minimal essential components only. Basically, any extra stuff like third-party apps or hidden processes won’t start – it’s the same as keeping only essential things running. We are seeing that this only makes removing locked files much easier.
To get into Safe Mode, you only need to press Windows + R, type msconfig, and hit Enter.
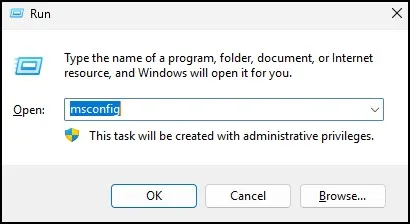
Further go to the Boot tab and check the Safe boot option itself. Click Apply and further restart your PC itself.
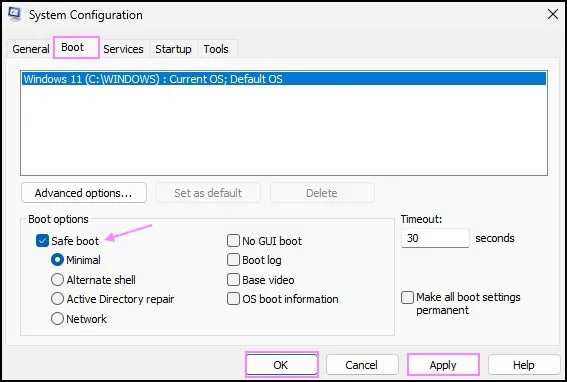
As per the boot process, your system will show different display with low resolution and basic drivers regarding the startup phase.
Now actually find the file and definitely try to delete it the same way you usually do.
Basically, it works the same way without extra effort because whatever was locking the file isn’t running anymore.
Once done, you must revisit msconfig and deselect Safe boot option. Otherwise, if you miss this step, every time you’re on your computer it will reboot in Safe Mode.
Although I don’t apply this method every day, but when it’s applied it moreover clears off the problem itself.
Method 4: Take Ownership of the File (Fix Access Denied)
There are also times when the problem isn’t that the file is in use — Windows just won’t let you modify it, even though no one else has it open.
You should know that whenever you come across the messages “Access Denied” or “You need permission to do this action,” this surely means permissions-related error. These error messages also explicitly indicate you are being blocked by the system due to permissions.
So, to fix this problem further, right click the file itself and go into Properties. From there, go further to the Security tab and click on Advanced itself.
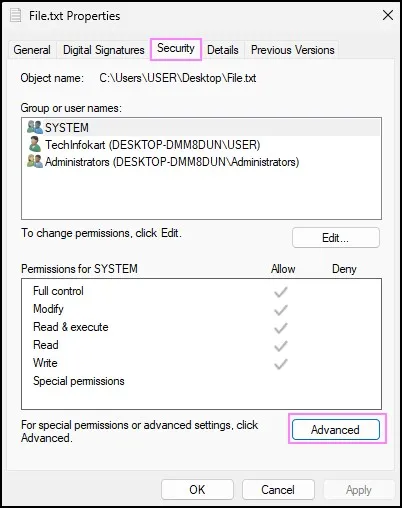
As per the display, you will find the current owner regarding the property at the top section. Click on Change, type your username, and it’s the same process to confirm it.
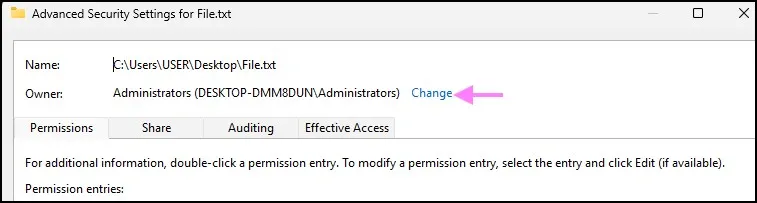
After completing that step, you must surely grant yourself complete control permissions. Moreover, this will provide you with full administrative access to the system.
You need to click a few times, but after that you will get full access to that file regarding your request. Now, when you actually try to force delete the file in Windows 11 again, it will definitely work without showing any error.
I’ve mostly seen this happen with files copied from another system
Method 5: Use a Third-Party Tool (When Nothing Works)
When all other methods fail, this becomes the final option you have to take.
Basically, tools like Unlocker or IObit Unlocker are design for this situation. These programs surely scan the file to identify what is blocking it. Moreover, they provide options to remove the lock.

Once installed, you just right-click the file, open the tool, and choose Unlock and delete.
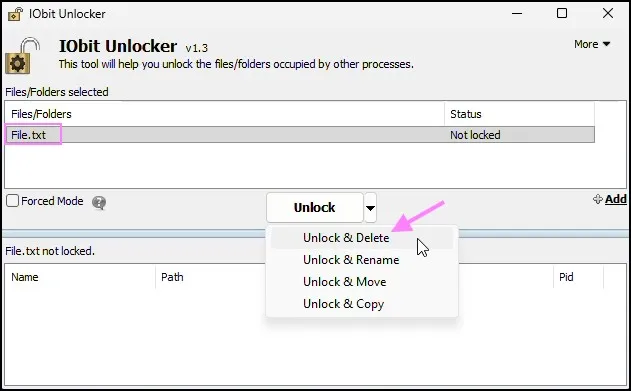
Basically, that’s the thing.
I surely prefer not to depend heavily on external tools, but these are undeniably quite effective. Moreover, their practical benefits cannot be ignored despite my general reluctance to use third-party solutions. When other things actually fail, they definitely finish the work fast.
Final Thoughts
This problem surely becomes frustrating when Windows fails to provide proper explanations for the errors. Moreover, users often struggle without clear guidance about what exactly went wrong. In reality, these problems surely arise from common issues like files being used, permission troubles, or background processes. Moreover, these are the most frequent causes that users encounter.
Between Command Prompt, Safe Mode, and a couple of extra tricks, you can almost always force delete file Windows 11 without too much trouble. Sometimes it takes a bit of trial and error, but yeah… that’s pretty much it.
Frequently Asked Questions (FAQs)
Why can’t I delete a file in Windows 11?
It’s usually being used by a program or blocked by permissions.
Is it safe to force delete files?
Yes, but avoid deleting system files.
What is the best method to force delete a file?
Command Prompt is the most reliable in most cases.
Can PowerShell delete locked files?
Yes, and sometimes it works when CMD doesn’t.
What if nothing works?
Use tools like Unlocker to remove the file.