
If you use a pen drive to carry personal files, office documents, or even client data, there’s always a small risk — what if it gets lost or someone plugs it into another system? That’s exactly why I started looking for ways to password protect USB drive Windows 11, and honestly, it’s easier than most people think.
After trying a few different methods, I found 3 simple ways that really work. Let me show you each one.
Method 1: Use BitLocker (Built-in Windows Feature)
If your system supports, BitLocker is honestly the best way to password protect USB drive Windows 11 without installing anything extra. I’ve been using this for a while now and it just works smoothly.
So here’s what you need to do.
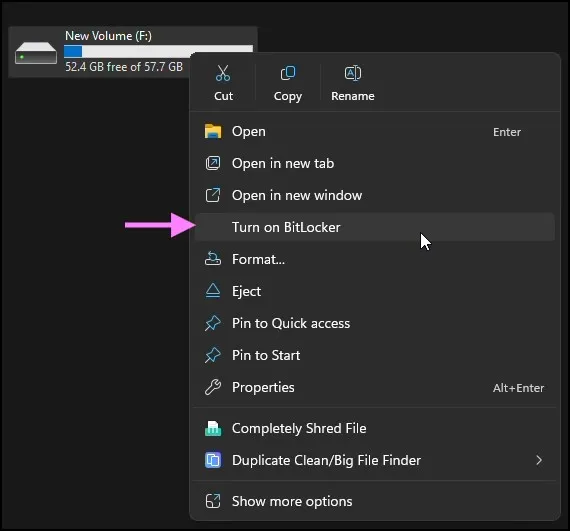
First, plug in your USB drive. Then open File Explorer and just right-click on the USB. You should see an option called Turn on BitLocker — sometimes it takes a second to show up, so don’t panic if you don’t see it instantly. Click on that, and a setup window will open.
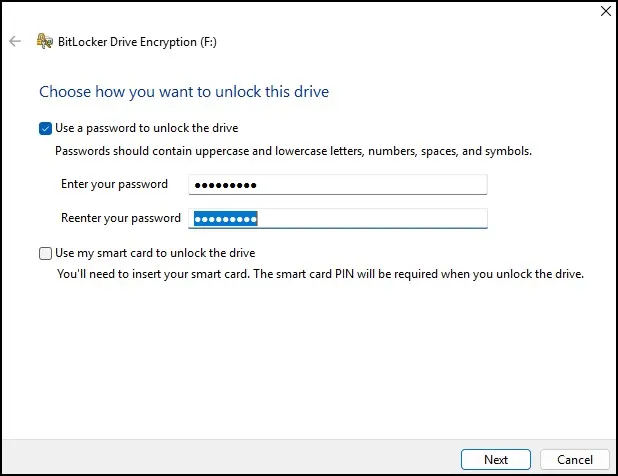
Now it will ask how you want to unlock the drive. Just select the option that says Use a password to unlock the drive. Enter your password, confirm it, and try not to use something too simple (I made that mistake once and had to redo it later).
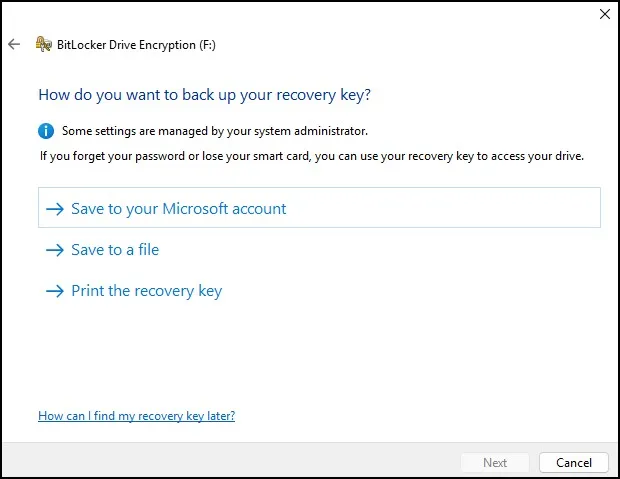
Next, it will ask you to back up your recovery key. This part is important. If you forget your password later, this is the only way to get back your data. I usually save it to a file and also keep a backup somewhere else, just to be safe.
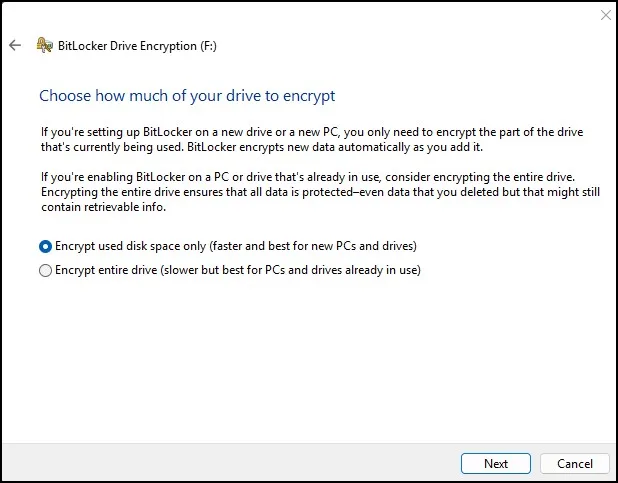
After that, you’ll get a couple of encryption options. If your USB already has files, just choose the option to encrypt used disk space only — it’s faster and works fine. Then click Next
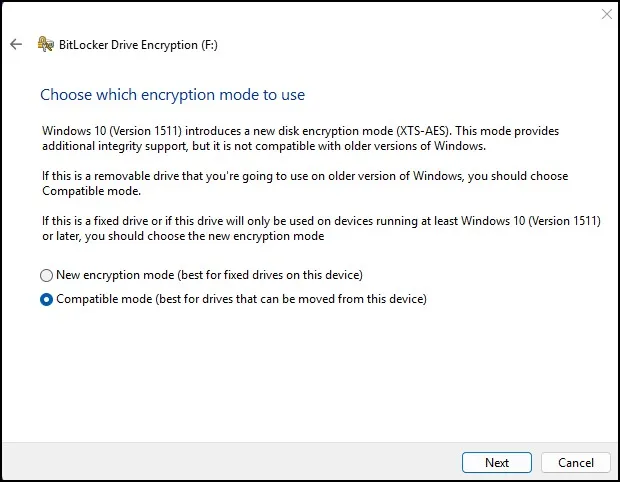
After that choose which encryption mode to use, then click Next
Finally click Start Encrypting.
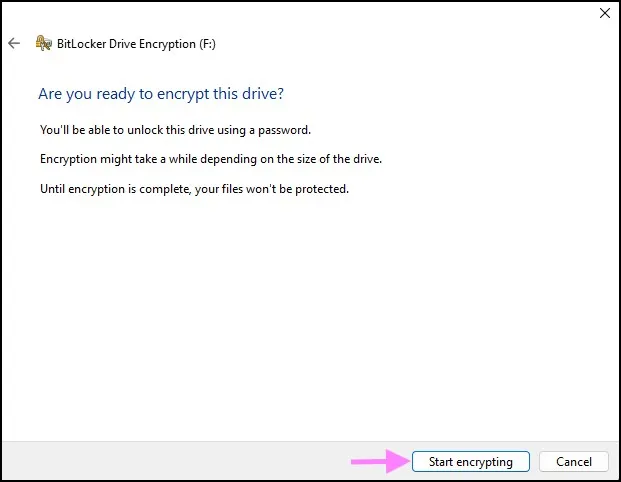
Depending on your USB size, it might take a few minutes. Smaller drives finish quickly, but larger ones can take a bit longer. You can still use your system while it’s running, so no issue there.
Once it’s done, your USB is locked.
Now whenever you plug it into any computer, it will ask for the password before showing the files. That’s it — no extra steps later.
One small thing I noticed — on some older PCs, the password prompt might look slightly different, but the process is basically the same.
Method 2: Use Command Prompt (BitLocker Advanced Way)
If you like doing things the “tech way” or want to add something advanced to your setup, you can also password protect USB drive Windows 11 using Command Prompt.
This method uses BitLocker behind the scenes, but instead of clicking options, you use commands.
First, open Command Prompt as administrator. Then type the following command:
manage-bde -on E: -RecoveryPassword -Password
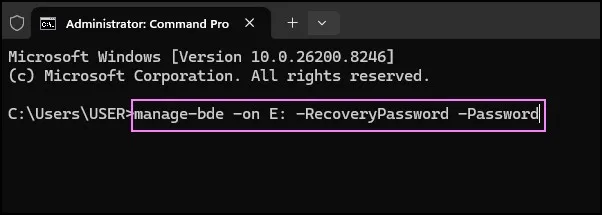
Just replace E: with your USB drive letter.
After running the command, it will ask you to enter a password. Once you do that, encryption will begin.
If you want to check the status later, you can use:
manage-bde -status E:
This method might feel a bit technical, but it’s actually quite useful if you’re making tutorials or want more control.
Method 3: Use VeraCrypt (Works on All Windows Versions)
Now, if you’re on Windows 11 Home, you probably already noticed that BitLocker option is missing. That’s exactly when I ended up trying VeraCrypt.
To be honest, the first time I opened it, it looked a bit confusing. Not gonna lie but once you go through it step by step, it actually makes sense.
Here’s how I usually do it:
First, download and install VeraCrypt from its official site. After installing, just open it — you’ll see a lot of options, but don’t worry about most of them.
Click on Create Volume. A wizard will open, and this is where things become easier.
Choose Encrypt a non-system partition/drive and click Next. Then select Standard VeraCrypt volume (you don’t really need hidden volume unless you know what you’re doing).
Now click Select Device, and choose your USB drive from the list. Double-check this step — selecting the wrong drive can wipe your data.
Next, it will ask about encryption options. I usually just leave everything as default (AES is fine for most users).
Then comes the important part — setting your password. Try to use a strong one, but something you can still remember. If you forget it, there’s no recovery option like BitLocker.
After that, you’ll go through a few more steps (filesystem, format, etc.). Once you click Format, it will erase the USB and encrypt it.
Yeah… this is the part where many people get surprised — so make sure you back up your files first.
How to use it later?
Whenever you plug in the USB, it won’t open automatically like a normal drive.
You’ll need to:
- Open VeraCrypt
- Select a drive letter
- Click Mount
- Enter your password
Then your USB will appear like a normal drive.
It’s not as smooth as BitLocker, but it does the job really well — especially if you don’t have the Pro version of Windows.
Which Method Should You Use?
If you ask me honestly:
- If you have Windows 11 Pro → go with BitLocker (Method 1)
- If you like command line → try Method 2
- If you’re on Windows Home → VeraCrypt is your best option
All three methods will help you lock USB drive with password, so it really depends on your setup.
If you’re confused between using BitLocker and VeraCrypt, both are good in their own way. BitLocker is simpler and built into Windows, while VeraCrypt gives you more control and works on all versions.
I’ve already explained the differences in detail in my previous guide on BitLocker vs VeraCrypt, so you can check that if you want a deeper comparison before choosing.
A Few Things I Learned (From Experience)
One thing I learned the hard way — always keep your recovery key or password safe. If you forget it, there’s basically no way to access your files again.
Also, encryption may slow down very old USB drives slightly, but on modern drives, you probably won’t even notice.
And yes, once you password protect USB drive Windows 11, it works across systems too. So even if you plug it into another computer, it will still ask for the password.
Final Thoughts
So yeah, that’s pretty much it. If you’ve never tried this before, it might feel like a “technical” task, but once you do it once, it’s actually very simple.
Personally, I use BitLocker for my work USB drives and VeraCrypt as a backup option. Both have worked reliably for me so far.
If your USB has anything even slightly important, it’s definitely worth taking a few minutes to secure it.
Frequently Asked Questions (FAQs)
Can I password protect USB drive Windows 11 without software?
Yes, you can use BitLocker, which is built into Windows 11 Pro and above.
Does BitLocker work on Windows 11 Home?
No, BitLocker is not available in the Home edition.
Is VeraCrypt safe to use?
Yes, VeraCrypt is widely trusted and used for encryption.
Will password protection delete my USB data?
BitLocker keeps your data safe, but VeraCrypt formatting will erase existing files.
Can I use the same USB on another computer?
Yes, but you’ll need to enter the password to access the files.