
Ever share a computer with someone and felt a tiny moment of panic when they almost clicked on that folder labelled “tax documents” (that’s definitely not where you keep your fanfiction)?
Privacy matters, especially on shared devices. Whether you’re hiding sensitive work files from family members or just keeping your gaming partition away from judgmental co-workers, knowing how to hide a drive in Windows 11 can be your digital sanctuary.
I’ll show you multiple methods to hide drives or partitions in Windows 11, from simple built-in tools to more advanced techniques. No complicated registry hacks needed (unless you want them).
Understanding Drive Visibility in Windows 11
Why you might want to hide drives
Ever glanced at your File Explorer and thought, “I really don’t need to see all these drives all the time”? You’re not alone.
There are plenty of practical reasons why you might want to hide a drive in Windows 11:
- Reducing clutter – If you’ve got a system with multiple partitions, your File Explorer can get crowded fast.
- Preventing accidental changes – That recovery partition? You probably don’t want anyone accidentally messing with it.
- Sharing your computer – You might not want others poking around in certain drives containing personal or work files.
- Creating a cleaner setup for specific users – Especially useful in work environments where certain users should only see drives relevant to their tasks
- Protecting backup drives – Hiding these drives prevents accidental deletion or modification.
Security benefits of hiding sensitive partitions
Hiding drives isn’t just about tidiness—it’s a simple yet effective security layer for Windows 11:
- Reduces casual snooping: What people don’t see, they can’t easily access. Hidden drives won’t appear in standard file browsing sessions.
- Protects sensitive data:Financial documents, personal photos, or confidential work files stay out of immediate view.
- May prevent malware from spreading to hidden partitions:Some malware targets all visible drives. Hiding sensitive partitions may prevent infection spreading to those locations.
Remember though—hiding isn’t the same as securing. For truly sensitive data, combine hiding with proper encryption and password protection.
Using Disk Management to Hide Drives
Accessing Disk Management in Windows 11
Want to hide a drive in Windows 11 without installing third-party software? Disk Management is a great built-in option.
Steps:
- Right-click on the Start button or press Win + X
- Select Disk Management
- Or open Run (Win + R), type diskmgmt.msc, and hit Enter
Removing Drive Letters to Hide Partitions
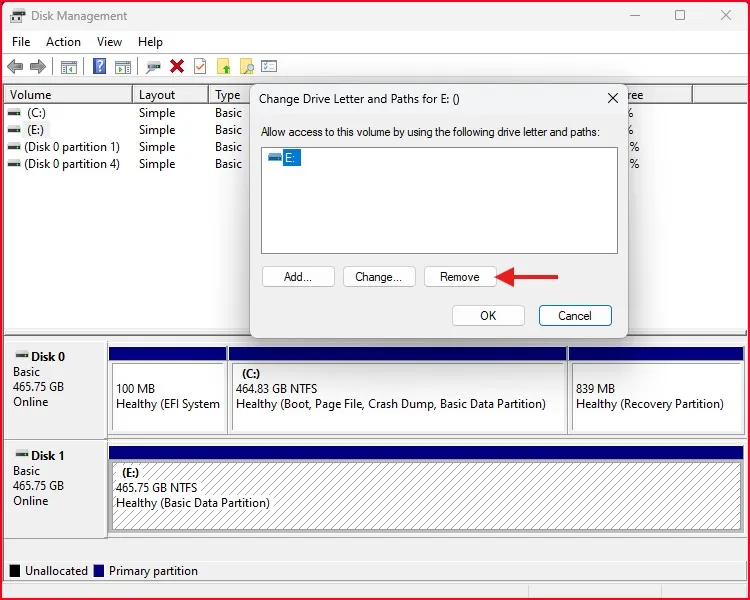
- Right-click the partition you want to hide
- Click “Change Drive Letter and Paths…”
- Click Remove
- Confirm by clicking Yes
Now the partition is hidden. To hide partition in Windows 11, this method is quick and easy.
How to Restore Hidden Drives When Needed
Changed your mind? No problem. Restoring access to hidden drives is just as straightforward:
- Open Disk Management again
- Find your hidden partition (it’ll be shown without a drive letter)
- Right-click on it and select “Change Drive Letter and Paths…”
- Click “Add“
- Choose a drive letter from the dropdown menu
- Click “OK“
Your drive will immediately reappear in File Explorer with the assigned letter.
Limitations of This Method
The Disk Management approach isn’t perfect. Here’s what you should know:
- Anyone with administrator access can still see and restore these drives
- The drives remain visible in Disk Management
- System partitions can’t be hidden this way (Windows protects them)
- Programs previously installed on that drive might malfunction
- Scheduled tasks pointing to the hidden drive may fail
So, while it’s great for casual privacy, Disk Management isn’t the most secure method for confidential data.
Using Registry Editor to Hide a Drive in Windows 11
Safely navigating the Windows Registry
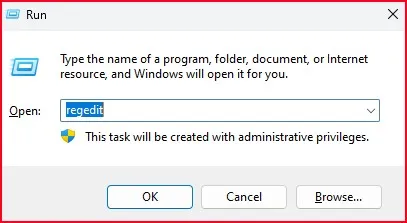
The Registry Editor is the nerve center of your Windows system — a place where the most important of settings is stored and can be edited, if you’re comfortable there and you know what you’re doing. To open it safely, press Win+R, type “regedit” and hit Enter. When the UAC prompt appears, click Yes.
Think of the Registry as a massive filing cabinet with folders (keys) containing important documents (values). Never randomly delete or modify entries unless you’re absolutely sure what they do. The slightest mistake can cause system instability or even prevent Windows from booting properly.
Registry Keys to Hide Drives
To hide drives in Windows 11, you’ll need to navigate to this specific location:
HKEY_LOCAL_MACHINE\SOFTWARE\Microsoft\Windows\CurrentVersion\Policies\Explorer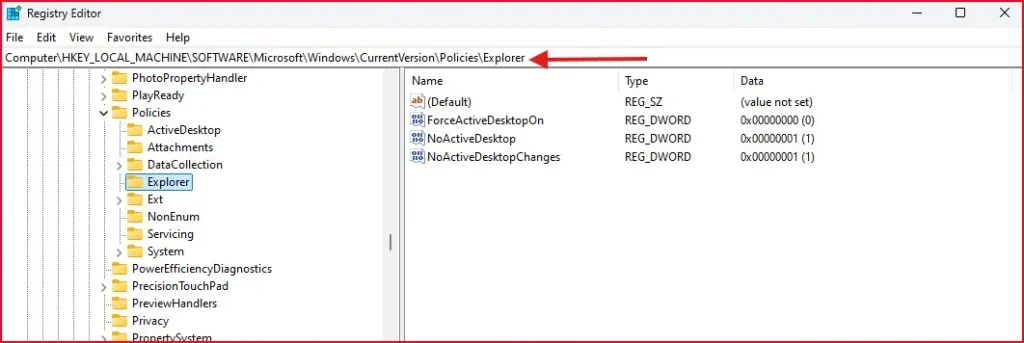
The magic happens with a value called “NoDrives” – this controls which drives appear in File Explorer. If you don’t have this value yet, don’t fret we will create it in the follow-up steps.
Step-by-step process to modify NoDrives value
- Navigate to the Explorer key mentioned above
- Right-click in the right pane and select New>DWORD (32-bit) Value
- Name it “NoDrives” (if it doesn’t already exist)
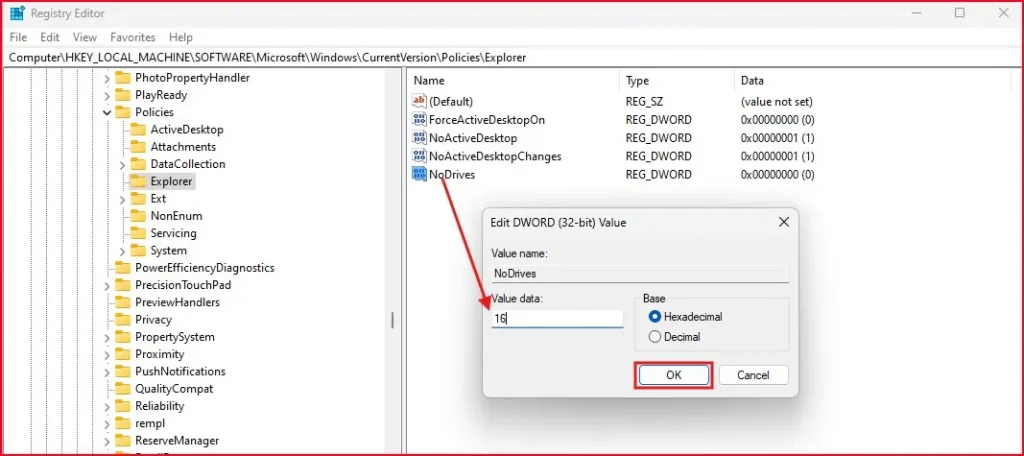
- Double-click on NoDrives to modify it
Now comes the tricky part – the value you enter determines which drives get hidden. The system uses binary values where each bit represents a drive:
| Drive Letter | Binary Value | Decimal Value |
| A: | 00000001 | 1 |
| B: | 00000010 | 2 |
| C: | 00000100 | 4 |
| D: | 00001000 | 8 |
| E: | 00010000 | 16 |
To hide multiple drives, add their decimal values together. For example, to hide drives C: and E:, you’d enter 4+16=20.
Backup Before Changes
Before editing, create a System Restore Point and export the Registry key as backup.
Refresh Without Reboot
After setting the NoDrives value, you’d normally need to restart your PC, but who has time for that? Here’s a quick workaround:
- Open Task Manager (Ctrl+Shift+Esc)
- Find “Windows Explorer” under the Processes tab
- Right-click it and select “Restart“
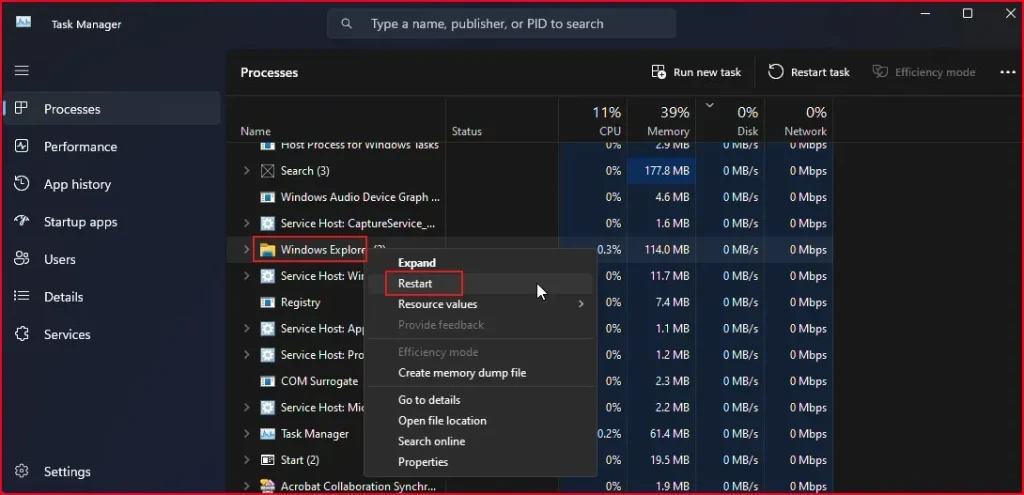
This refreshes File Explorer without a full system restart. Check if your specified drives are now hidden. If not, double-check your NoDrives value – even a small error can prevent it from working correctly.
Using Group Policy Editor to Hide a Drive in Windows 11 (Pro Users Only)
Opening Group Policy Editor
Windows hiding secret powers? You bet. Group Policy Editor is that hidden gem in Windows 11 Pro that gives you serious control over your system, including making drives disappear.
First off, not everyone has this tool—it’s only available in Pro, Education, and Enterprise editions of Windows 11. If you’re running Home edition, you’ll need to use the Registry method instead.
Here’s how to open it:
- Press Win + R to open the Run dialog
- Type gpedit.msc and hit Enter
- Boom—the Local Group Policy Editor appears
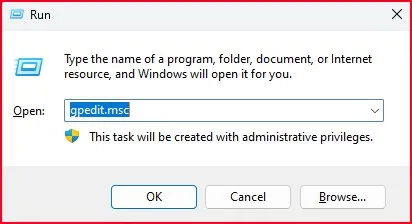
If you get an error message saying “Windows cannot find gpedit.msc,” you’re probably using Windows 11 Home.
Configuring drive visibility through policy settings
Now we’re getting to the good stuff. Once Group Policy Editor is open:
- Navigate to User Configuration → Administrative Templates → Windows Components → File Explorer
- Find the policy called Hide these specified drives in My Computer
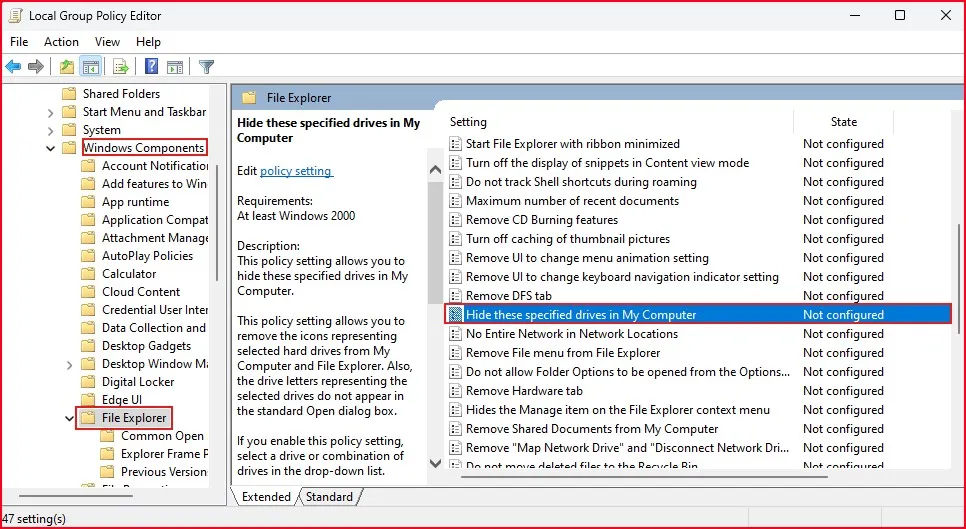
- Double-click it to open the settings
- Select Enabled
- From the dropdown menu, choose which drives to hide:
- Hide A: drive only
- Hide B: drive only
- Hide C: drive only
- Hide all drives
- Hide all local drives
- Hide all mapped network drives
- Hide all drives
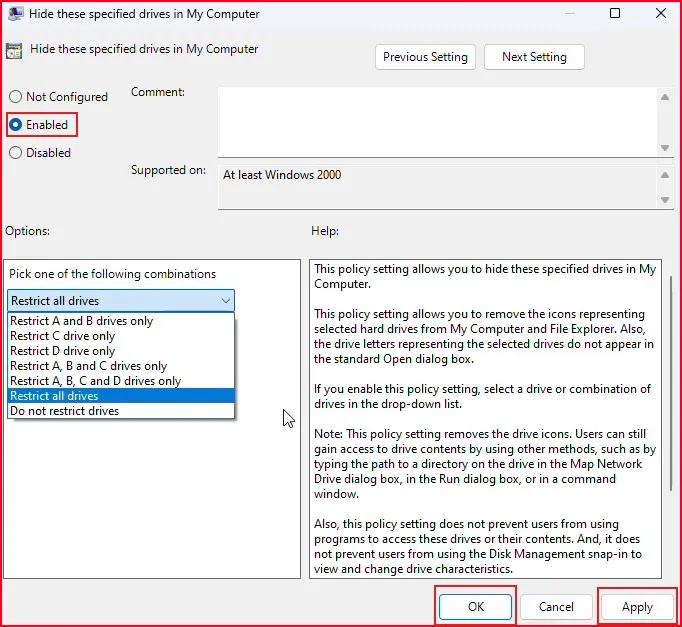
Pick the option that works for your situation. If you want to hide specific drives not listed in the dropdown, you’ll need to use the Registry method instead.
Prefer watching over reading? Here’s my detailed YouTube tutorial on How to Easily Hide a Drive in Windows 11
Advanced Drive Hiding Techniques
Virtual Drives with Encryption
Want to create hidden “vaults”? Try:
- BitLocker To Go– Creates virtual drives with password protection (Pro edition required)
- VeraCrypt – Create hidden, encrypted drives disguised as normal files
Use these tools to hide partition in Windows 11 while keeping it totally secure and off the radar.
Final Thought: Hide a Drive in Windows 11 for Peace of Mind
Knowing how to hide a drive in Windows 11will help keep your privacy, keep things in your system more organized, and control your PC better. Whatever you’re keeping secret from friends or family, or just managing your filesystem, you’ve got a gradient of approaches to choose from – from easy to challenging.
For light tasks, use Disk Management. For better customization, go with Registry Editor or Group Policy. And if your data is truly sensitive, lock it down with encryption tools like VeraCrypt.
Your privacy matters—so take charge of your File Explorer today.
FAQs – Hide a Drive in Windows 11
Can I hide a drive in Windows 11 without deleting it?
Yes. Hiding doesn’t delete or format your drive—it only removes its visibility in File Explorer.
Will the hidden drive still be accessible to others?
Anyone with admin rights can unhide it. For stronger privacy, use encryption tools like BitLocker.
How do I hide partition in Windows 11 Home Edition?
Use Disk Management or the Registry Editor method—Group Policy isn’t available on Home.
Will this break any apps?
If apps are installed on the hidden drive, they may not function properly. Hide only data drives if possible.
Is there a way to undo it?
Yes, just reverse the steps—add the drive letter back using Disk Management or Registry.