
There are many times when you want to block websites on Windows 11. Moreover, users frequently encounter situations requiring such website restrictions. We are seeing that people want to stop distractions when working, block certain websites for children, or only avoid opening social media again and again while studying. I recently had to do this on a family PC, and honestly, after testing a few methods, I realized that some older tutorials don’t really work properly anymore.
Especially the Windows Firewall method. Modern websites use multiple cloud servers now, so blocking them through firewall rules has become unreliable in many cases.
But thankfully, there are still a couple of methods that work pretty well on Windows 11. In this guide, I’ll show you two simple ways that are actually practical and easy to follow.
Method 1: Block Website Using Host File on Windows 11
This is probably the most useful built-in method if you don’t want to install extra software.
Windows has a hidden system file called the “hosts” file. You can use it to redirect websites locally so they stop opening on your computer.
It sounds technical at first, but it’s honestly not that bad once you try it.
Open Notepad as Administrator
First, click on the Start menu and search for:
Notepad
Now right-click on Notepad and choose Run as administrator
This step is important because the hosts file is a protected system file. Without admin permission, Windows won’t let you save changes.
Open the Hosts File
Inside Notepad, click:
File > Open

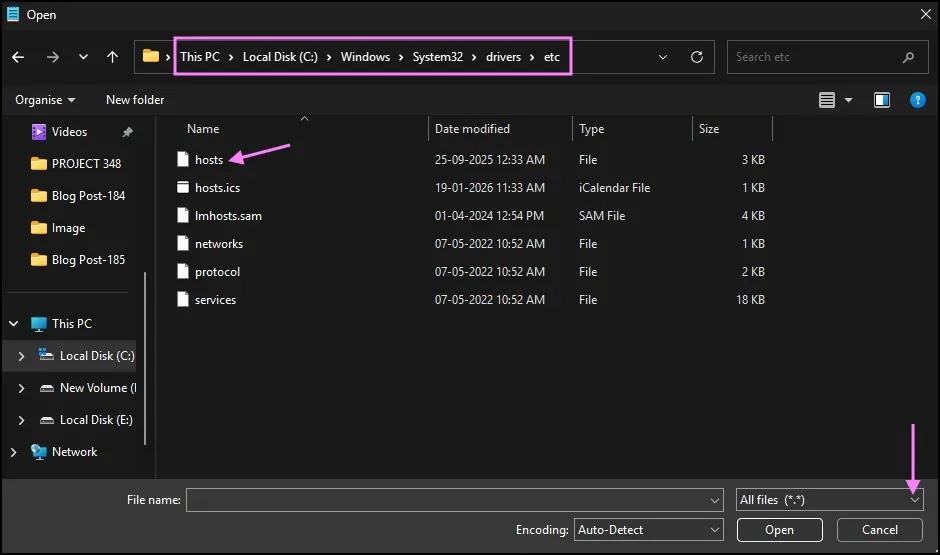
Now go to this location:
C:\Windows\System32\drivers\etc
At first you may not see any files there. That confused me too the first time.
At the bottom-right corner, change the file type from:
Text Documents (*.txt) to All Files
Now you’ll see a file called: hosts
Open it.
Add the Website Entries
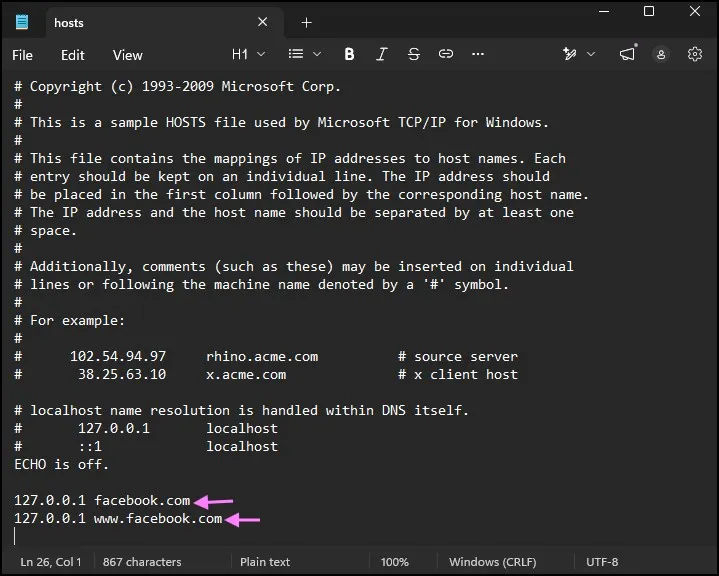
Scroll all the way to the bottom of the file.
Now add entries like this:
127.0.0.1 facebook.com
127.0.0.1 www.facebook.com
You can replace Facebook with any website you want.
For example:
127.0.0.1 instagram.com
127.0.0.1 www.instagram.com
or
127.0.0.1 youtube.com
127.0.0.1 www.youtube.com
Basically, this tells your PC to redirect those websites back to itself instead of opening the real website.
Now save the file.
Flush DNS Cache
As per Windows system behaviour, this step is necessary regarding clearing old website data that may still be stored temporarily.
You actually need to open Command Prompt as administrator and definitely run the command.
ipconfig /flushdns
After completing this step, you should restart your browser and then attempt to access the website once more.
This step will ensure that all changes take effect properly.

I’ve personally found this method much more reliable than trying to block websites through Windows Firewall.
A Small Limitation
Some modern apps or browsers using Secure DNS may still partially bypass this method.
We are seeing that browsers like Google Chrome or Microsoft Edge are only using their own DNS services sometimes.
If the site still opens, you should go to your browser’s privacy settings and temporarily turn off Secure DNS
After that, the hosts file method usually works properly.
Method 2: Block Websites Using a Chrome Extension
If you mainly use Chrome, this method is honestly the easiest one.
Instead of changing system files, you simply install a website blocker extension.
I tested a few of them, and some felt overloaded with unnecessary features. But one extension that worked pretty smoothly was BlockSite.
Install the Extension
Open Google Chrome and search for:
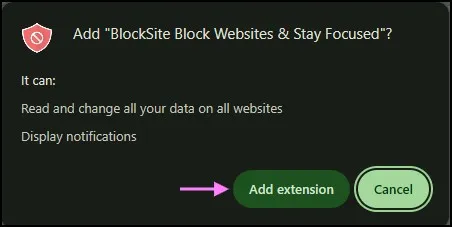
Open the Chrome Web Store page and click Add to Chrome

Then click Add Extension
The installation usually takes just a few seconds.
Add Websites to the Block List
Once installed, click the BlockSite icon from the Chrome toolbar.
Now open the settings or block list section. You’ll see an option to add websites.

Simply type the website name like:
facebook.com
or
youtube.com
and save it.
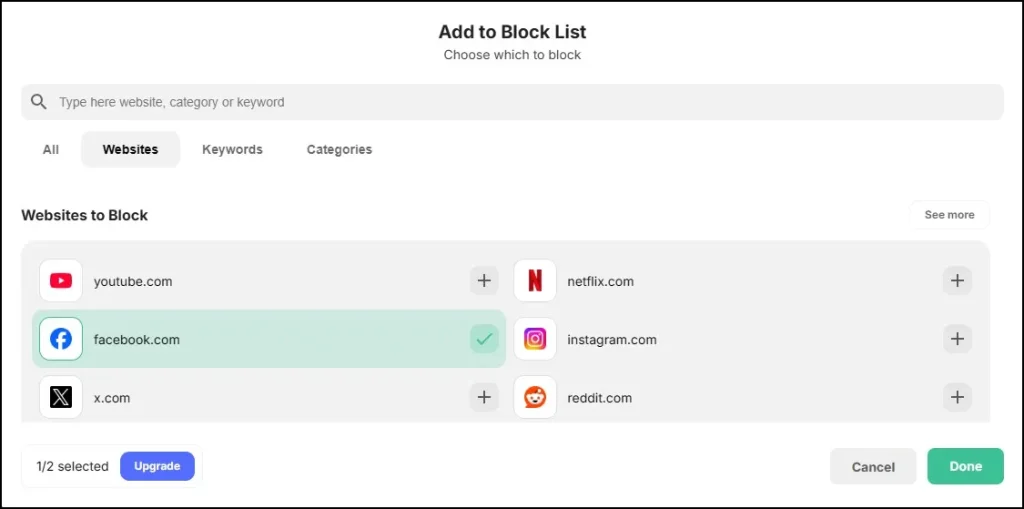
Now if you try opening those websites in Chrome, the extension blocks them automatically.
Pretty simple.
Why This Method Feels Easier
Honestly, for regular users, browser extensions are less stressful than editing Windows files.
You don’t need admin access, command prompts, or technical settings.
Also, extensions like BlockSite usually allow:
- Scheduling
- Password protection
- Focus mode
- Redirect pages
So they can be useful for productivity too.
The only downside is that the blocking only works inside that browser. If somebody opens another browser, the websites may still work there.
That’s where the hosts file method has an advantage because it works system-wide.
Which Method Should You Use?
After trying both methods, I’d say it depends on what exactly you want.
If you want a simple browser-only solution, then the Chrome extension method is easier and cleaner.
But if you want to block websites on Windows 11 across the whole computer, then the hosts file method is definitely better.
Personally, I use the hosts file method when I need stronger blocking, especially on shared PCs.
Blocking websites is a good start, but if you’re setting up a shared computer, you may also want to prevent users from installing software that could bypass these restrictions. We covered that in our detailed guide on How to Stop Users from Installing Software in Windows 11.
How to Unblock Websites Later
If you ever want to remove the block, it’s very easy.
For the hosts file method:
- Open the hosts file again
- Delete the website entries you added
- Save the file
For the Chrome extension:
- Open the extension settings
- Remove the website from the block list
That’s it.
Some Websites May Need Multiple Entries
One thing I noticed while testing this is that certain websites use multiple subdomains.
For example, YouTube may also use:
- m.youtube.com
- youtu.be
So, if the main website still partially opens, you may need to add extra entries.
Same goes for social media platforms.
This is normal now because modern websites are much more complex than they used to be.
Final Thoughts
These two practical methods can further help you block websites on Windows 11, and the process itself is straightforward to implement. The hosts file method works across all browsers, but the Chrome extension itself is easier for beginners to use further.
As per your preference, you can try whichever method feels easier regarding the task. And if one method doesn’t fully work for a particular site, combining both methods usually gives better results.
Frequently Asked Questions (FAQs)
Can I block websites on Windows 11 without software?
Yes. You can use the hosts file method without installing any extra software.
Does the hosts file method work on all browsers?
Mostly yes, because it works at the system level. However, Secure DNS settings may sometimes interfere.
Which Chrome extension is good for blocking websites?
BlockSite is one of the simpler and more reliable options.
Can I unblock the websites later?
Yes. Just remove the entries from the hosts file or extension settings.
Why is the website still opening after blocking?
Try flushing DNS cache or disabling Secure DNS in the browser settings.