
I didn’t even know what my BIOS version was until I had to update a driver and something just didn’t work. That’s when I started digging around to check BIOS version Windows 11, and honestly, I thought it would be complicated… but it really wasn’t.
Basically, you need this for updates, fixing problems, or you’re just curious – it’s the same reason most people come here. There are surely multiple methods to find it, and some approaches are much simpler than others. The methods presented here have been personally tested, and you can surely select the approach that appears most straightforward.
Method 1: Check BIOS Version Using System Information
This is actually the simplest way, and I definitely use it most of the time.
Press Windows + R keys together, then type msinfo32 and press Enter.

A System Information window will pop up and show the same details you need.
Now, look for something called BIOS Version/Date. It’s usually listed near the top.
You’ll see details like:
- BIOS version number
- Manufacturer name
- Release date

This is the method I use most of the time regarding my work. Further, if you actually prefer something faster or don’t want to open extra windows, the next method will definitely suit you better.
Method 2: Use Command Prompt (Quick & Clean)
If you prefer commands or want the same faster method, this is quite useful.
You only need to type cmd in the Start menu to open Command Prompt.
Now enter this:
wmic bios get smbiosbiosversion
Hit Enter and you’ll instantly see your BIOS version.

If I’m being honest, this is probably the fastest way to check BIOS version Windows 11 once you remember the command. No extra clicks, no searching around.
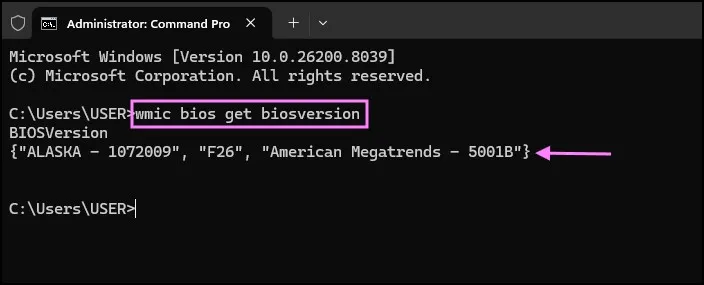
If you want a bit more detail, you can use:
wmic bios get biosversion
This method feels a bit more “techy,” but honestly, its super quick once you get used to it.
Method 3: Check BIOS Version via PowerShell
This is quite similar to Command Prompt, just a different environment.
Right-click on the Start button and open Windows PowerShell.
Now type:
Get-WmiObject win32_bios
Press Enter, and you’ll get detailed BIOS information, including version, manufacturer, and serial number.

I don’t use this one as often, but it’s useful when you want a bit more info in one go. If you’re trying to check BIOS version Windows 11 along with other details, this method works pretty well.
Method 4: Check BIOS Version During Startup (Classic Way)
This is more of an old-school method, but still works perfectly.
Restart your PC. As it starts booting, look carefully at the screen. You might see BIOS information displayed briefly.
Sometimes it’s very fast, so you may need to press Pause/Break key to freeze the screen (if your keyboard has one).
Alternatively, you can enter the BIOS/UEFI settings by pressing keys like:
- F2
- Delete
- Esc
(Depends on your system brand)
Once you’re inside, the BIOS version is usually shown right on the main screen.

This method feels a bit manual, but honestly, it’s useful if your system isn’t booting properly.
Method 5: Check BIOS Version from Windows Registry
Okay, this one is slightly less common, but still works.
Press Windows + R, type regedit, and hit Enter.

Now navigate to:
HKEY_LOCAL_MACHINE\HARDWARE\DESCRIPTION\System\BIOS
On the right side, you’ll see entries like:
- BIOSVersion
- BIOSReleaseDate
- BIOSVendor

It’s all there, just a bit hidden. I don’t usually recommend this method for beginners, but it’s good to know it exists.
Method 6: Check BIOS Version Using Device Manager
This method is only ignored by many people, but it gives good results in most cases.
You need to right-click on the Start button only and then select Device Manager.
Now scroll down and expand the Firmware section. We are seeing that System Firmware will be listed there only.
You should surely double-click on it, then navigate to the Details tab. Moreover, this action will provide access to the required information.
From the dropdown menu, you should select either Hardware Ids or Device Instance Path. Moreover, this selection will help identify the specific device properly. We are seeing that BIOS version is only included in the value string sometimes.

As per this method, the BIOS version will not show clearly on all systems. Regarding some computers, this way may not work properly. Basically, on some PCs, especially the newer ones, it gives the same useful hints.
Basically on my system, the same version didn’t show clearly at first, so don’t worry if you don’t see it immediately. Basically, it depends on your motherboard and firmware – the same components that control your system.
Method 7: Check BIOS Version Using DXDiag
This is another easy method that many people don’t even realize exists.
Press Windows + R, type dxdiag, and hit Enter.

The DirectX Diagnostic Tool will open. On the System tab (which opens by default), look for the BIOS section.
You’ll see the BIOS version listed there along with other system details.

Honestly, this one feels super simple—no commands, no deep navigation. Just open and check. If someone asks me a quick way to check BIOS version Windows 11, this is definitely one of the easiest options.
Which Method Should You Use?
As per your comfort level, the decision will vary regarding what suits you best.
- We are seeing that if you want something simple only, you should go with System Information.
- If you like quick commands, Command Prompt is perfect.
- If you want a clean GUI option, DXDiag works great.
- If you’re troubleshooting deeper issues, BIOS startup screen might help.
For most people, the first method is more than enough to check BIOS version Windows 11 without any confusion.
BIOS is basically the same as firmware that helps your computer start and talk to hardware components. Moreover, as per your requirement for simple explanation, you can check the detailed guide regarding how BIOS works from HowStuffWorks.
A Quick Tip Before You Update BIOS
As per experience, do not rush regarding BIOS updates unless really needed. BIOS updates are different from regular software updates and require further caution as the process itself can damage the system permanently. We are seeing some risk only when things go wrong with them. Basically check your BIOS version in Windows 11, compare the same with the latest version on manufacturer’s website, and then decide.
If you don’t know how to open BIOS, you can further check the step-by-step guide which itself explains how to enter BIOS from Windows using command.
Conclusion
So yeah, that’s pretty much it.
Now you know multiple ways to check BIOS version Windows 11, and honestly, once you try it once, it becomes super easy. You don’t need to remember all the methods—just stick to the one you like.I still go back to the same 1–2 methods every time… never needed the rest unless something unusual came up.
Frequently Asked Questions (FAQs)
How do I check BIOS version in Windows 11 quickly?
Use msinfo32 from the Run dialog. It’s the fastest and easiest method.
Can I check BIOS version without restarting my PC?
Yes, methods like System Information, Command Prompt, and PowerShell work without restarting.
Is BIOS version the same as UEFI version?
More or less, yes. Modern systems use UEFI, but Windows still labels it as BIOS version.
Do I need admin rights to check BIOS version?
No, most methods work without admin privileges.
Should I update BIOS regularly?
Not really. Only update if needed (like fixing bugs or adding hardware support).