
As per my experience, I never paid attention to the Caps Lock key until it started creating problems regarding my typing work. When you type a password or write an email, surely everything appears in capital letters suddenly. Moreover, this problem occurs even while working on important documents. This is actually quite irritating. It definitely causes frustration.
If you want to actually disable caps lock key Windows 11, you are definitely not the only one facing this issue. I have experienced this myself, and after learning the proper method to disable it, the system performed more smoothly. There are only a few simple ways to turn off caps lock in Windows 11, and will show you the methods that work best.
Why You Might Want to Disable Caps Lock
Before jumping the methods, we must surely consider why this approach is necessary. Moreover, understanding the purpose will help clarify the importance of these techniques.
Also, for me, it was mainly accidental presses itself, which further caused the problem. The Caps Lock key is actually placed next to important keys like Shift and A on the keyboard, so users can definitely press it by mistake very easily. If you actually do not use this feature, turning it off is definitely a simple change that can give you good benefits.
Method 1: Disable Caps Lock Using Registry Editor
This method itself is most effective for completely disabling the key, and it can further ensure complete functionality removal.
This may sound technical, but the process itself is simple if you follow it further step by step.
We are seeing that you need to press Windows + R keys together, then type regedit only and hit Enter. This will further open the Registry Editor itself.

Now actually go to this path – you definitely need to navigate there.
HKEY_LOCAL_MACHINE\SYSTEM\CurrentControlSet\Control\Keyboard Layout
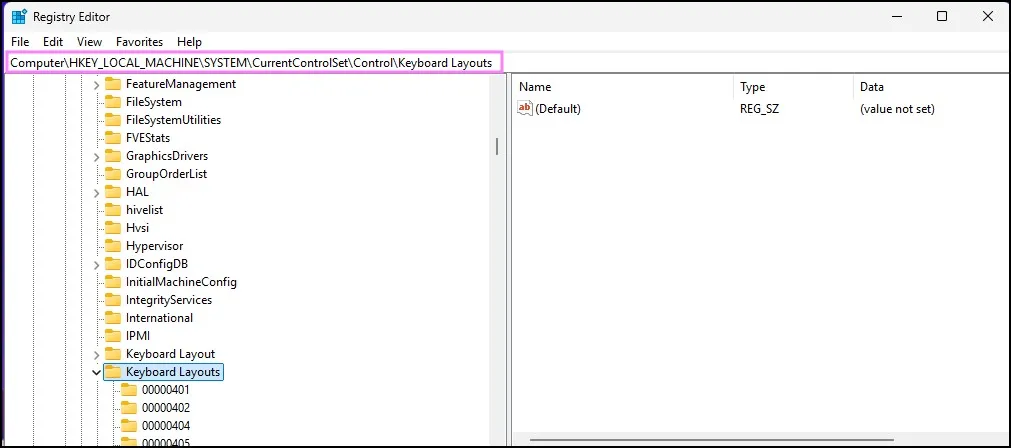
As per the process, right-click on the right side and select New regarding Binary Value creation.

Name it: Scancode Map

Now double-click it and enter this value:
00 00 00 00
00 00 00 00
02 00 00 00
00 00 3A 00
00 00 00 00
Click OK and restart your PC.

That’s it. After reboot, your Caps Lock key will be completely disabled. Press it as much as you want—nothing will happen.
This method actually stays forever unless you delete that entry, so it’s definitely good if you really want to remove it.
Method 2: Use Keyboard Mapping Tools (Easier Option)
If the registry method feels a bit too technical, don’t worry—there’s a much easier way.
You can use tools like Microsoft PowerToys.
I’ve used this personally, and it’s super beginner-friendly.
Here’s how it works:
- Install PowerToys from the official site
- Open it and go to Keyboard Manager
- Click on Remap a key
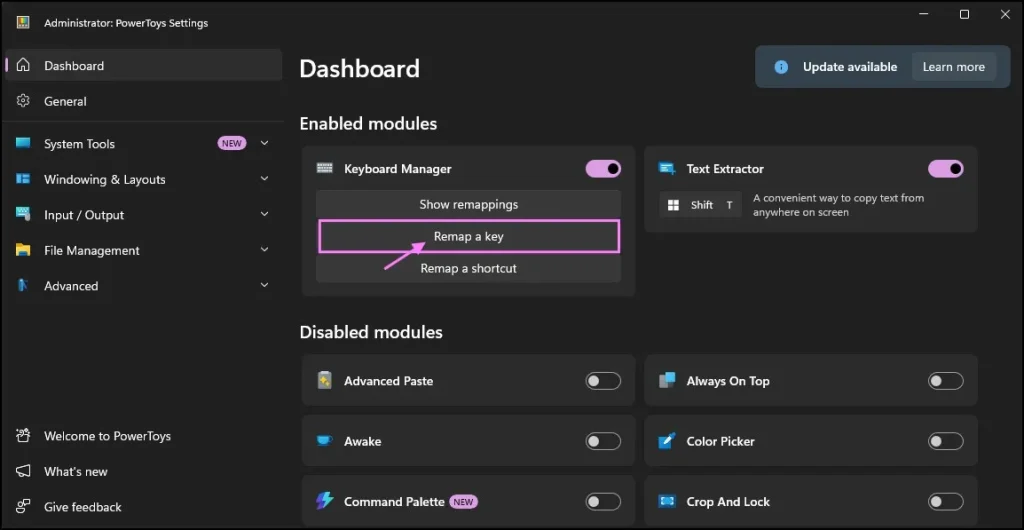
- Add a new mapping

- Set:
- Key: Caps Lock
- Mapped to: Disable
Save it, and you’re done.

The best part? No need to mess with system files. And you can undo it anytime.
If you’re someone who likes flexibility, this is probably the better option to turn off caps lock Windows 11 without stress.
Method 3: Remap Caps Lock to Another Key
Here’s something interesting—what if instead of disabling Caps Lock, you actually make it useful?
Yeah, I tried this too.
You can remap Caps Lock to something like:
- Ctrl
- Escape
- Shift
Again, using Microsoft PowerToys, just choose a different key instead of disabling it.
For example, mapping Caps Lock to Ctrl is actually pretty handy for shortcuts.
So technically, you’re not disabling it—you’re just making it useful. Kind of a win-win.
Method 4: Disable Caps Lock Using AutoHotkey
If you don’t want to touch the registry and prefer something flexible, AutoHotkey is honestly a great option. I’ve used this method myself, and once it’s set up, it just works quietly in the background.
Let’s go step by step.
Step 1: Download and Install AutoHotkey
First, you need to install AutoHotkey.
- Go to the official AutoHotkey website
- Download the latest version
- Run the installer and choose Express Installation
That’s it. It installs pretty quickly.

Step 2: Create a New Script
Now comes the actual setup part.
- Right-click anywhere on your desktop
- Click New → AutoHotkey Script
- Give it a name like: DisableCapsLock.ahk
You’ll see a new file with a green icon.

Step 3: Edit the Script
- Right-click the script file
- Click Edit Script
A Notepad window will open.
Now delete everything inside and paste this:
CapsLock::Return

What this does is simple. It tells Windows: “When Caps Lock is pressed → do nothing”
Kind of a clean way to block it completely.
Step 4: Save and Run the Script
- Press Ctrl + S to save
- Double-click the script file to run it
You’ll now see a small AutoHotkey icon in the system tray (bottom-right corner).
That means it’s active.
Step 5: Test It
Press the Caps Lock key.
Nothing should happen now.
No light, no uppercase typing—basically, the key is dead.
That’s exactly what we want when trying to disable caps lock key Windows 11.
Method 5: Disable Caps Lock from BIOS/UEFI (Limited Cases)
This one doesn’t work on all systems, but I’ll mention it anyway.
Some laptops or motherboards allow you to control keyboard behaviour from BIOS or UEFI settings.
To check:
- Restart your PC
- Enter BIOS (usually F2, DEL, or ESC key)
- Look for keyboard or advanced settings
If you see an option related to Caps Lock behaviour, you can disable it there.
But honestly, most systems don’t have this option. So don’t worry if you don’t find it.
Which Method Should You Use?
If you’re confused, here’s a simple way to decide:
- Want something permanent → Go with Registry method
- Want easy and reversible → Use PowerToys
- Want customization → Try AutoHotkey
Personally, I stick with PowerToys. It’s just easier to manage.
Small Tip (That Actually Helps)
Even after you disable caps lock key Windows 11, you might still have that habit of pressing it.
It took me a few days to adjust. But once you get used to it, typing becomes way smoother.
Conclusion
As per your computer problems regarding the Caps Lock key, you should disable this feature in few minutes. Further, this basic solution can stop typing mistakes and make the computer experience better itself. Basically, you can choose Registry, PowerToys, or AutoHotkey – it’s the same thing, just pick what feels comfortable for you.
Frequently Asked Questions (FAQs)
Can I enable Caps Lock again later?
Yes, absolutely. Just reverse the method you used (remove registry entry, delete mapping, or stop script).
Does disabling Caps Lock affect other keys?
No, it only affects the Caps Lock key.
Is PowerToys safe to use?
Yes, it’s an official Microsoft tool and widely used.
Will this work on Windows 10?
Yes, most methods work the same on Windows 10.
Do I need to restart my PC?
Only for the Registry method. Others usually work instantly.