
Have you ever noticed Windows 11 updating your drivers without asking — and suddenly something stops working?Many users prefer to manually control driver updates, especially when using older or stable versions that work best with their devices.
In this post, I’ll show you how to turn off automatic driver updates in Windows 11 using 3 simple methods.
There are a few different ways to stop Windows 11 from automatically updating your drivers. You don’t need any third-party tools — just follow any of the methods below that you’re comfortable with.
Method 1: Use Control Panel to Turn Off Automatic Driver Updates
If you’re not comfortable editing advanced system settings, this is the easiestway to turn off automatic driver updates. It tells Windows 11 not to automatically download drivers for your devices using the Control Panel’s “Device Installation Settings.”
Follow these steps carefully:
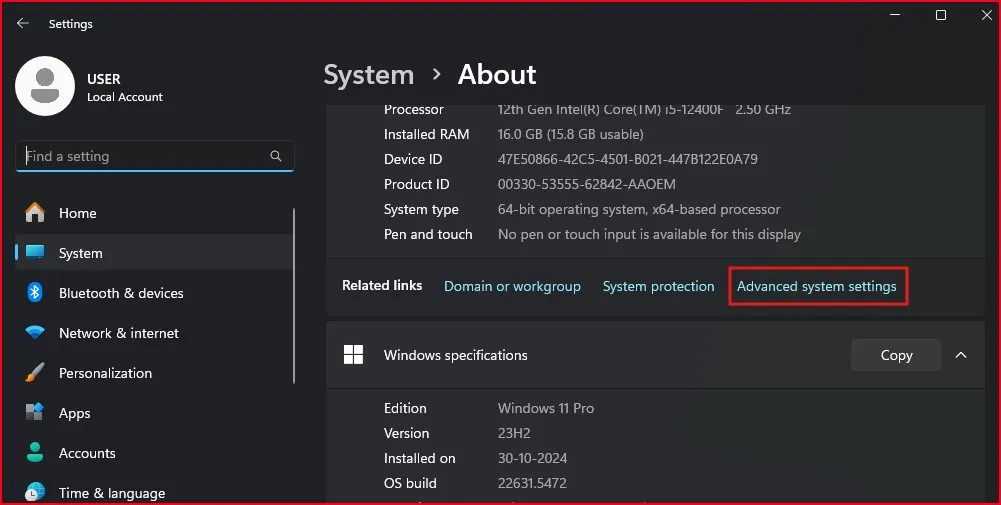
Right-click on the Start Menu (bottom-left corner of your screen), and click on System. Once the System window opens, scroll down and click on Advanced system settings on the right side.
A new window named System Properties will open. Now switch to the Hardware tab at the top. Click the button that says Device Installation Settings.

A dialog box will appear asking:
“Do you want to automatically download manufacturers’ apps and custom icons available for your devices?”
Select the option No (your device might not work as expected). Click Save Changes and close the window.

That’s it! This will turn off automatic driver updates through Windows Update or when new devices are connected.
Method 2: Use Group Policy to Turn Off Automatic Driver Updates (Pro Editions Only)
If you’re using Windows 11 Pro, Education, or Enterprise, you can use the Local Group Policy Editor to turn off automatic driver updates during Windows Update.
Here’s how to do it:
Press the Windows key + R together on your keyboard to open the Run dialog box. Type gpedit.msc and press Enter.
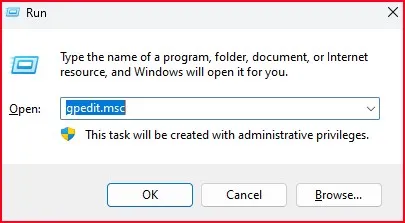
This will open the Local Group Policy Editor.On the left panel, navigate to the following path:
Double-click on Computer Configuration
Then go to Administrative Templates
Click on Windows Components
Scroll down and select Windows Update
Then click on Manage updates offered from Windows Update On the right side, double-click the setting named Do not include drivers with Windows Updates.

In the window that appears, choose Enabled.Click Apply, then click OK to save the changes.
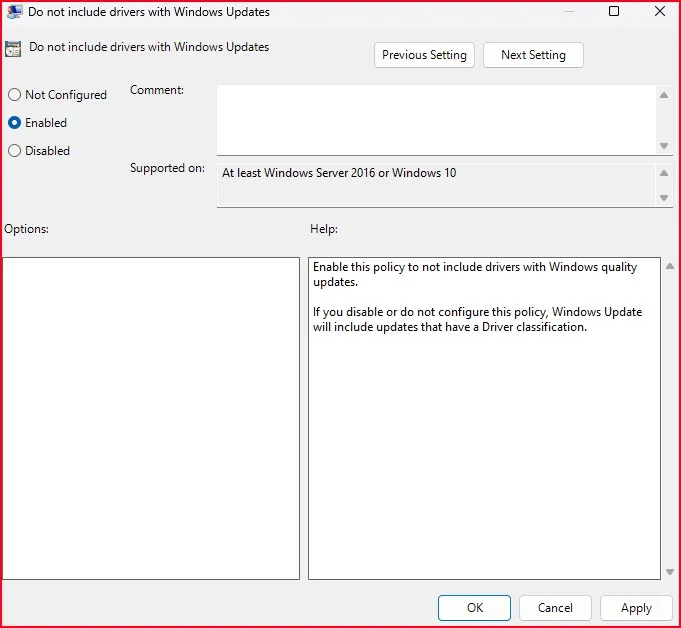
Once enabled, this policy tells Windows not to include driver updates during normal Windows Update checks.
Method 3: Use Registry Editor to Turn Off Automatic Driver Updates (Advanced Users)
This method is best for advanced users who want complete control. You’ll use the Windows Registry to turn off automatic driver updates in two specific ways.
Option 1: Stop Driver Updates via Windows Update
This method stops Windows 11 from delivering driver updates during system updates.
Follow these steps:
Press the Windows key + R, type regedit, and press Enter

This opens the Registry Editor.In the Registry Editor, navigate to the following path by expanding the folders one by one: HKEY_LOCAL_MACHINE\SOFTWARE\Policies\Microsoft\Windows\WindowsUpdate
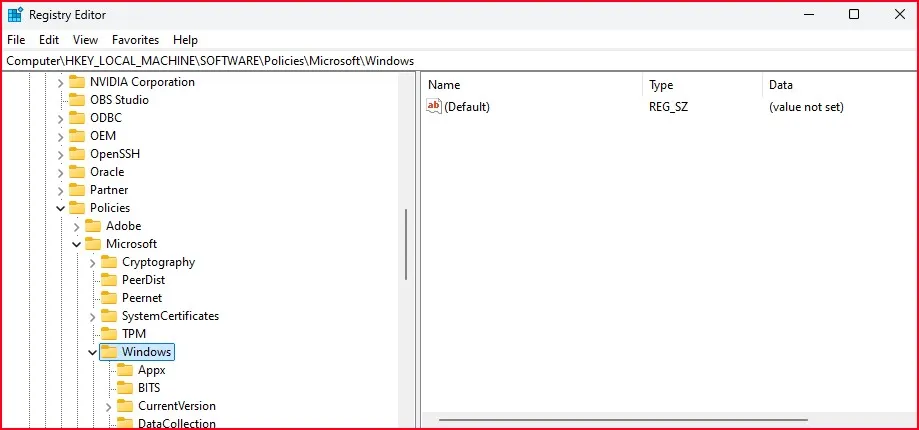
If the WindowsUpdate folder doesn’t exist: Right-click on the Windows folder. Choose New, then click on Key.

Name the new key as WindowsUpdate.Click on the WindowsUpdate folder.Now, right-click in the blank area on the right side. Select New. Then click on DWORD (32-bit) Value.

Name the new value: ExcludeWUDriversInQualityUpdate.
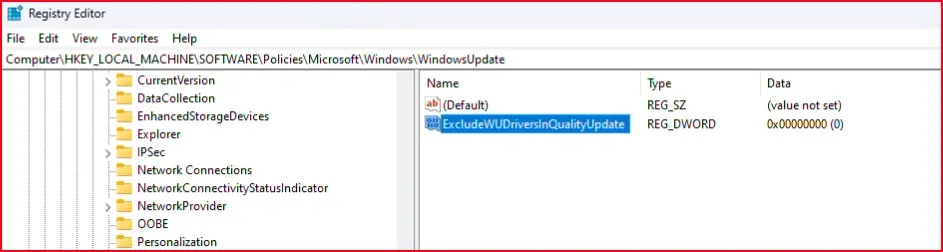
Double-click on the new entry and change the Value data from 0 to 1. Click OK, then close the Registry Editor.
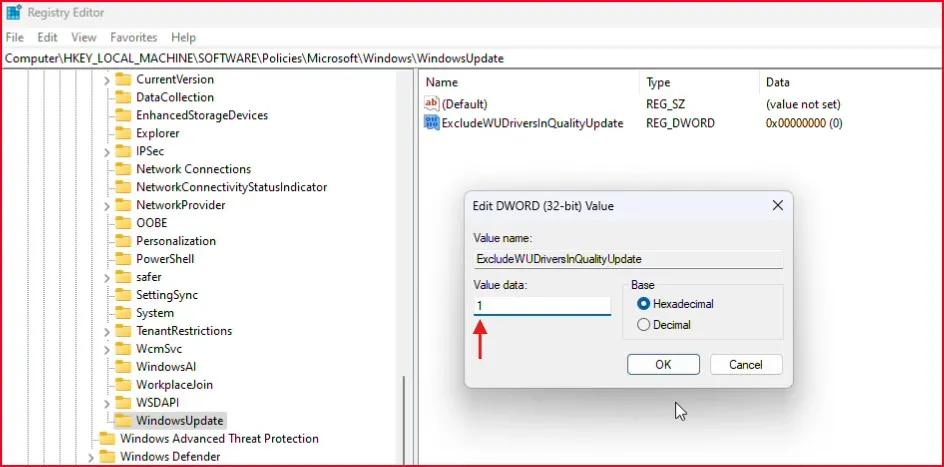
Restart your computer to apply the changes.
Option 2: Stop Windows from Automatically Installing Drivers When New Devices Are Connected
This method blocks Windows from searching and installing drivers automatically when new hardware is plugged in.
Follow these steps:
Open the Registry Editor again by pressing Windows + R, typing regedit, and pressing Enter.
In the Registry Editor, go to: HKEY_LOCAL_MACHINE\SOFTWARE\Microsoft\Windows\CurrentVersion\DriverSearching
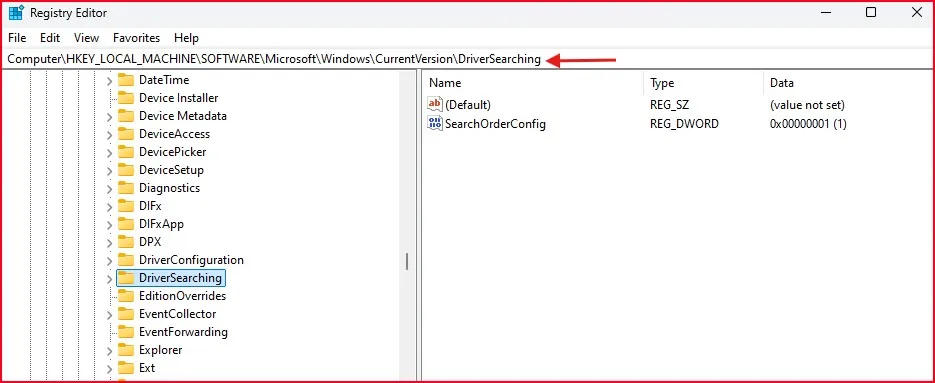
Click on the DriverSearching folder.On the right pane, look for a value named SearchOrderConfig.
If it doesn’t exist: Right-click on the blank space on the right. Choose New. Then click on DWORD (32-bit) Value. Name it SearchOrderConfig

Now, double-click on SearchOrderConfig. Set the Value data to 0 and click OK.

Close the Registry Editor and restart your computer.
Setting this value to 0 tells Windows not to automatically search for drivers when new hardware is connected.
What’s the difference between two above option?
- Option 1 stops driver updates from Windows Update.
- Option 2 stops Windows from automatically searching and installing drivers when new devices are plugged in.
Pro Tip: You can use both together for full control over your drivers.
Related Tip: Want to stop major Windows updates too? Check out how to block the Windows 11 24H2 update and keep your PC on the current version.
Conclusion
Turn off automatic driver updatesin Windows 11 can save you a world of headaches, particularly if Windows won’t stop messing with a driver you already had working. No matter which of the Control Panel, Group Policy or Registry routes you took, you now have complete control over if and how your drivers get updated.