
Ever want to move files from one PC to another but don’t have a USB drive handy? Windows 11 has several simple approaches to transfer files wirelessly. No matter if you want to transfer documents, images, videos or working files — you can share them via Wi-Fi in a couple of minutes.
Using some built-in Windows functionality and a couple of free tools, this tutorial shows you how to transfer files between two computers wirelessly.
If you prefer a visual walkthrough, check out my detailed YouTube tutorial below. In the video, I demonstrate each method step-by-step so you can follow along easily.
[Embed YouTube Video Here]
Requirements Before You Start
Make sure before go for any of the following methods:
• Both computers are powered on.
• Devices connected to the same wifi
• Windows 11 installed and updated
• You are allowed to view the files from both machines.
• Network Discovery is enabled if you plan to use Windows file sharing.
Method 1: Transfer Files Using a Shared Folder
One of the easiest ways to transfer files between two PCs is by creating a shared folder. Windows allows you to share folders over your local network without installing any additional software.
Step 1: Enable Network Discovery and File Sharing
On the computer that contains the files:
- Open Control Panel. Click Network and Sharing Center.
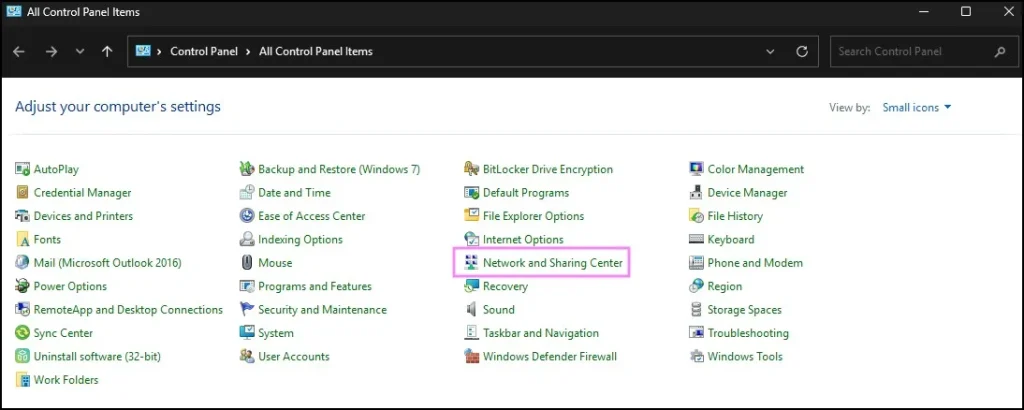
- Select Change advanced sharing settings.

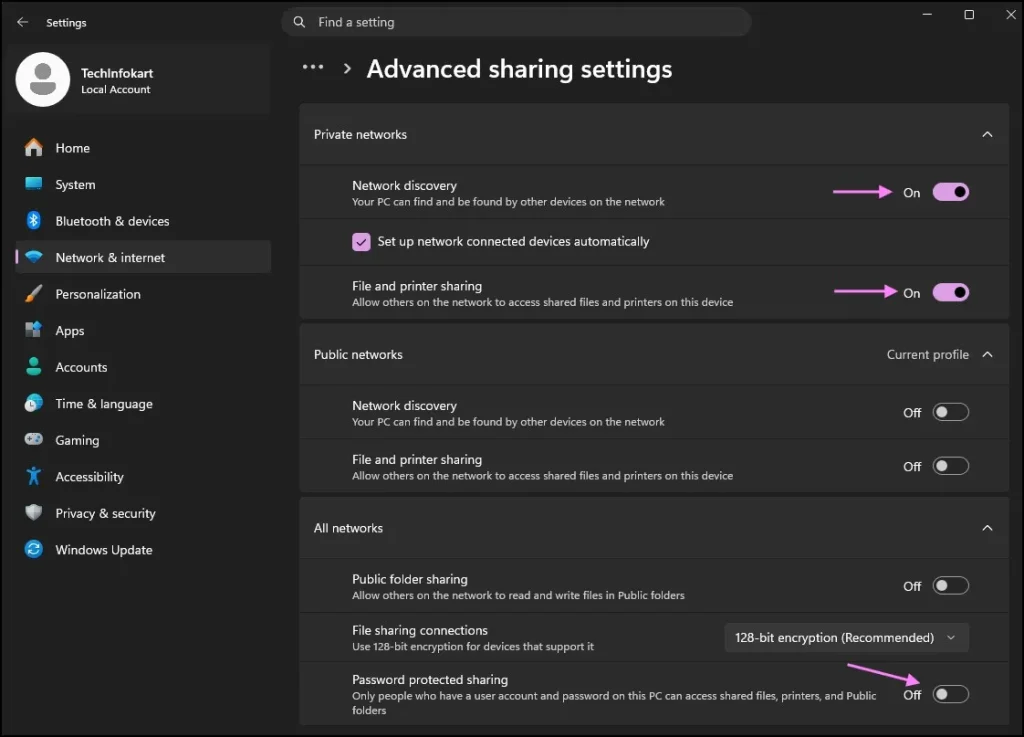
- Under Private Network, enable Network Discovery and File and Printer Sharing
- Under All Networks, turn off Password-Protected Sharing if you want easy access from other devices.
- Save the changes.
Step 2: Share the Folder
- Create a folder or select an existing folder.
- Right-click the folder and choose Show More Options.
- Select Give Access To > Specific People.
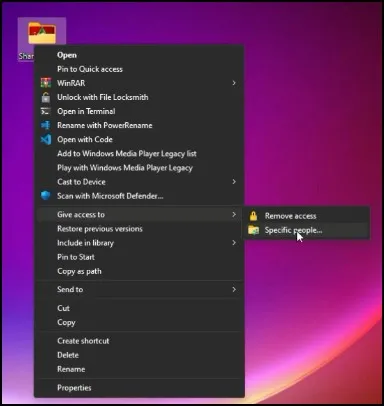
- From the drop-down menu, select Everyone.
- Click Add.

- Choose Read/Write permission if the receiving computer should be able to modify files.
- Click Share and then Done.

Step 3: Configure Advanced Sharing
For maximum compatibility:
- Right-click the folder and select Properties. Open the Sharing tab.
- Click Advanced Sharing.

- Enable Share this folder.
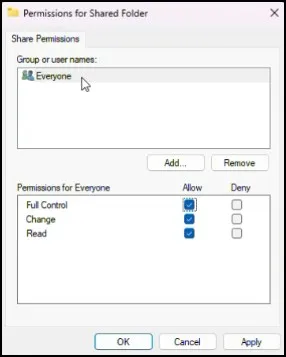
- Click Permissions.

- Select Everyone and allow:
- Read
- Change
- Full Control
- Click Apply and then OK.
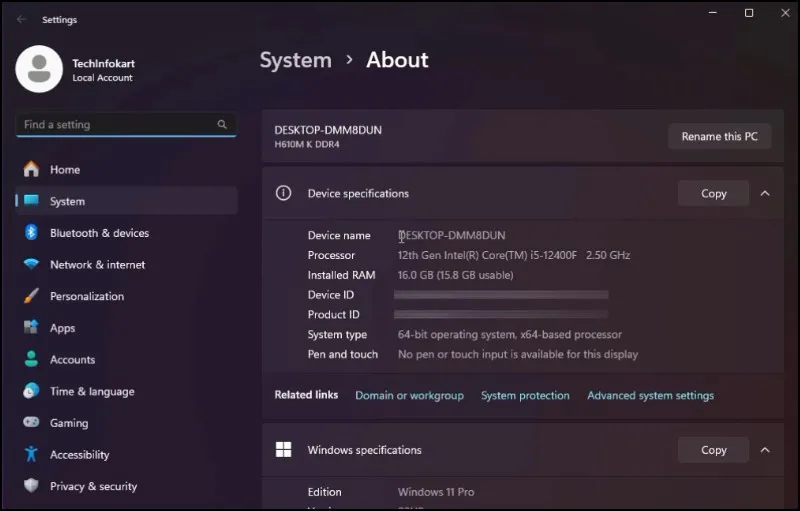
Step 4: Find the Computer Name
- Right-click This PC. Select Properties.

- Note the Device Name or Computer Name.
Step 5: Access the Shared Folder From Another Computer
On the receiving computer:
- Press Windows + R.
- Type: \\ComputerName
- Replace ComputerName with the name you noted earlier.
- Press Enter.
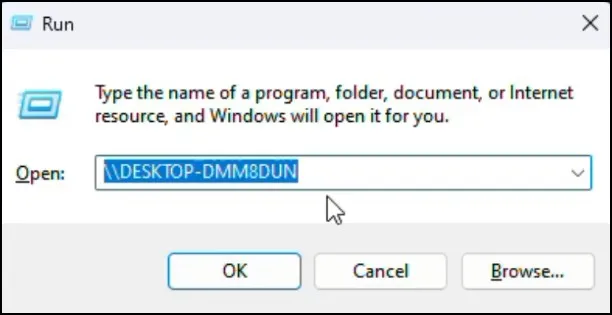
The shared folder should appear. You can now copy files from one computer to the other.

Advantages
- No third-party software required.
- Works well for large files.
- Fast transfer speeds on local networks.
Limitations
- Both computers must be on the same network.
- Initial setup takes a few minutes.
Method 2: Transfer Files Using a Shared Folder Link
If you frequently share folders, Windows also provides a shareable folder path that can be sent to another user.
How It Works
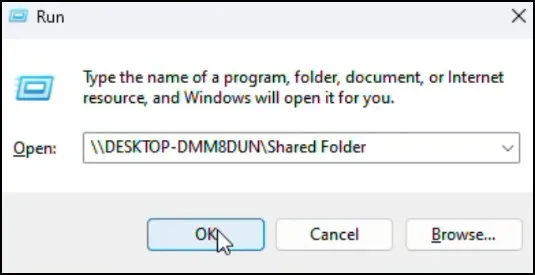
When sharing a folder through the Specific People option, Windows creates a network path.
For example:

You can copy this path and send it through:
- Microsoft Teams
- Slack
- Any messaging application
Accessing the Shared Folder
On the receiving computer:
- Copy the folder path.
- Press Windows + R.
- Paste the path.
- Press Enter.
Windows will open the shared folder directly.
Advantages
- Quick access to shared folders.
- Easy to send through messaging platforms.
- No need to manually browse the network.
Limitations
- Requires both computers to be on the same network.
- Folder permissions must already be configured.
Method 3: Use Nearby Sharing in Windows 11
Nearby Sharing is Microsoft’s built-in feature for sending files wirelessly between Windows devices.
Enable Nearby Sharing
On both computers:
- Open Settings.
- Navigate to System > Nearby Sharing.
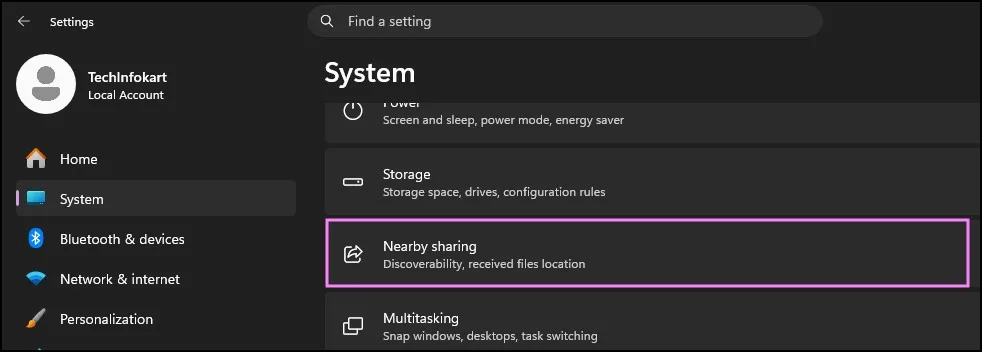
- Turn on Nearby Sharing.
- Select Everyone Nearby for easier detection.

Send a File
- Right-click the file you want to share.
- Click Share.
- Select the nearby computer from the list.
- Accept the transfer request on the receiving device.
The file will begin transferring immediately.
Advantages
- Very easy to use.
- Built directly into Windows 11.
- No shared folders required.
Limitations
- Better suited for smaller files.
- Devices must be discoverable to each other.
Method 4: Transfer Files Using LocalSend
LocalSend is a free application that allows wireless file transfer between devices on the same network.
Why Use LocalSend?
Unlike traditional Windows sharing, LocalSend requires very little configuration and works across multiple platforms.
Steps
- Install LocalSend on both computers.
- Connect both devices to the same Wi-Fi network.
- Open the application.
- Select the destination computer.
- Choose the files you want to send.
- Accept the transfer on the receiving computer.
Advantages
- Extremely simple setup.
- Fast transfer speeds.
- No cloud storage required.
- No account creation needed.
Limitations
- Requires installing software on both computers.
Method 5: Transfer Files Using OneDrive
If the two computers are not on the same network, OneDrive is often the easiest solution.
Upload Files
- Open your OneDrive folder.
- Copy the files into it.
- Wait for synchronization to complete.
Access Files on Another Computer
- Sign in to the same Microsoft account.
- Open OneDrive.
- Download or access the uploaded files.
Advantages
- Works from anywhere.
- No need to be connected to the same Wi-Fi.
- Files stay backed up in the cloud.
Limitations
- Requires an internet connection.
- Upload and download speed depends on your internet connection.
Which Method Should You Choose?
| Method | Best For | Internet Required | Difficulty |
| Shared Folder | Large local transfers | No | Medium |
| Folder Link | Quick local access | No | Easy |
| Nearby Sharing | Small file transfers | No | Easy |
| LocalSend | Fast local transfers | No | Very Easy |
| OneDrive | Remote file sharing | Yes | Easy |
For most home users, Shared Folder and LocalSend provide the best balance between speed and simplicity.
Conclusion
There are five easy methods to transfer files between two computers wirelessly in Windows 11. Assuming both computers are on the same Wi-Fi network, you will find that using a Shared Folder (or LocalSend) is usually the fastest. OneDrive is a straightforward cloud-based solution for users that need to transfer files between various locations.
Select the method fits best with your case scenario, and you will be able to transfer files from computer to another without depending on a USB drives, external hard disks or any kind of network cable between the computers.
Also Read: How to Use Gmail Delegate Access to Share Your Inbox Securely
Frequently Asked Questions
Can I transfer files between two computers without a USB drive?
Yes. You can use Windows file sharing, Nearby Sharing, LocalSend, or OneDrive to transfer files wirelessly.
Do both computers need to be on the same Wi-Fi network?
For Shared Folder, Folder Link, and LocalSend, yes. OneDrive can work over the internet from different locations.
Which method is the fastest?
Shared Folder and LocalSend are usually the fastest options when both computers are connected to the same local network.
Is Windows file sharing secure?
Yes, provided you only share folders with trusted devices and keep your network secure.
Can I transfer files between Windows 10 and Windows 11?
Yes. Most of the methods described in this guide work between Windows 10 and Windows 11 computers.