
If you’re attempting to enter the UEFI Firmware Settings from Windows but the option is missing, below are a few tips that can help get you into the UEFI (BIOS). This is generally caused by your system being booted in Legacy BIOS mode, instead of UEFI mode.
In this guide, you’ll learn, step by step, how to fix the “UEFI Firmware settings not showing” error on both Windows 10 and Windows 11 PCs.
Understanding UEFI Firmware
Before we proceed discussing the fix, let us first understand what UEFI firmware is. UEFI stands for Unified Extensible Firmware Interface, the modern BIOS firmware that your computer uses to boot up the device’s system hardware and provides information on boot time. It contributes to security features such as Secure Boot, and ensures that your system launches without issue.
Why Access UEFI Settings?
- Hardware Repair: Adjusting or diagnosing any hardware problems that you may have.
- Features enable/disable: It can control features like virtualization or Secure Boot.
- Firmware Updates: Keeping your firmware updated for compatibility and security.
Why is the UEFI Firmware Settings option missing?
If you boot up your computer in legacy BIOS mode, and your system disk is not GPT partition style, then in Troubleshoot > Advanced options you might not have UEFI Firmware Settings available.
To enable this feature, you’ll need to:
- Confirm your system is in Legacy BIOS mode.
- Check your disk partition style.
- Convert MBR to GPT using a safe method.
- Switch your BIOS boot mode from Legacy to UEFI.
Let’s go through each step.
Step 1: Check If UEFI Firmware Settings Is Missing
- Right-click the Start button and go to Settings.
- Navigate to Update & Security > Recovery.
- Under Advanced startup, click Restart now.
- Once the PC restarts, go to Troubleshoot > Advanced Options.
If you don’t see UEFI Firmware Settings, it means your PC is currently booting in Legacy BIOS mode.
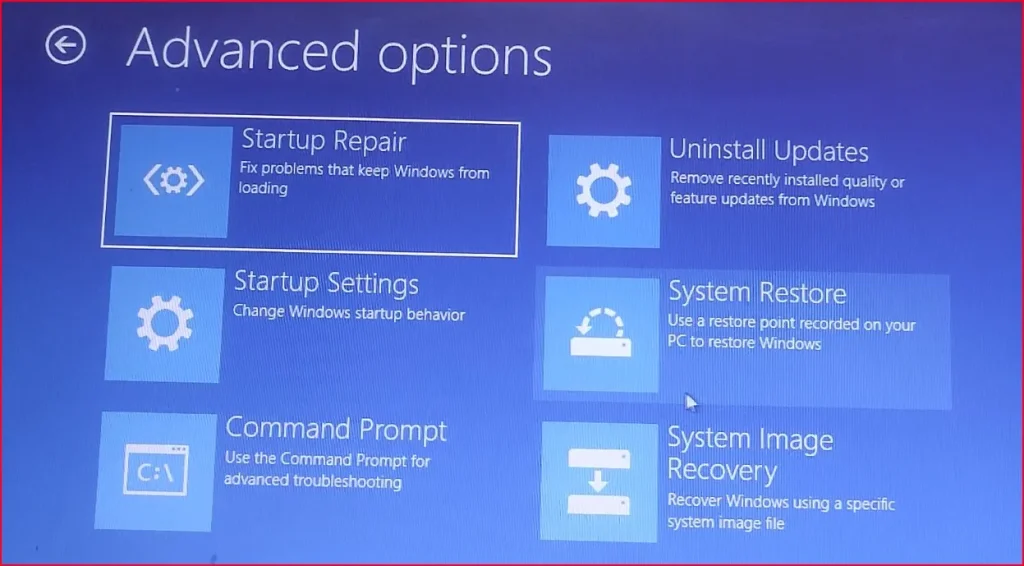
Step 2: Check BIOS Mode and Partition Style
To check BIOS mode:
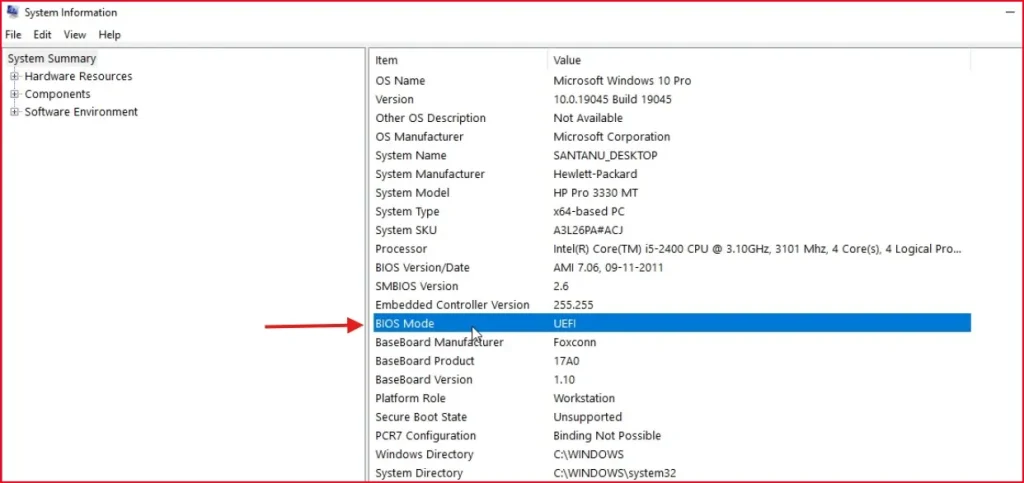
- Click on the Start button, type System Information, and open it.
- Scroll down and look for BIOS Mode.
If it says Legacy, then your system is not using UEFI.
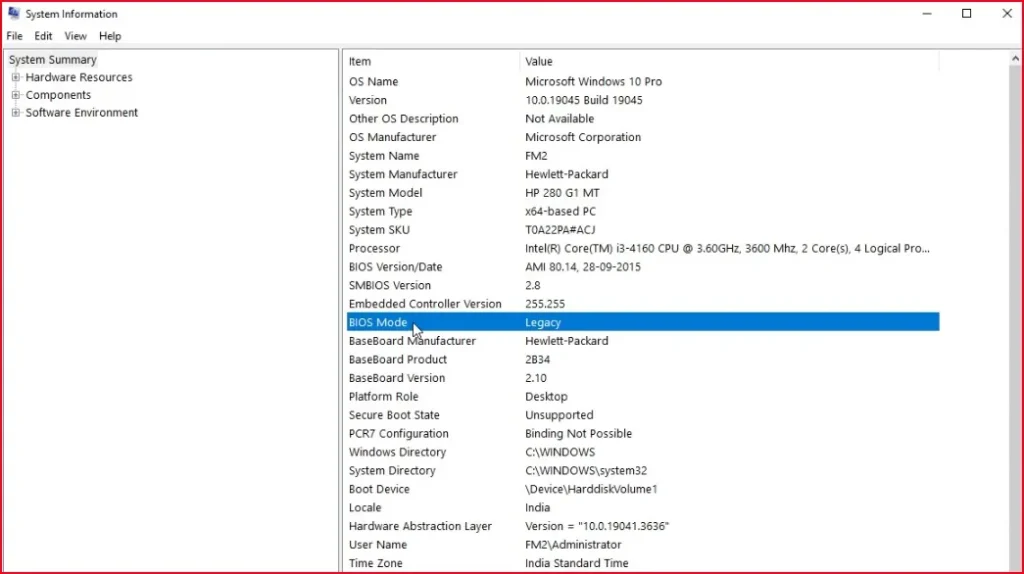
To check partition style:
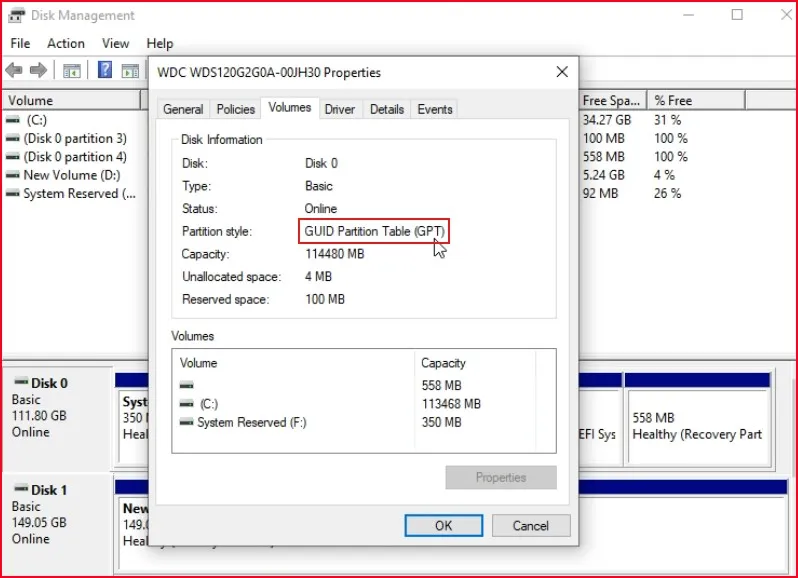
- Press Win + R, type diskmgmt.msc, and hit Enter.
- In Disk Management, right-click on Disk 0 (your system disk), select Properties.
- Go to the Volumes tab and check Partition Style.
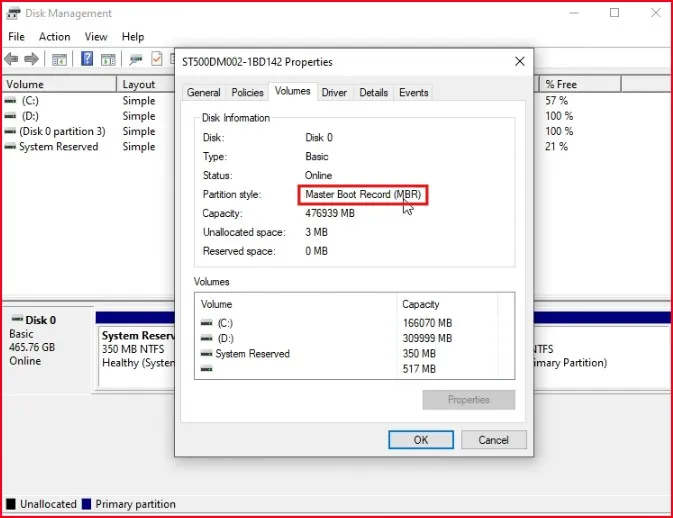
If it says MBR (Master Boot Record), then we need to convert it to GPT. Check if your disk is MBR or GPT
Step 3: Convert MBR to GPT Without Data Loss
This method works only if you are running Windows 10 version 1703 or later. Before making major changes like converting your disk or switching boot modes, it’s smart to create a restore point. Not sure how? Check out my guide on How to Create a System Restore Point in Windows 11.
- Open Command Prompt as Administrator:
- Search for CMD in the Start menu
- Right-click and choose Run as Administrator
- Type the following command and press Enter: mbr2gpt /convert /allowfullOS
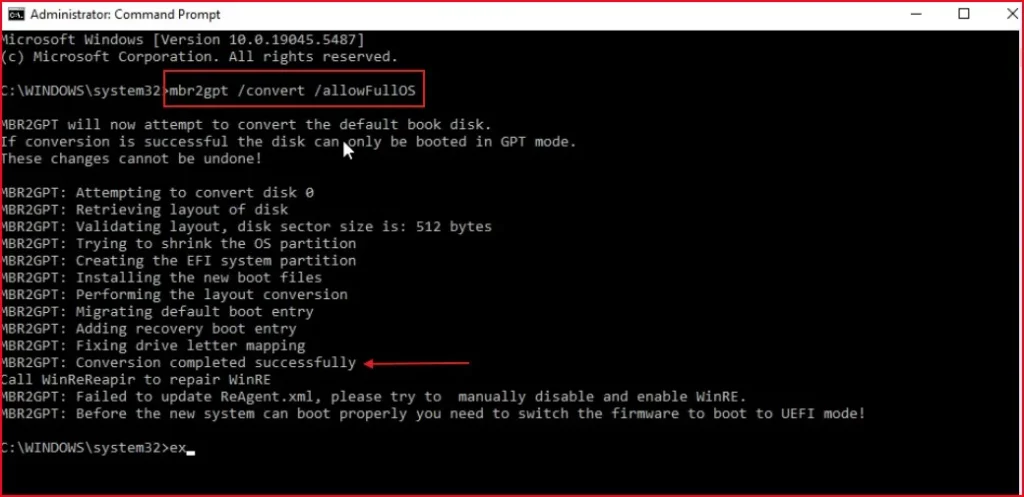
This will convert your system disk from MBR to GPT without losing your data.
Once the process completes successfully, you will see a success message.
For more details and advanced options, check out Microsoft’s official guide on the MBR2GPT tool.
Note: If you get a validation error, check the video link, where I’ve explained how to fix that.
Step 4: Change BIOS Settings from Legacy to UEFI
Now, we need to switch the boot mode in BIOS.
- Restart your PC and enter BIOS Setup.
- This could be F2, F10, F12, or DEL depending on your system.
- Navigate to the Boot section.
- Disable Legacy Support (if available).
- Enable UEFI and Secure Boot (if supported).
- Save the settings and exit BIOS.
Each manufacturer has a different BIOS interface, so look for similar options if names vary slightly.
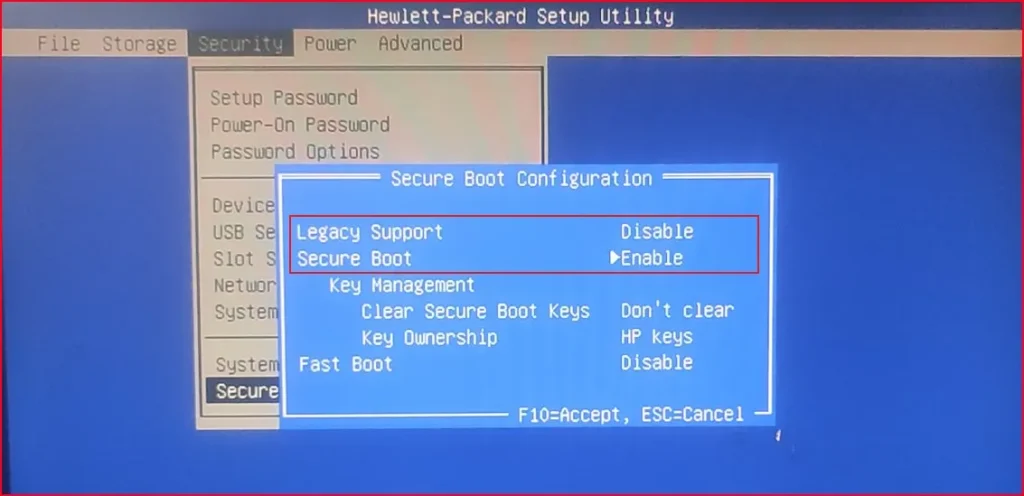
Enabling Secure Boot is key when switching to UEFI—learn how it works and how to enable it in this quick guide: What is Secure Boot? How to Enable and Disable it in Windows.
Step 5: Verify the Changes
Check BIOS Mode again:
- Go to System Information and confirm BIOS Mode is now UEFI.
Check Disk Partition Style:
- Open diskmgmt.msc, right-click Disk 0, go to Volumes tab.
- It should now say GUID Partition Table (GPT).
Step 6: Confirm UEFI Firmware Settings Is Available
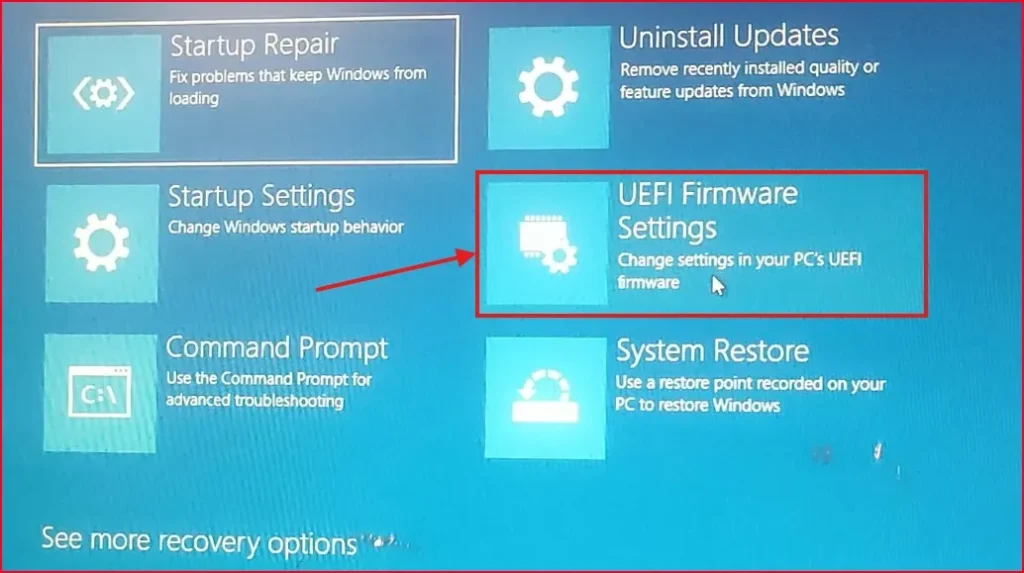
- Go to Settings > Update & Security > Recovery.
- Click Restart Now under Advanced Startup.
- Navigate to Troubleshoot > Advanced Options.
You should now see the UEFI Firmware Settings option available!
If you’re more comfortable following a step-by-step guide with visuals, I’ve also made a detailed YouTube video covering everything explained in this blog post. You can watch it below and follow along:
Advanced Troubleshooting (Optional)
If you’ve followed all the steps above and UEFI Firmware Settings still isn’t showing, the issue might be deeper. Here are two more advanced solutions you can try:
1. Updating Motherboard Firmware Safely
Sometimes, outdated firmware is the reason why UEFI settings aren’t accessible. Updating your motherboard firmware (also known as BIOS/UEFI update) can solve this—but it must be done carefully.
Follow these steps to update safely:
- Identify your exact motherboard model (using tools like CPU-Z or by checking system documentation).
- Visit the official manufacturer’s website and download the newest firmware for your specific model
- Be sure to read all the instructions on the firmware download page.
- Make sure your PC has stable power during the update—use a UPS if possible.
- Use the official BIOS update tool or method provided (some boards allow update from USB in BIOS).
- Never interrupt the update process—doing so can permanently damage your motherboard.
- Clearing CMOS (Last resort)
If nothing works, you can also try reset the computers CMOS, and that will set the BIOS to the factory default.
2. Steps to reset CMOS:
- Shut down and unplug your PC.
- Open the cabinet and locate the CMOS battery (a silver coin-cell battery).
- Remove the battery and wait for about 5 minutes.
- Alternatively, look for a CMOS reset jumper on your motherboard and use that.
- Reinsert the battery or move the jumper back.
- Boot your PC—your BIOS will be reset to factory defaults.
This guide will also attempt to describe how to fix boot up problems that may down to the UEFI and introduce you to what UEFI is.
Conclusion
However, to get rid of the “UEFI Firmware Settings Not Showing” issue is to convert your disk from MBR to GPT and to switch the BIOS mode from Legacy to UEFI. This way, not only does your PC become ready for modern features such as Secure Boot, but also for improved system security.
Tell me in the comments if you have any sort of trouble—I’d be glad to help you!
Frequently Asked Question (FAQ)
Why is UEFI Firmware Settings missing in Windows?
UEFI Firmware Settings missing because your system is running in Legacy BIOS mode and the disk is formatted as MBR. UEFI Firmware Settings require UEFI mode and a GPT disk.
Can I convert MBR to GPT without losing data?
Yes! The mbr2gpt /convert /allowfullOS command converts your system disk safely, but make sure to back up your data just in case.
Is it safe to switch from Legacy BIOS to UEFI?
Yes, if done correctly. Just make sure your system supports UEFI and follow the steps in this guide.
Do all PCs support UEFI?
Most modern PCs do. However, very old systems may not have UEFI support.